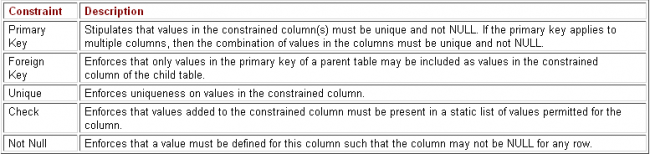
Constraints are rules you can define in your Oracle tables to restrict the type of data you can place in the tables.
Two methods exist for defining constraints: the table constraint method and the column constraint method. The constraint is defined as a table constraint if the constraint clause syntax appears after the column and datatype definitions. The constraint is defined as a column constraint if the constraint definition syntax appears as part of an individual column’s definition. All constraints can be defined either as table constraints or as column constraints, with two exceptions:
- Not NULL constraints can only be defined as column constraints.
- Primary keys consisting of two or more columns (known also as composite primary keys) can only be defined as table constraints. However, single-column primary keys can be defined either as column or table constraints.
Primary Key
A constraint of this type identifies the column or columns whose singular or combined values identify uniqueness in the rows of your Oracle table. Every row in the table must have a value specified for the primary key column(s).
SQL> create table employee
(
empid varchar2(5) constraint pk_employee_01 primary key,
lastname varchar2(25),
firstname varchar2(25),
salary number(10,4)
); //column constraint method
Or cab be simplified as
create table employee
(
empid varchar2(5) primary key,
lastname varchar2(25),
firstname varchar2(25),
salary number(10,4)
); //column constraint method
Each primary key constraint was given a meaningful name when defined. Oracle strongly recommends that you give your constraints meaningful names in this way so that you can easily identify the constraint later
create table employee
(
empid varchar2(5),
lastname varchar2(25),
firstname varchar2(25),
salary number(10,4),
constraint pk_employee_01 primary key (empid)
); //table constraint method
Composite Primary Keys
So that you understand the nature of composite primary keys in Oracle for OCP, the following code block shows how to define a composite primary key:
create table names
(
firstname varchar2(10),
lastname varchar2(10),
constraint pk_names_01 primary key (firstname, lastname)
);
Defining Foreign Key Constraints
To help you understand how to define foreign key constraints, let’s think in terms of an example. Let’s say we have our own table called DEPARTMENT, which we just created in the last code block. It lists the department number, name, and location for all departments in our own little company. Let’s also say that we want to create our EMPLOYEE table with another column, called DEPARTMENT_NUM. Because there is an implied parent-child relationship between these two tables with the shared column, let’s make that relationship official by using a foreign key constraint, shown in bold in the following block:
create table employee
(
empid varchar2(5) primary key,
lastname varchar2(25),
firstname varchar2(25),
department_num number(5) references department(department_num) on delete set null,
salary number(10,4)
); //references table_name(column_name) on delete set null,
For a foreign-key constraint to be valid, the same column appearing in both tables must have exactly the same datatype. You needn’t give the columns the same names, but it’s a good idea to do so. The foreign key constraint prevents the DEPARTMENT_NUM column in the EMP table from ever storing a value that can’t also be found in the DEPT table. The final clause, on delete set null, is an option relating to the deletion of data from the parent table. If someone attempts to remove a row from the parent table that contains a referenced value from the child table, Oracle sets all corresponding values in the child to NULL. The other option is on delete cascade, where Oracle allows remove all corresponding records from the child table when a referenced record from the parent table is removed.
Unique Key Constraints
Let’s say we also want our employee table to store social security or government ID information. The definition of a UNIQUE constraint on the GOVT_ID column prevents anyone from defining a duplicate government ID for any two employees in the table. Take a look at the following example, where the unique constraint definition is shown in bold:
create table employee
(
empid varchar2(5) primary key,
lastname varchar2(25),
firstname varchar2(25),
govt_id number(10) unique,
salary number(10,4),
department_num number(5) references department (department_num),
);
Defining Other Types of Constraints
The last two types of constraints are not NULL and CHECK constraints. By default, Oracle allows columns to contain NULL values. The not NULL constraint prevents the data value defined by any row for the column from being NULL. By default, primary keys are defined to be not NULL. All other columns can contain NULL data, unless you explicitly define the column to be not NULL. CHECK constraints allow Oracle to verify the validity of data being entered on a table against static criteria. For example, you could specify that the SALARY column cannot contain values over $250,000. If someone tries to create an employee row with a salary of $1,000,000 per year, Oracle would return an error message saying that the record data defined for the SALARY column has violated the CHECK constraint for that column. Let’s look at a code example where both not NULL and check constraints are defined in bold:
create table employee
(
empid varchar2(5) primary key,
department_num number(5) references department (department_num),
lastname varchar2(25) not null,
firstname varchar2(25) unique,
salary number(10,4) check (salary <=250000),
govt_id number(10) unique
);
Adding Integrity Constraints to Existing Tables
Another constraint-related activity that you may need to do involves adding new constraints to an existing table. This can be easy if there is no data in the table already, but it can be a nightmare if data already exists in the table that doesn’t conform to the constraint criteria. The simplest scenario for adding the constraint is to add it to the database before data is inserted. Take a look at the following code block:
SQL> create table employee
2 (empid varchar2(5),
3 lastname varchar2(25),
4 firstname varchar2(25),
5 salary number(10,4),
6 department_num number(5),
7 govt_id number(10));
Table created.
alter table employee
add constraint pk_employee_01 primary key (empid);
alter table employee
add constraint fk_employee_01 foreign key (department_num) references department (department_num);
alter table employee
add constraint ck_employee_01 check (salary <=250000);
alter table employee
add constraint uk_employee_01 unique (govt_id);
alter table employee modify
(lastname not null);
Disabling Constraints
A constraint can be turned on and off. When the constraint is disabled, it will no longer do its job of enforcing rules on the data entered into the table. The following code block demonstrates some sample statements for disabling constraints:
alter table employee
disable primary key;
alter table employee
disable constraint uk_employee_01;
You may experience a problem if you attempt to disable a primary key when existing foreign keys depend on that primary key. This problem is shown in the following situation:
Enabling a Disabled Constraint
When the constraint is later enabled, the rules defined for the constraint are once again enforced, rendering the constraint as effective as it was when it was first added to the table. You can enable a disabled constraint as follows:
alter table department
enable primary key;
alter table employee
enable uk_employee_01;
Removing Constraints
Usually, there is little about a constraint that will interfere with your ability to remove it, so long as you either own the table or have been granted appropriate privileges to do so. When a constraint is dropped, any index associated with that constraint (if there is one) is also dropped. Here is an example:
alter table employee
drop unique (govt_id);
alter table employee
drop primary key cascade;
alter table employee
drop constraint ck_employee_01;
An anomaly can be found when disabling or dropping not NULL constraints. You cannot disable a not NULL constraint, per se—a column either accepts NULL values or it doesn’t. Therefore, you must use the alter table modify clause in all situations where the not NULL constraints on a table must be added or removed. Here’s an example:
alter table employee
modify (lastname null);
alter table employee
modify (lastname not null);
Recent Comments