Creating USER and User Name Policy
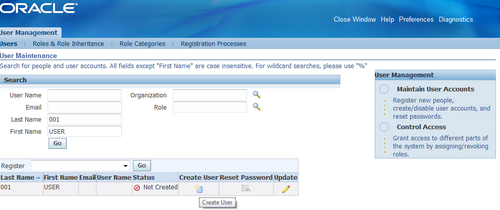
An user id should be created for each employee who needs access to the system. After an employee is created in HRMS, SYSADMIN logins to User Management and search for that employee by first and last name.
The sysadmin needs to enter the mail id and password (not mandatory, if not entered manually system generates a password). A mail is sent to the user with the log in credentials. Next the sysadmin can add the roles/responsibilities to the user as per the business requirements.

Configuring the User Name Policy
The Oracle User Management registration infrastructure supports a configurable user name policy. This policy is used to generate a suggested user name in the sample user creation flows shipped with the application, as well as for validating the chosen user name format.
Note: Oracle User Management is supplied with a default policy that identifies users by their email address.
Seeded User Name Policies
The following table lists the seeded user name policies that are shipped with Oracle Applications.
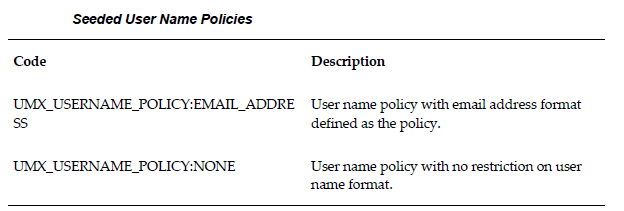
Administrators can configure either of these seeded policies. In addition to these, custom policies can also be implemented if desired.
Configuration of user name policy is a three-stage process.
Stage 1 – Suggested User Name Generation Subscription Setup
1. Log on as a user that is assigned the Workflow Administrator Web Applications responsibility (typically sysadmin).
2. Go to Workflow Administrator Web Applications > Business Events
3. From the Business Events page, search for the Business Event with the name racle.apps.fnd.umx.username.generate.
4. Click on the Subscription icon to go to the Subscriptions page.
5. For the subscription corresponding to the policy, change the status to “Enabled”.
Stage 2 – Validation Event Subscription Setup
1. Log on as a user that is assigned the Workflow Administrator Web Applications responsibility (typically sysadmin).
2. Go to Workflow Administrator Web Applications > Business Events
3. From the Business Events page, search for the Business Event with the name
oracle.apps.fnd.user.name.validate.
4. Click on the Subscription icon to go to the Subscriptions page.
5. For the subscription corresponding to the policy, change the status to “Enabled”.
Stage 3 – Profile Option Setup
1. Log on as a user that is assigned the Functional Administrator responsibility (typically sysadmin).
2. Go to Functional Administrator > Core Services > Profiles
3. Search with the Profile Name of UMX: User Name Policy in the Maintain Profile Options page.
4. Click on the Update icon to go to the Update Profile Option page.
5. Choose a value corresponding to the policy and click on the Apply button.
Additional Requirements
In all the three of the stages above, the values set must correspond to the same user name policy.
The Listener and JVMs must be restarted after the user name policy is changed.
Leave a Reply
Want to join the discussion?Feel free to contribute!