OPM PROCESS EXECUTION TABLES R12

  • GME_BATCH_HEADER
  • GME_BATCH_HEADER_MIG
  • GME_BATCH_HISTORY
  • GME_BATCH_MAPPING_MIG
  • GME_BATCH_SALES_ORDERS
  • GME_BATCH_STEPS
  • GME_BATCH_STEPS_MIG
  • GME_BATCH_STEP_ACTIVITIES
  • GME_BATCH_STEP_ACTIV_MIG
  • GME_BATCH_STEP_CHARGES
  • GME_BATCH_STEP_CHARGES_MIG
  • GME_BATCH_STEP_DEPENDENCIES
  • GME_BATCH_STEP_DEP_MIG
  • GME_BATCH_STEP_ITEMS
  • GME_BATCH_STEP_ITEMS_MIG
  • GME_BATCH_STEP_RESOURCES
  • GME_BATCH_STEP_RESOURCES_MIG
  • GME_BATCH_STEP_RSRC_SUMMARY
  • GME_BATCH_STEP_TRANSFERS
  • GME_BATCH_STEP_TRANSFERS_MIG
  • GME_BATCH_TXNS_MIG
  • GME_ERES_GTMP
  • GME_EXCEPTIONS_GTMP
  • GME_GANTT_DOCUMENT_FILTER
  • GME_INVENTORY_TXNS_GTMP
  • GME_LAB_BATCH_LOTS
  • GME_MATERIAL_DETAILS
  • GME_MATERIAL_DETAILS_MIG
  • GME_MATERIAL_DISPENSING_GTMP
  • GME_MIGRATION_CONTROL
  • GME_PARAMETERS
  • GME_PENDING_PRODUCT_LOTS
  • GME_PROCESS_PARAMETERS
  • GME_PROCESS_PARAMETERS_MIG
  • GME_RESOURCE_TXNS
  • GME_RESOURCE_TXNS_GTMP
  • GME_RESOURCE_TXNS_MIG
  • GME_RESOURCE_TXNS_SUMMARY
  • GME_SCALE_DETAIL
  • GME_TEMP_EXCEPTIONS
  • GME_TEXT_HEADER
  • GME_TEXT__TL
  • GME_TRANSACTION_PAIRS
  • GME_UNALLOCATED_ITEMS_GTMP
OPM INVENTORY TABLE R12

  • BISOPM_ONHANDSALE_SUM
  • BIS_OPM_PROD_SUM
  • GMI_AUTO_ALLOCATION_BATCH
  • GMI_CATEGORY_SETS
  • GMI_CLOS_WAREHOUSES
  • GMI_DISCRETE_TRANSFERS
  • GMI_DISCRETE_TRANSFER_LINES
  • GMI_DISCRETE_TRANSFER_LOTS
  • GMI_ITEMS_XML_INTERFACE
  • GMI_ITEM_CATEGORIES
  • GMI_ITEM_CONV_AUDIT
  • GMI_ITEM_CONV_AUDIT_DETAILS
  • GMI_ITEM_ORGANIZATIONS
  • GMI_LOTS_CONV_XML_INTERFACE
  • GMI_LOTS_XML_INTERFACE
  • GMI_LOT_TRACE
  • GMI_MASSTRANS_CTL
  • GMI_MIGRATION_PARAMETERS
  • GMI_OBSOLETE_ITEM_COLUMNS
  • GMI_QUANTITY_XML_INTERFACE
  • GMI_SUBLOT_GENERATE
  • GMI_TRAN_TMP
  • IC_ADJS_JNL
  • IC_ALLC_CLS
  • IC_ALOT_PRM
  • IC_CLDR_DTL
  • IC_CLDR_HDR
  • IC_CLDR_HDR_B
  • IC_CLDR_HDR_TL
  • IC_COMD_CDS
  • IC_COST_CLS
  • IC_CRUL_CLS
  • IC_CTMS_CLS
  • IC_CYCL_ADT
  • IC_CYCL_DTL
  • IC_CYCL_ERR
  • IC_CYCL_HDR
  • IC_CYCL_MSC
  • IC_DECM_MST
  • IC_FRGT_CLS
  • IC_GLED_CLS
  • IC_INVN_CLS
  • IC_INVN_TYP
  • IC_ITEM_CDT
  • IC_ITEM_CNV
  • IC_ITEM_CPG
  • IC_ITEM_HIERARCHY
  • IC_ITEM_MST
  • IC_ITEM_MST_B
  • IC_ITEM_MST_B_MIG
  • IC_ITEM_MST_TL
  • IC_ITEM_WHS
  • IC_JRNL_MST
  • IC_LOCT_INV
  • IC_LOCT_MST
  • IC_LOTS_CPG
  • IC_LOTS_MST
  • IC_LOTS_MST_MIG
  • IC_LOTS_STS
  • IC_PERD_BAL
  • IC_PHYS_CNT
  • IC_PHYS_ERR
  • IC_PKGS_MST
  • IC_PLNT_INV
  • IC_PRCE_CLS
  • IC_PRCH_CLS
  • IC_PURG_PRM
  • IC_RANK_MST
  • IC_SALE_CLS
  • IC_SHIP_CLS
  • IC_STAT_RPT
  • IC_STOR_CLS
  • IC_SUMM_INV
  • IC_TAXN_ASC
  • IC_TAXN_CLS
  • IC_TEXT_HDR
  • IC_TEXT_TBL_TL
  • IC_TRAN_ARC
  • IC_TRAN_CMP
  • IC_TRAN_PND
  • IC_TXN_REQUEST_HEADERS
  • IC_TXN_REQUEST_LINES
  • IC_WHSE_INV
  • IC_WHSE_MST
  • IC_WHSE_REL
  • IC_WHSE_STS
  • IC_XFER_MST
  • IN_ADDR_MST
  • IN_CTRY_MST
  • IN_ITEM_MST
  • IN_REGN_MST
  • IN_STAT_CTL
  • IN_STAT_DTL
  • IN_STAT_HDR
  • IN_STAT_MSG
  • IN_TEXT_HDR
  • IN_TEXT_TBL_TL
  • IN_TOFD_MST
  • SY_WF_ITEM_ROLES
Product family
Product Code
Step No
Step name


1
Order Management (OM):


Order Management
ONT
1.1
Complete the sales orders
Order Management
ONT
1.2
Import Sales Order
Order Management
ONT
1.3
Pre-Billing Acceptance
Shipping
WSH
1.4
Complete the shipping transactions
Order Management
ONT
1.5
Prepare the link with AR


Order Management
ONT
1.5.1
Check run of Workflow background engine
Receivables
AR
1.5.2
Run the Invoice Interface/Autoinvoice
Receivables
AR
1.5.3
Verify the Autoinvoice Exceptions


2
Receivables (AR):


Receivables
AR
2.1
Complete all Receivables transactions for the period being closed
Subledger Accounting
SLA
2.2
Create accounting
Subledger Accounting
SLA
2.3
Transfer to GL
Receivables
AR
2.4
Manage the Receivables Period


3
Purchasing (PO):


Purchasing
PO
3.1
Complete all transactions for Oracle Purchasing
Subledger Accounting
SLA
3.2
Create accounting for Payables
Subledger Accounting
SLA
3.3
Transfer to GL
Purchasing/Payables
PO/AP
3.4
Purchasing Period management


Payables
AP
3.4.1
Close the Payables period
Purchasing
PO
3.4.2
Run the Receipt Accruals – Period-End Report
Purchasing
PO
3.4.3
Manage the PO Periods
Payables
AP
3.4.4
Open next AP Period


4
Transactions control:


4.1
Enter all transactions in eBS:


Inventory
INV
4.1.1
Enter the pending cycle counts
Inventory
INV
4.1.2
Check run of the Material Transaction Manager
Inventory
INV
4.1.3
Check run of the Move Transaction Manager 
Inventory
INV
4.1.4
Check run of the Lot Move Transaction Manager    
Inventory
INV
4.1.5
Check run of the Cost manager (mandatory)


Inventory
INV
4.2
Check the pending or in error transactions
Inventory
INV
4.3
Unprocessed Material (resolution required)
Inventory
INV
4.4
Uncosted material transactions (resolution required)
Costing
CST
4.5
Pending LCM Interface Transactions (resolution required)
Work In Process
WIP
4.6
Pending WIP Costing transactions (resolution required)
Shop Floor Management
WSM
4.7
Pending WSM interface (resolution required)


4.7.1
Run the Import WIP Lot Transactions


4.7.2
Run the (WSM) Pending Transactions Report


Shipping
WSH
4.8
Unprocessed Shipping Transactions (by default, resolution required)


Shipping
WSH
4.8.1
Search delivery line with the status Shipped
Shipping
WSH
4.8.2
Run the Interface Trip Stop SRS


Inventory
INV
4.9
Pending material transactions for this period (resolution recommended)
Work In process
WIP
4.10
Pending Shop Floor Move (resolution recommended)
Purchasing
PO
4.11
Pending Receiving Transactions (resolution recommended)
Project Manufacturing
PJM
4.12
Project Manudacturing – Cost Collector


Project Manufacturing
PJM
4.12.1
Run the Cost Collection Manager
Project Manufacturing
PJM
4.12.2
Import the transactions in Projects


5
Cost Management:


Costing
CST
5.1
Cost Of Goods Sold


Costing
CST
5.1.1
Record the Order Management Transactions
Costing
CST
5.1.2
Collect the Revenue Recognition information
Costing
CST
5.1.3
Generate the COGS Recognition events


Costing
CST
5.2
Create accounting
Costing
CST
5.3
Transfer to GL


6
 Inventory Open / Close period:


Inventory
INV
6.1
Open the next period
Inventory
INV
6.2
Close the period
Inventory
INV
6.3
Open or Close several periods in the same time


Inventory
INV
6.3.1
Hierarchy of Organizations
Costing
CST
6.3.2
Open several periods
Costing
CST
6.3.3
Close several periods
Basic objective of this whitepaper is
>Identifying a key setups to complete Demand planning to supply flow
>Identifying the role of advanced modules like ASCP to achieve better execution of Supplier scheduling process
>Basic flow of ASCP

Setup

Step 1: Item creation
Note: Item should be ‘Purchased’ and ‘Purchasable’ enabled. Ensure ‘planner’ is entered under general planning tab (At organization level) Ensure it’s a ‘Buy’ item. 
In the MPS/MRP Planning tab – the item should have a planning method
– MRP Planning (Or method of planning used at the Location)
– Create Supply

Step2: Create Blanket Purchase Order and Approve it

Step3: Create Approved Supplier List , Make sure Global parameter is set to Yes

Step 4:  Make sure ‘Planning schedule’ and ‘Shipping Schedule’ is enabled under planning tab
Step 5: Create Sourcing Rule and Assign it

 Step 6: Create Demand of Item (Demand can come from various sources , I have taken just one example where demand is entered in Master demand schedule

Step 7: Run ASCP Data Collection (From Advanced Supply Chain Planner)

Step 8: Create Plan (Optional if Plan already exists)

Step 9: Launch Plan

Step 10:  Viewing ASCP Plan result

Step 11: Execute Push Plan (From Advanced Supply Chain planner Responsibility)

Step 12: Create/Build supplier schedule and confirm it.
Responsibility : Supplier Scheduling

Generate Schedules and Confirm schedules.. Once schedule line is confirmed it will display in iSupplier

View Data in iSupplier Portal

The deferred COGS of goods account is the new feature introduced in Release 12. The basic fundamental behind the enhancement is that the COGS is now directly matched to the Revenue. The same was not possible till now.

Prior to this enhancement, the value of goods shipped from inventory were expensed to COGS upon ship confirm, despite the fact that revenue may not yet have been earned on that shipment. With this enhancement, the value of goods shipped from inventory will be put in a Deferred COGS account. As percentages of Revenue are recognized, a matching percentage of the value of goods shipped from inventory will be moved from the Deferred COGS account to the COGS account, thus synchronizing
the recognition of revenue and COGS in accordance with the recommendations of generally accepted accounting principles.

The Matching Principle is a fundamental accounting directive that mandates that revenue and its associated cost of goods sold must be recognized in the same accounting period. This enhancement will automate the matching of Cost of Goods Sold (COGS) for a sales order line to the revenue that is billed for that sales order line.

The deferral of COGS applies to sales orders of both non-configurable and configurable items (Pick-To-Order and Assemble-To-Order). It applies to sales orders from the customer facing operating units in the case of drop shipments when the new accounting flow introduced in 11.5.10 is used. And finally, it also applies to RMAs that references a sales order whose COGS was deferred. Such RMAs will be accounted using the original sales order cost in such a way that it will maintain the latest known COGS recognition percentage. If RMAs are tied to a sales order, RMAs will be accounted for such that the distribution of credits between deferred COGS and actual COGS will maintain the existing proportion that Costing is aware of.  If RMAs are not tied to a sales order, there is no deferred COGS.

SETUP and ACCOUNTING :
To set the deferred COGS account.

Inventory — Setup — Organization — Parameters — Other Accounts
A new account is added which is referred as the Deferred COGS accounts. 

Please note that when upgrading from a pre R12 version the DEFERRED_COGS_ACCOUNT will be populated if it is null with the cost_of_goods_sold_account on the organization parameter. This can then be changed accordingly if a different account is required.

NEW ACCOUNTING :

Release 12 : 
When a Sales order is shipped the following accounting takes place:

Inventory Valuation Account : Credit.
                   Deferred COGS account : Debit

Once the revenue is recognised, you would need to decide the percentage you wish to recognize the Revenue. A COGS recognition transaction will be created to reflect a change in the revenue recognition percentage for a sales order line.

The steps to generate such transactions are as follows:
1. Run the Collect Revenue Recognition Information program. This program will collect the change in revenue recognition percentage based on AR events within the user specified date range.
2. Run the Generate COGS Recognition Events. This program will create the COGS recognition transaction for each sales order line where there is a mismatch between the latest revenue recognition percentage and the current COGS recognition percentage.

Note that users can choose how often they want to create the COGS Recognition Events.

Navigation to run the COGS recognition request :
– Cost > COGS Recognition > Collect Revenue Recognition Information
– Cost > COGS Recognition > Generate COGS Recognition Events
– Cost > View Transactions > Material Transactions

The distribution for the COGS Recognition transaction associated with the Sales Order transaction now would be as follows:

       Deferred COGS : Debit revenue percentage
       COGS               : Credit (Actual revenue percentage )

Thus, essentially the recognized COGS balance is to move the value from Deferred COGS to COGS.

This particular COGS recognition transaction actually correspond to a revenue recognition percentage change.

You can view the transactions as :
Navigation:
– Cost > View Transactions > Material Transactions > Distributions

A new COGS Revenue Matching Report shows the revenue and COGS information of sales order that fall within the user specified date range by sales order line

SIMPLER TERMS ( Table level details ) : 
Once the whole cycle is complete we will have 2 transactions lines in mtl_material_transactions.

1. Sales Order
2. COGS Recognition transaction

Accounting will be in mtl_transaction_accounts and the Subledger accounting tables as follows:

Transaction 1:
Inventory Valuation Account : Credit. (item_cost)
             Deferred COGS account : Debit (item_cost) 

Transaction 2:
Deferred COGS : Credit (Actual revenue percentage)
              COGS : Debit (Actual revenue percentage ) 
Categories are the method by which the items in inventory can be separated logically and functionally for planning, purchasing and other activities.You can use categories and category sets to group your items for various reports and programs. A category is a logical classification of items that have similar characteristics. A category set is a distinct grouping scheme and consists of categories. The flexibility of category sets allows you to report and inquire on items in a way that best suits your needs. This article will describe how to create categories and category set in oracle inventory.
Suppose we need a category called ‘INV_COLORS’. We can define multiple colors in this category and then assign this category to an item.
Example:
  1. Item1 —- Black
  2. Item2 —- Red
  3. Item3 —- Green
  4. Item4 —- Orange
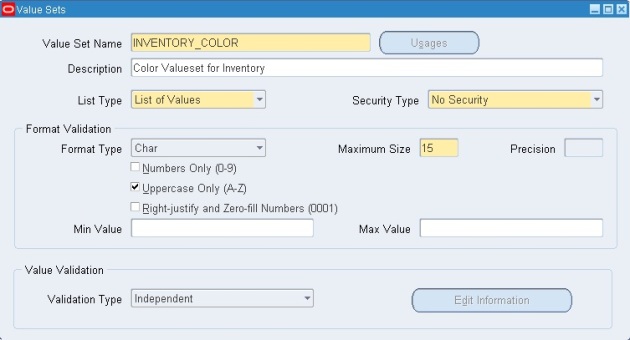
1] First we need to create a value set to hold these colors.
Navigation > Setup: Flexfields: Validation: Sets
Validation type Select: Independent
2] Next we need to enter our values in the INVENTORY_COLOR valueset
REDGREENBLUE, BLACK, and ORANGE
Navigation -> Setup: Flexfields: Validation: Values
Save and close the Screen.
3] Now we need to create a KFF Structure
Navigation Setup: Flexfields: Key: Segments
Create the structure name: In the “Code” field enter INV_COLORS
4] Click on the “Segments” button.
  • Enter the “Number” field: 10
  • Enter the Name field: Color
  • Enter the “Window Prompt”: Color (This value will appear on the screen)
  • Enter the “Column” field: Segment1 (you can choose any column)
Save and exit the form.
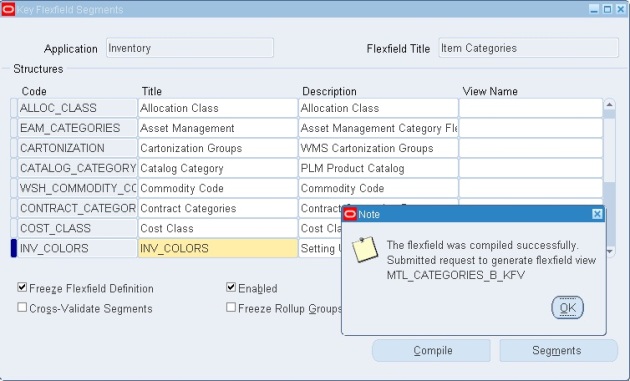
5] Check the Freeze flex field Definition, the following warning will appear.
Click OK.
6] The “Compile” button is now available to be selected. Click on the compile button.
Click Ok
Close the form.
7] Go to View -> Request and Verify that the new Category flexfield compiled successfully.
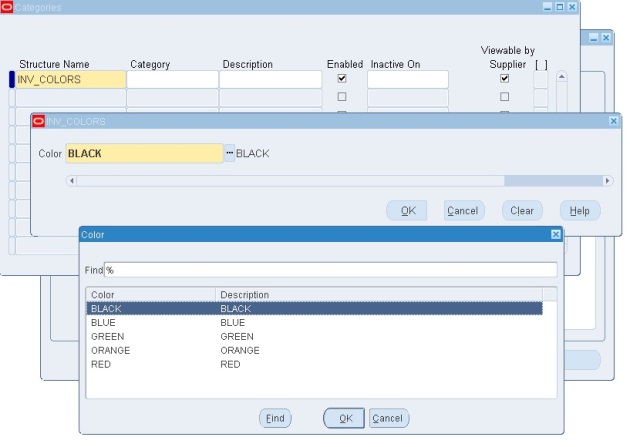
8] The new structure is ready for use. Now let’s create a category.
Navigation : Setup: Items: Categories: Category Codes
  • Enter the structure name: INV_COLORES
  • Enter the category: BLACK
  • (Note the form does not provide an LOV for the categories. You will need to use edit symbol at the top of the page or “ e “ to bring up the lov)
  • Enter the description.
9] Next we create our category set.
Navigation Setup: Items: Categories: Category Sets
  • Fill in the category set Name: INV_COLORS_SET
  • The description: Inventory color set
  • The Flex Structure: INV_COLORS
  • The Controlled: Org Level
  • Default Category: BLACK
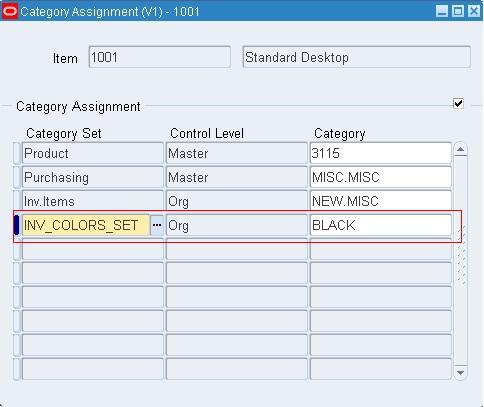
10] After creating the category set, we can assign it to any items.