When building customization’s for the Oracle E-Business Suite it might be needed to load data from external sources into specific tables. Tables might be seeded tables, i.e. Open Interface tables, or custom tables which you’ve added to a special customization’s database schema.

To load data from external sources into Oracle eBS you might consider using SQL*Loader to accomplish this. SQL*Loader is using comma seperated (csv) files with data and a so called control file (ctl). The control file tells the system how to import the csv file with data. The control file describes the table and columns to be loaded, what the seperator is of the incoming file etc. Next the SQL*Loader program exports a log file to give an overview of the process, a bad file of records that caused errors in the process, and a discard file for records that were not selected during the load.


Starting a SQL*Loader load can be done by command line by executing the below:

sqlldr db_user/db_password@host:port/sid control=control_file_name.ctl log=log_file_name.log

SQL*Loader can also be executed by starting a special concurrent program which you can create in Oracle E-Business Suite. Below the steps how to do this.

1) First of all you need to have a csv file with data – the csv can also contain header information. The header in a csv file can be skipped by adding a special parameter in the control file. Take note of the columns in the csv file.

2) You need a control file – for example see the below control file. There are a big number of commands you can use in the control file to completely have control on how data gets loaded into tables. If you want to know more than contact me on this topic.

SKIP = 1
LOAD DATA
INFILE ‘data_file_name.csv’
BADFILE ‘data_file_name.bad’
REPLACE INTO TABLE XXX.YOUR_CUSTOM_TABLE
FIELDS TERMINATED BY “,” OPTIONALLY ENCLOSED BY ‘”‘
TRAILING NULLCOLS
(

COLUMN1,COLUMN2,COLUMN3,…
)

SKIP=1
Tells SQL*Loader to exclude row 1 in the data file (to exclude the headers)

INFILE
Specifies the name of the incoming data csv file

BADFILE
Determines the bad file generated for any errors occured during the load

REPLACE
This command will first truncate the table and than add the records. If you change this in an APPEND command the records will be added only to the table specified without truncating first

FIELDS TERMINATED BY
Determines the seperator used in the data csv file

OPTIONALLY ENCLOSED BY
Determines an additional enclosing character like for example ” if you’re adding data which contains the column seperator used

TRAILING NULLCOLS
Is used to treat any missing data in the csv file as NULL for the table to be loaded

COLUMN1, COLUMN2, COLUMN3, …
Gives the column names to be loaded

3) Create the SQL*Loader Executable in Oracle E-Business Suite. Go to responsibility System Administrator – Concurrent – Program – Executable.


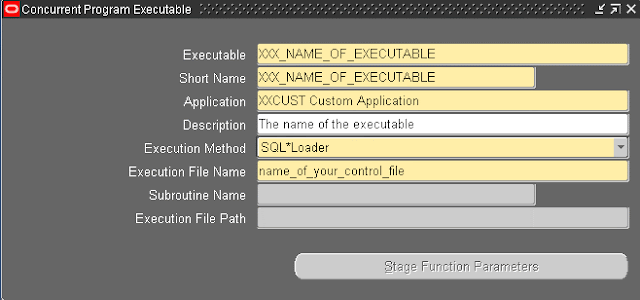
Give you executable a name, shortname and assign it to your customizations application. A description is optionally. Select Execution Method SQL*Loader to let eBS know SQL*Loader needs to be started. The Execution File Name holds the name of the control file you want to start (exclude the extension ctl here). The control file needs to be located in the bin directory of your customization application.

4) Create the concurrent program in Oracle E-Business Suite. Go to responsibility System Administrator – Concurrent – Program – Define.


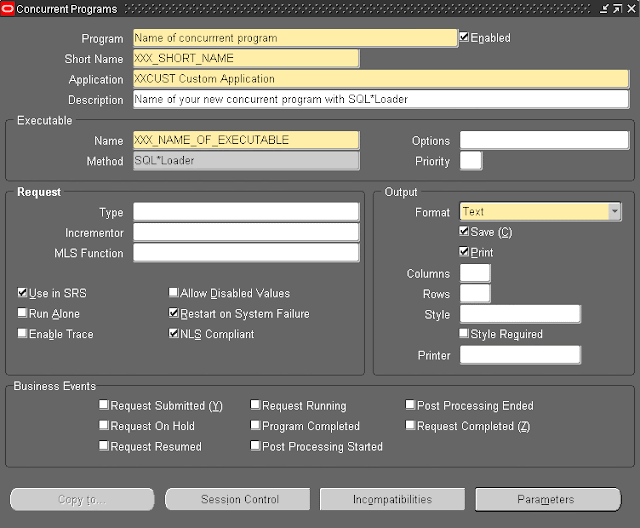
Give your concurrent program a name, a short name, assign it to your customization’s application and optionally provide a description. Assign your created executable to the concurrent program.

5) Add parameters to dynamically provide the incoming data csv file. Click on Parameters.


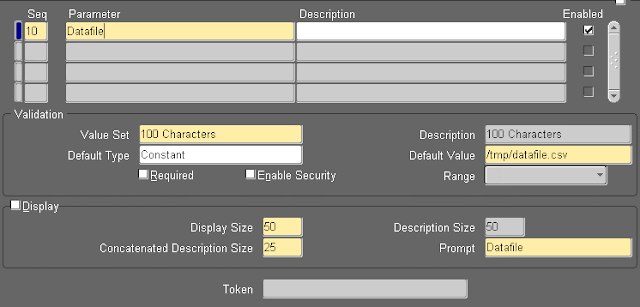
Add Sequence 10 and give the parameter a name. In this we want to provide a full path to the incoming data csv file so we use seeded Value Set 100 Characters to hold the path. Optionally add a default value.

6) When done creating the concurrent program add it to a Concurrent Request Group and start loading data in your tables.

Some times we don’t have the access to add the responsibility to the user using the the Create User form. So for this Oracle is having one API fnd_user_pkg.addresp which can do the job without using the Create User Form.

R12 – FND – Script to add responsibility using fnd_user_pkg with validation

DECLARE
v_user_name       VARCHAR2 (10) := ‘Enter_User_Name’;
v_resp_name       VARCHAR2 (50) := ‘Enter_Existing_Responsibility_Name’;
v_req_resp_name   VARCHAR2 (50) := ‘Enter_required_Responsibility_Name’;
v_user_id         NUMBER (10);
v_resp_id         NUMBER (10);
v_appl_id         NUMBER (10);
v_count           NUMBER (10);
v_resp_app        VARCHAR2 (50);
v_resp_key        VARCHAR2 (50);
v_description     VARCHAR2 (100);
RESULT            BOOLEAN;
BEGIN
SELECT fu.user_id, frt.responsibility_id, frt.application_id
INTO v_user_id, v_resp_id, v_appl_id
FROM fnd_user fu,
fnd_responsibility_tl frt,
fnd_user_resp_groups_direct furgd
WHERE     fu.user_id = furgd.user_id
AND frt.responsibility_id = furgd.responsibility_id
AND frt.LANGUAGE = ‘US’
AND fu.user_name = v_user_name
AND frt.responsibility_name = v_resp_name;

fnd_global.apps_initialize (v_user_id, v_resp_id, v_appl_id);

SELECT COUNT (*)
INTO v_count
FROM fnd_user fu,
fnd_responsibility_tl frt,
fnd_user_resp_groups_direct furgd
WHERE     fu.user_id = furgd.user_id
AND frt.responsibility_id = furgd.responsibility_id
AND frt.LANGUAGE = ‘US’
AND fu.user_name = v_user_name
AND frt.responsibility_name = v_req_resp_name;

IF v_count = 0
THEN
SELECT fa.application_short_name,
frv.responsibility_key,
frv.description
INTO v_resp_app, v_resp_key, v_description
FROM fnd_responsibility_vl frv, fnd_application fa
WHERE frv.application_id = fa.application_id
AND frv.responsibility_name = v_req_resp_name;

fnd_user_pkg.addresp (username         => v_user_name,
resp_app         => v_resp_app,
resp_key         => v_resp_key,
security_group   => ‘STANDARD’,
description      => v_description,
start_date       => SYSDATE – 1,
end_date         => NULL);

RESULT :=
fnd_profile.SAVE (x_name          => ‘APPS_SSO_LOCAL_LOGIN’,
x_value         => ‘BOTH’,
x_level_name    => ‘USER’,
x_level_value   => v_user_id);

RESULT :=
fnd_profile.SAVE (x_name          => ‘FND_CUSTOM_OA_DEFINTION’,
x_value         => ‘Y’,
x_level_name    => ‘USER’,
x_level_value   => v_user_id);

RESULT :=
fnd_profile.SAVE (x_name          => ‘FND_DIAGNOSTICS’,
x_value         => ‘Y’,
x_level_name    => ‘USER’,
x_level_value   => v_user_id);

RESULT :=
fnd_profile.SAVE (x_name          => ‘DIAGNOSTICS’,
x_value         => ‘Y’,
x_level_name    => ‘USER’,
x_level_value   => v_user_id);

RESULT :=
fnd_profile.SAVE (x_name          => ‘FND_HIDE_DIAGNOSTICS’,
x_value         => ‘N’,
x_level_name    => ‘USER’,
x_level_value   => v_user_id);

DBMS_OUTPUT.put_line (
‘The responsibility added to the user ‘
|| v_user_name
|| ‘ is ‘
|| v_req_resp_name);

COMMIT;
ELSE
DBMS_OUTPUT.put_line (
‘The responsibility has already been added to the user’);
END IF;
END;

The scripts in this blog can be used to:
1)    Register the executable and Program
2)    Attach Concurrent program to a Request Group
3)    Submit Concurrent program

1)    Registering the Executable from back end
          Usually we create executable in the front-end, but this can be done from the database tier i.e. back-end too.
          Below is the PL/SQL code to create an executable from back-end.
         BEGIN
              FND_PROGRAM.executable(‘XXMZ_EMPLOYEE’ — executable
                                                              , ‘XXMZ Custom’ — application
                                                              , ‘XXMZ_EMPLOYEE’ — short_name
                                                              , ‘Executable for Employee INFORMATION’ — description
                                                              , ‘PL/SQL Stored Procedure’ — execution_method
                                                              , ‘XXMZ_EMPLOYEE’ — execution_file_name
                                                              , ” — subroutine_name
                                                              , ” — Execution File Path
                                                              , ‘US’ — language_code
                                                              , ”);
             COMMIT;
         END;
       Query in the front-end to see whether your executable is created.

2)    Registering the Concurrent program from back end
            Usually we create Concurrent program in the front-end, but this can be done from the database tier too.
            Below is the program to create a Concurrent program from back-end.
            BEGIN
                     FND_PROGRAM.register(‘Concurrent program for Employee Information’ — program
                                                                , ‘XXMZ Custom’ — application
                                                                , ‘Y’ — enabled
                                                                , ‘XXMZ_EMPLOYEE’ — short_name
                                                                , ‘ Employee Information’ — description
                                                                , ‘XXMZ_EMPLOYEE’ — executable_short_name
                                                                , ‘XXMZ Custom’ — executable_application
                                                                , ” — execution_options
                                                                , ” — priority
                                                                , ‘Y’ — save_output
                                                                , ‘Y’ — print
                                                                , ” — cols
                                                                , ” — rows
                                                                , ” — style
                                                                , ‘N’ — style_required
                                                                , ” — printer
                                                                , ” — request_type
                                                                , ” — request_type_application
                                                                , ‘Y’ — use_in_srs
                                                                , ‘N’ — allow_disabled_values
                                                                , ‘N’ — run_alone
                                                                , ‘TEXT’ – output_type
                                                                , ‘N’ — enable_trace
                                                                , ‘Y’ — restart
                                                                , ‘Y’ — nls_compliant
                                                                , ” — icon_name
                                                                , ‘US’); — language_code
                        COMMIT;
            END;

 Query in the front-end to see whether your Concurrent program is created .

3)    Attaching the concurrent program to the request group
               Usually we Attach Concurrent program to the request group in the front-end, but this can be done from database tier too.
               Below is the program to Attach Concurrent program to the request group from back-end.
               BEGIN
                        FND_PROGRAM.add_to_group(‘XXMZ_EMPLOYEE’ — program_short_name
                                                                             , ‘XXMZ Custom’ — application
                                                                             , ‘xxmz Request Group’ — Report Group Name
                                                                             , ‘XXMZ’); — Report Group Application
                        COMMIT;
              END;

  Query in the front-end to see whether your Concurrent program is Attached to Request Group.

4)    Submitting Concurrent Program from Back-end
We first need to initialize oracle applications session using
                        fnd_global.apps_initialize(user_id,responsibility_id,application_responsibility_id)
and then run fnd_request.submit_request
                         DECLARE
                               l_request_id NUMBER(30);
                         begin
                                  FND_GLOBAL.APPS_INITIALIZE (user_id => 1318, resp_id => 59966, resp_appl_id => 20064);
                                  l_request_id:= FND_REQUEST.SUBMIT_REQUEST (‘XXMZ’ –Application Short name,
‘VENDOR_FORM’– Concurrent Program Short Name );
                                  DBMS_OUTPUT.PUT_LINE(l_request_id);
                                  commit;
                         end;

Once the concurrent program is submitted from back-end, status of the concurrent program can be checked using below query.

SELECT * FROM FND_CONCURRENT_REQUESTS WHERE   REQUEST_ID= l_request_id;

You can use following code to wait for the request. It will return Boolean value.

FND_CONCURRENT.WAIT_FOR_REQUEST
                                   (request_id IN number default NULL,
                                    interval IN number default 60,
                                    max_wait IN number default 0,
                                    phase OUT varchar2,
                                    status OUT varchar2,
                                    dev_phase OUT varchar2,
                                    dev_status OUT varchar2,
                                    message OUT varchar2);

5) Delete a concurrent program from back-end

BEGIN   apps.fnd_program.remove_from_group (      program_short_name    => ‘CTAR_AR_TRX_LINE_CONVERSION’,      program_application   => ‘CTAR’,      request_group         => ‘Receivables All’,      group_application     => ‘Receivables’);   fnd_program.delete_program (‘CTAR_AR_ACCTD_AMT_DUE_RMNG’, ‘CTAR’);   fnd_program.delete_executable (‘CTAR_AR_ACCTD_AMT_DUE_RMNG’, ‘CTAR’);   COMMIT;END;

Bar Code Local Setup:

1) Copy Barcode font in C:WindowsFonts directory.
2) Copy xdo.cfg in C:Program FilesOracleXML Publisher DesktopTemplate Builder for Wordconfig directory. The sample file is already available when BI Publisher desktop is installed.
3) Right click the font file and go to properties. Copy the .ttf file name. Double click the font file to get the family name.
4) Open the xdo.cfg file and paste as follows (My filename is w39elc.ttf and font family is WASP 39 ELC)

<font family=”WASP 39 ELC” style=”normal” weight=”normal”>  <truetype path=”C:WINDOWSFontsw39elc.ttf” /> </font>

Bar Code Application Setup:
Basically this post refers to any font that you want to embed into you output but I was working specifically on demand to insert the barcode.
So start with something simple. Obtain the font file. In my case I posses “WASP 39 ELC” font. Font file name is w39elc.ttf. Install the font into Windows by double clicking on it and choosing “install”
Open your RTF template and place the bar code in the location you want.


So far so good and if you run this template locally on your workstation you will see the bar code. But not in EBS.
  This is what you need to do in order to make it work in EBS
Open “XML Publisher Administrator” responsibility
Go to “Administration”-> “Font Files”


Click on “Create Font File”


In “Font Name” put the name of the font as it appears in Word. Choose the font file and click “Apply”


Go to “Administrator”-> “Font Mapping”
image
Click on “Create Font Mapping Set”


Put into “Mapping Name” – Bar Code Fonts, into “Mapping Code” – BAR_CODE_FONTS, into “Type” –FO To PDF and click “Apply”


Click on the Bar Code Fonts link


Click on “Create Font Mapping”


Define Font Mapping as appears in the print screen bellow and click “Continue”


Ok, now you need  template to “know” the bar code font we just created.


Open template definition and go to “Edit Configuration”
Expand “FO Processing” and put into “Font Mapping Set” – Bar Code Fonts and click “Apply”.


Now you can run your template and it will display the bar code properly.
This article will explain how to add a DFF to a existing OAF page through personalization.I am using Supplier Quick Update Page ( /oracle/apps/pos/supplier/webui/SuppSummPG ).
If you want to see how to create DFF please click here.
In this scenario I am using a custom DFF. Following are the details.
Application -> Payables ( Code: SQLAP )
Name -> XXCUST_SUPPLIER_DFF
Title -> XXCUST – Supplier DFF
Table Name -> AP_SUPPLIERS
DFV View name -> XXCUST_SUPPLIER_DFV
Reference Fields -> ATTRIBUTE_CATEGORY
Following are the Context Field Details.
Prompt -> Supplier Type
Value Set -> XXCUST_SUP_TYPE ( Values : External and Internal )
Reference Field -> ATTRIBUTE_CATEGORY
Below table shows the segment details of XXCUST_SUPPLIER_DFF.
Code
Segments
Column
Value Set
Global Data Elements
Identification Number
ATTRIBUTE1
15 Characters
External
Type
ATTRIBUTE2
XXCUST_EXT_SUP_TYPE
Values
         Domestic 
          International
Internal
Department
ATTRIBUTE2
15 Characters
Following steps you need to perform to create flex item in the Quick Update page.
1) Click on Personalize Page.In the Personalize Page click on Complete View.
2) Click on Create Item.( Based on where you want to place the DFF choose appropriate layout).
3) Create flex item with following details.
4) If you want to arrange the item in the page click on Reorder.
Following is the output.