Often times, WebADI can be very confusing to work with. There are just too many issues if it is not properly set up. Sometimes you may encounter VBProject Runtime Error when trying to open Web-ADI template file, or sometimes the Excel spreadsheet just hangs up, or can’t be opened.

There are few steps you will have to take before WebADI can be properly used:

  • Microsoft Office Version
  • Microsoft Excel Settings
  • Internet Explorer Settings


Follow the steps below given in the screenshots and apply the settings exactly as they are depicted. The screenshots are from Excel 2010, however the settings should also work for 2000, 2003, 2007 versions.

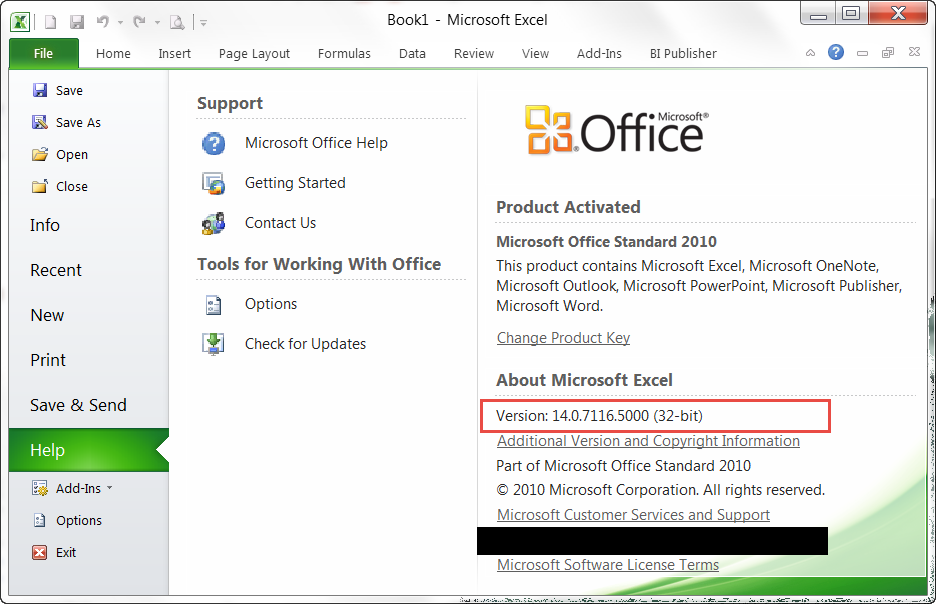
A)  Check the Microsoft Office Version
Make sure you are using 32-bit version of Microsoft Office. Click on Excel –> File –> Help. If you are running 64-bit version, you may want to uninstall 64-bit and re-install the 32-bit version of Microsoft Office.

B)  Open Microsoft Excel –> File –> Options –> Trust Center –> Trust Center Settings

B-1)  Trusted Documents:
Make sure to check “Allow documents on a network to be trusted“.


B-2)  Add-Ins:
Make sure to uncheck all the options.


B-3)  ActiveX Settings:
Check only “Enable all controls without restrictions and without prompting“. All other options should be unchecked.


B-4)  Macro Settings:

Check “Enable all macros” and “Trust access to the VBA project object model” options.


B-5)  Protected View:

Check only “Enable Protected View for Outlook attachments” and “Enable Data Execution Prevention mode” options. All other options should be unchecked.


In case the WebADI still does not work, then keep all the options unchecked, and retry.

B-6)  Message Bar:

Check “Show the Message Bar in all applications when achieve content, such as ActiveX controls and macros, has been blocked“.


B-7)  External Content:

Check the “Enable all Data Connections” and “Enable automatic update for all Workbook Links” options only.


C)  Internet Explorer Settings:

Open Internet Explorer –> Tools –> Internet Options –> Security Tab –> Custom Level.


C-1)  Downloads

Scroll down to Downloads section, and make sure File Download is Enabled.


C-2)  Miscellaneous: 

Scroll down to Miscellaneous section, and make sure to match the following setting.


C-3)  Scripting: 

Scroll down to Scripting section, and make sure to match the following setting. Then press OK.


Now log out from your Oracle Applications and re-log back in. Retry the Web-ADI upload.

This article presents a mixed bag of Oracle functionality relating to the identification of host names and IP addresses for Oracle clients and servers.

UTL_INADDR
SYS_CONTEXT
V$INSTANCE
V$SESSION

    UTL_INADDR

    The UTL_INADDR provide a means of retrieving host names and IP addresses of remote hosts from PL/SQL.
    The GET_HOST_ADDRESS function returns the IP address of the specified host name.
    SQL> SELECT UTL_INADDR.get_host_address('TEST') FROM dual;

    UTL_INADDR.GET_HOST_ADDRESS('TEST')
    --------------------------------------------------------------------------------
    192.167.1.56

    SQL>

     The IP address of the database server is returned if the specified host name is NULL or is omitted.

    SQL> SELECT UTL_INADDR.get_host_address from dual;

    GET_HOST_ADDRESS
    --------------------------------------------------------------------------------
    192.161.1.55

    SYS_CONTEXT

    The SYS_CONTEXT function is able to return the following host and IP address information for the current session:
    • TERMINAL – An operating system identifier for the current session. This is often the client machine name.
    • HOST – The host name of the client machine.
    • IP_ADDRESS – The IP address of the client machine.
    • SERVER_HOST – The host name of the server running the database instance.
    SQL> SELECT SYS_CONTEXT('USERENV','TERMINAL') FROM dual;

    SYS_CONTEXT('USERENV','TERMINAL')
    --------------------------------------------------------------------
    TEST10

    SQL> SELECT SYS_CONTEXT('USERENV','IP_ADDRESS') FROM dual;

    SYS_CONTEXT('USERENV','IP_ADDRESS')
    --------------------------------------------------------------------
    192.167.1.55

    SQL> SELECT SYS_CONTEXT('USERENV','SERVER_HOST') FROM dual;

    SYS_CONTEXT('USERENV','SERVER_HOST')
    --------------------------------------------------------------------
    Z4210gr11

    V$INSTANCE

    The HOST_NAME column of the V$INSTANCE view contains the host name of the server running the instance.
    SQL> SELECT host_name FROM v$instance;

    HOST_NAME
    ------------------------------------------------
    Z4210gR11

    V$SESSION

    The V$SESSION view contains the following host information for all database sessions:

    TERMINAL – The operating system terminal name for the client. This is often set to the client machine name.

    MACHINE – The operating system name for the client machine. This may include the domain name if present.

    The following examples show the typical output for each column.

    SQL> SELECT terminal, machine FROM v$session WHERE username = 'OEAG';

    TERMINAL MACHINE
    ------------------------------ ----------------------------------------------------
    TEST10 ORACLE-BASETEST10

    Concurrent Request Phase Codes:

    SELECT LOOKUP_CODE, MEANING
      FROM FND_LOOKUP_VALUES
     WHERE LOOKUP_TYPE = ‘CP_PHASE_CODE’ AND LANGUAGE = ‘US’
           AND ENABLED_FLAG = ‘Y’;

    LOOKUP_CODE
    MEANING
    C
    Completed
    I
    Inactive
    P
    Pending
    R
    Running

    Concurrent Request Status Codes:

    SELECT LOOKUP_CODE, MEANING
      FROM FND_LOOKUP_VALUES
     WHERE LOOKUP_TYPE = ‘CP_STATUS_CODE’ AND LANGUAGE = ‘US’
           AND ENABLED_FLAG = ‘Y’;

    LOOKUP_CODE
    MEANING
    R
    Normal
    I
    Normal
    Z
    Waiting
    D
    Cancelled
    U
    Disabled
    E
    Error
    M
    No Manager
    C
    Normal
    H
    On Hold
    W
    Paused
    B
    Resuming
    P
    Scheduled
    Q
    Standby
    S
    Suspended
    X
    Terminated
    T
    Terminating
    A
    Waiting
    G
    Warning

    Normally a concurrent request proceeds through three, possibly four, life cycle stages or phases,

    Phase Code
    Meaning with Description
    Pending
    Request is waiting to be run
    Running
    Request is running
    Completed
    Request has finished
    Inactive
    Request cannot be run

    Within each phase, a request’s condition or status may change. Below appears a listing of each phase and the various states that a concurrent request can go through.

    The status and the description of each meaning given below:

    Phase
    Status
    Description
    PENDING
    Normal
    Request is waiting for the next available manager.
    Standby
    Program to run request is incompatible with other program(s) currently running.
    Scheduled
    Request is scheduled to start at a future time or date.
    Waiting
    A child request is waiting for its Parent request to mark it ready to run. For example, a report in a report set that runs sequentially must wait for a prior report to complete.


    RUNNING
    Normal
    Request is running normally.
    Paused
    Parent request pauses for all its child requests to complete. For example, a report set pauses for all reports in the set to complete.
    Resuming
    All requests submitted by the same parent request have completed running. The Parent request is waiting to be restarted.
    Terminating
    Running request is terminated, by selecting Terminate in the Status field of   the Request Details zone.


    COMPLETED
    Normal
    Request completes normally.
    Error
    Request failed to complete successfully.
    Warning
    Request completes with warnings. For example, a report is generated successfully but fails to print.
    Cancelled
    Pending or Inactive request is cancelled, by selecting Cancel in the Status field of the Request Details zone.
    Terminated
    Running request is terminated, by selecting Terminate in the Status field of   the Request Details zone.


    INACTIVE
    Disabled
    Program to run request is not enabled. Contact your system administrator.
    On Hold
    Pending request is placed on hold, by selecting Hold in the Status field of the Request Details zone.
    No Manager
    No manager is defined to run the request. Check with your system administrator.
    Let’s say Invoices are imported from External Systems – irrespective of the transportation layer / method. Instead of viewing the Interface tables in the back end – say AP_INVOICES_INTERFACE , AP_INVOICE_LINES_INTERFACE, they can be viewed in the front-end.


    Responsibility – Payables Manager
    Navigation – Invoices – Entry – Open Interface Invoices
    Clicking on the above link, opens the below form ..
    Open the Query-mode to view the Invoice in the Interface table
    Above is the header line. Click on Lines to view the lines information.
    This would avoid looking for Invoices by querying in the back-end.
    To Access OAF Personalization in Oracle Apps, we need to set the values of following profiles options to enable Personalization Page link in OAF Pages. You can enable these profile options at all levels (Function, Site, Responsibility, User)


    These four profile options are mandatory for working on OAF personalization in apps. To Assign these Profile Options, we need to go to System Administrator or Functional Administrator Responsibility.

    Navigation:
    System Administrator -> Profile -> System
    Functional Administrator -> Core Services -> Profiles

    Profile Name
    Profile Value
    FND: Diagnostics
    Yes
    Personalize Self-Service Defn
    Yes
    FND: Personalization Region Link Enabled
    Yes / Minimal
    Disable Self-Service Personal
    No

    Meanings:

    1. FND: Diagnostics
    Setting the FND: Diagnostics (FND_DIAGNOSTICS) profile option to “Yes” will enable the diagnostics global button to be rendered on the screen.

    2. Personalize Self-Service Defn
    Set the value to Yes to allow ‘Personalize’ link to appear at the right top of the OAF page.

    3. FND: Personalization Region Link Enabled
    It renders the “Personalize  Region” links above each  region in a page. Each link  takes you first to the Choose Personalization Context page, then to the Page Hierarchy Personalization page with focus on the region node from which  you selected the “Personalize  Region” link.

    Two Options
    Set the value to Yes to display all the personalization links above each OAF page region.
    Set the value to Minimal to display key regional links.

    4. Disable Self-Service Personal
    Set the value to No will enable all OAF personalizations on all pages at all levels (Function, Site, Responsibility, User)