When your databases has lots of tables, object privileges can become unwieldy and hard to manage. You can simplify the management of privileges with the use of a database object called a role. A role acts in two capacities in the database. First, the role can act as a focal point for grouping the privileges to execute certain tasks. Second, the role can act as a “virtual user” of a database, to which all the object privileges required to execute a certain job function can be granted, such as data entry, manager review, batch processing, and so on


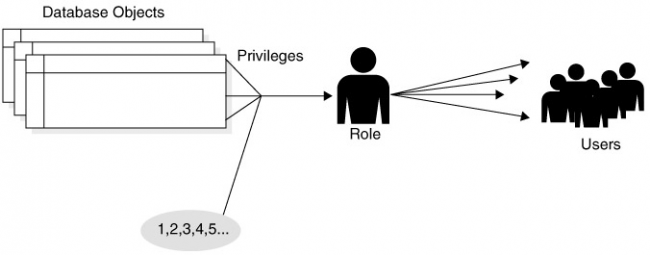
Step 1:
  Design and Crate roles is a process that can happen outside the database. A role mechanism can be used to provide authorization. A single person or a group of people can be granted a role or a group of roles. One role can be granted in turn to other roles. By defining different types of roles, administrators can manage access privileges much more easily. You simply sit down and think to yourself, how many different purposes will users be accessing this application for? Once this step is complete, you can create the different roles required to manage the privileges needed for each job function. Let’s say people using the EMP table have two different job roles: those who can query the table and those who can add records to the table. The next step is to create roles that correspond to each activity. This architecture of using roles as a middle layer for granting privileges greatly simplifies administration of user privileges. Let’s take a look at how to create the appropriate roles:
Create role role_name;
Step 2 :  Granting Privileges to Roles
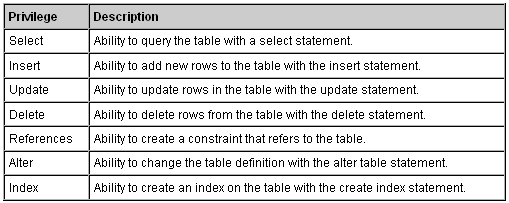
The next step is to grant object privileges to roles. You can accomplish this task using the same command as you would use to grant privileges directly to users—the grant command. The following code block demonstrates how to grant privileges to both our roles:
Grant select on emp to rpt_writer;
Revoking privileges from roles works the same way as it does for users. System privileges are granted and revoked with roles in the exact same way they are with users as well.
Step 3: Granting Roles to Users
Once a role is created and privileges are granted to it, the role can then be granted to users. This step is accomplished with the grant command. Let’s see an example of how this is done:
Grant rpt_writer to turner;
If a role already granted to a user is later granted another privilege, that additional privilege is available to the user immediately. The same statement can be made for privileges revoked from roles already granted to users, too.
Step 4:  Revoking and Dropping Roles
Finally, a role can be revoked by the role’s owner or by a privileged administrative user using the revoke statement, much like revoking privileges:
revoke rpt_writer from turner;
Roles can be deleted from the database using the drop role statement. When a role is dropped, the associated privileges are revoked from the users granted the role. The following code block shows how to eliminate roles from Oracle:
drop role rpt_writer;
Step 5: Modifying Roles if necessary
Let’s say that after we create our roles, we realize that changing records in the EMP table is serious business. To create an added safeguard against someone making a change to the EMP table in error, the DATA_CHANGER role can be altered to require a password by using the alter role identified by statement. Anyone wanting to modify data in EMP with the privileges given via the DATA_CHANGER role must first supply a password. Code for altering the role is shown in the following example:
Alter role data_changer
Identified by highly#secure;

Step 6: Defining User Default Roles
Now user TURNER can execute all the privileges given to him via the RPT_WRITER role, and user FORD can do the same with the privileges given from DATA_CHANGER. Or can he? Recall that we specified that DATA_CHANGER requires a password in order for the grantee to utilize its privileges. Let’s make a little change to FORD’s user ID so that this status will take effect:
alter user ford default role none;
You can use the following keywords in the alter user default role command to define default roles for users: all, all except rolename, and none. Note that users usually cannot issue alter user default role themselves to change their default roles—only a privileged user such as the DBA can do it for them.
Step 7: Enabling the Current Role
FORD knows he is supposed to be able to accomplish this task because he has the DATA_CHANGER role. Then he remembers that this role has a password on it. FORD can use the set role command to enable the DATA_CHANGER role in the following way:
set role data_changer identified by highly#secure;
Now FORD can make the change he needs to make:
SQL> insert into scott.emp (empno, ename, job)
  2  values (1234, ‘SMITHERS’,’MANAGER’);
You must already have been granted the roles that you name in the SET ROLE statement. Also, you can disable all roles with the SET ROLE NONE statement.
Privileges are the right to execute particular SQL statements. Two types of privileges exist in Oracle: object privileges and system privileges. Object privileges regulate access to database objects in Oracle, such as querying or changing data in tables and views, creating foreign key constraints and indexes on tables, executing PL/SQL programs, and a handful of other activities. System privileges govern every other type of activity in Oracle, such as connecting to the database, creating tables, creating sequences, creating views, and much, much more.
Privileges are given to users with the grant command, and they are taken away with the revoke command. The ability to grant privileges to other users in the database rests on users who can administer the privileges. The owner of a database object can administer object privileges related to that object, whereas the DBA administers system privileges

Object privileges
(Grant Privileges on Tables)
You can grant users various privileges to tables. These privileges can be any combination of select, insert, update, delete, references, alter, and index. Below is an explanation of what each privilege means.

The syntax for granting privileges on a table is:
    grant privileges on object to user;
For example, if you wanted to grant select, insert, update, and delete privileges on a table called suppliers to a user name smithj, you would execute the following statement:
    grant select, insert, update, delete on suppliers to smithj;
You can also use the all keyword to indicate that you wish all permissions to be granted. For example:
    grant all on suppliers to smithj;
The keyword all can be use as a consolidated method for granting object privileges related to a table. Note that all in this context is not a privilege; it is merely a specification for all object privileges for a database object
If you wanted to grant select access on your table to all users, you could grant the privileges to the public keyword. For example:
    grant select on suppliers to public;
Revoke Privileges on Tables
Once you have granted privileges, you may need to revoke some or all of these privileges. To do this, you can execute a revoke command. You can revoke any combination of select, insert, update, delete, references, alter, and index.
The syntax for revoking privileges on a table is:
    revoke privileges on object from user;
//  Grant this on this to this
For example, if you wanted to revoke delete privileges on a table called suppliers from a user named anderson, you would execute the following statement:
    revoke delete on suppliers from anderson;
If you wanted to revoke all privileges on a table, you could use the all keyword. For example:
    revoke all on suppliers from anderson;
If you had granted privileges to public (all users) and you wanted to revoke these privileges, you could execute the following statement:
    revoke all on suppliers from public;

System Privileges

Several categories of system privileges relate to each object. Those categories determine the scope of ability that the privilege grantee will have. The classes or categories of system privileges are listed in this section. Note that in the following subtopics, the privilege itself gives the ability to perform the action against your own database objects, and the any keyword refers to the ability to perform the action against any database object of that type in Oracle.
Database Access These privileges control who accesses the database, when he or she can access it, and what he or she can do regarding management of his or her own session. Privileges include create session, alter session, and restricted session. Users These privileges are used to manage users on the Oracle database. Typically, these privileges are reserved for DBAs or security administrators. Privileges include create user, become user, alter user, and drop user.
Tables You already know that tables store data in the Oracle database. These privileges govern which users can create and maintain tables. The privileges include create table, create any table, alter any table, backup any table, drop any table, lock any table, comment any table, select any table, insert any table, update any table, and delete any table. The create table or create any table privilege also enables you to drop the table. The create table privilege also bestows the ability to create indexes on the table and to run the analyze command on the table. To be able to truncate a table, you must have the drop any table privilege granted to you.
Indexes You already know that indexes are used to improve SQL statement performance on tables containing lots of row data. The privileges include create any index, alter any index, and drop any index. You should note that no create index system privilege exists. The create table privilege also enables you to alter and drop indexes that you own and that are associated with the table.
Synonyms A synonym is a database object that enables you to reference another object by a different name. A public synonym means that the synonym is available to every user in the database for the same purpose. The privileges include create synonym, create any synonym, drop any synonym, create public synonym, and drop public synonym. The create synonym privilege also enables you to alter and drop synonyms that you own.
Views You already know that a view is an object containing a SQL statement that behaves like a table in Oracle, except that it stores no data. The privileges include create view, create any view, and drop any view. The create view privilege also enables you to alter and drop views that you own.
Sequences You already know that a sequence is an object in Oracle that generates numbers according to rules you can define. Privileges include create sequence, create any sequence, alter any sequence, drop any sequence, and select any sequence. The create sequence privilege also enables you to drop sequences that you own.
Roles Roles are objects that can be used for simplified privilege management. You create a role, grant privileges to it, and then grant the role to users. Privileges include create role, drop any role, grant any role, and alter any role.

Transactions These privileges are for resolving in-doubt distributed transactions being processed on the Oracle database. Privileges include force transaction and force any transaction.
PL/SQL There are many different types of PL/SQL blocks in Oracle. These privileges enable you to create, run, and manage those different types of blocks. Privileges include create procedure, create any procedure, alter any procedure, drop any procedure, and execute any procedure. The create procedure privilege also enables you to alter and drop PL/SQL blocks that you own.
Triggers A trigger is a PL/SQL block in Oracle that executes when a specified DML activity occurs on the table to which the trigger is associated. Privileges include create trigger, create any trigger, alter any trigger, and drop any trigger. The create trigger privilege also enables you to alter and drop triggers that you own.
Examples
grant create session to turner;
// Grant this to this
revoke create session from turner;

// Revoke this from this
Open to the Public
Another aspect of privileges and access to the database involves a special user on the database. This user is called PUBLIC. If a system privilege or object privilege is granted to the PUBLIC user, then every user in the database has that privilege. Typically, it is not advised that the DBA should grant many privileges or roles to PUBLIC, because if a privilege or role ever needs to be revoked, then every stored package, procedure, or function will need to be recompiled. Let’s take a look:

GRANT select, update, insert ON emp TO public;

Tip    
Roles can be granted to the PUBLIC user as well. We’ll talk more about roles in the next discussion.
Granting Object Privileges All at Once
The keyword all can be use as a consolidated method for granting object privileges related to a table. Note that all in this context is not a privilege; it is merely a specification for all object privileges for a database object. The following code block shows how all is used:
GRANT ALL ON emp TO turner;

Giving Administrative Ability along with Privileges

When another user grants you a privilege, you then have the ability to perform whatever task the privilege enables you to do. However, you usually can’t grant the privilege to others, nor can you relinquish the privilege without help of the user who granted the privilege to you. If you want some additional power to administer the privilege granted to you, the user who gave you the privilege must also give you administrative control over that privilege. For example, let’s say KING now completely trusts TURNER to manage the creation of tables (a system privilege) and wants to give him access to the EMP table (an object privilege). Therefore, KING tells SCOTT to give TURNER administrative control over both these privileges, as follows:
GRANT CREATE TABLE TO turner WITH ADMIN OPTION;
GRANT SELECT, UPDATE ON turner TO SPANKY WITH GRANT OPTION;
Tip    
The GRANT OPTION is not valid when granting an object privilege to a role.
A system privilege or role can be granted with the ADMIN OPTION. A grantee with this option has several expanded capabilities. The grantee can grant or revoke the system privilege or role to or from any user or other role in the database. However, a user cannot revoke a role from himself. The grantee can further grant the system privilege or role with the ADMIN OPTION. The grantee of a role can alter or drop the role.
Finally, if a role is granted using the with admin option clause, the grantee can alter the role or even remove it. You’ll learn more about roles in the next discussion.
You can grant INSERT, UPDATE, or REFERENCES privileges on individual columns in a table.

Cascading Effects

No cascading effects of revoking system privileges from users occur.
when an object privilege is revoked from a grantor of that privilege, all grantees receiving the privilege from the grantor also lose the privilege. However, in cases where the object privilege involves update, insert, or delete, if subsequent grantees have made changes to data using the privilege, the rows already changed don’t get magically transformed back the way they were before

In this chapter, you will learn about and demonstrate knowledge in the following areas of user access and privileges in the Oracle database:

  • Creating users
  • Granting and revoking object privileges
  • Using roles to manage database access

The basic Oracle database security model consists of two parts. The first part consists of password authentication for all users of the Oracle database. Password authentication is available either directly from the Oracle server or from the operating system supporting the Oracle database. When Oracle’s own authentication system is used, password information is stored in Oracle in an encrypted format. The second part of the Oracle security model consists of controlling which database objects a user may access, the level of access a user may have to these objects, and whether a user has the authority to place new objects into the Oracle database. At a high level, these controls are referred to as privileges. We’ll talk about privileges and database access later in this section.
Create Users

The most basic version of the command for creating users defines only the user we want to create, along with a password, as seen in the following example:
Create User USERNAME identified by PASSWORD;
create user turner identified by ike;
Tip :
The user does not have privileges at this point. The DBA can then grant privileges to the user. The privileges determine the actions that the user can do with the objects in the database. Also, usernames can be up to 30 characters in length and can contain alphanumeric characters as well as the $, #, and _ characters.


A database link is a schema object in one database that enables you to access objects on another database. The other database need not be an Oracle Database system. However, to access non-Oracle systems you must use Oracle Heterogeneous Services.
You might want to create a database link, for instance, if you want the data in a remote database updated when the local database is updated. Here’s how to accomplish this:
The first thing you need to do is to create a database link pointing to the other location. The database link can be created with a command similar to the following:
    CREATE [SHARED | PUBLIC] DATABASE LINK <link-name>
    [CONNECT TO <username> IDENTIFIED BY <password>]
    [USING <connect-string>];

To create a fixed user database link, a username and password to connect with must be specified. For example:
    CREATE PUBLIC DATABASE LINK BASING
    CONNECT TO USRCRY IDENTIFIED BY CRYPWD
    USING BASING_ORA;
    Select count(*) from table@basing;

You’ll want to give the database link a better name, use the appropriate userid/password to connect to the remote database, and configure your TNSNAMES.ORA file with a TNS alias to point to that database.
An index can be created in a table to find data more quickly and efficiently. The users cannot see the indexes, they are just used to speed up searches/queries.
Indexes are objects in the database that provide a mapping of all the values in a table column, along with the ROWID(s) for all rows in the table that contain that value for the column. A ROWID is a unique identifier for a row in an Oracle database table. Indexes have multiple uses on the Oracle database. Indexes can be used to ensure uniqueness on a database, and they can also boost performance when you’re searching for records in a table. Indexes are used by the Oracle Server to speed up the retrieval of rows by using a pointer. The improvement in performance is gained when the search criteria for data in a table include a reference to the indexed column or columns.
In Oracle, indexes can be created on any column in a table except for columns of the LONG datatype. Especially on large tables, indexes make the difference between an application that drags its heels and an application that runs with efficiency. However, many performance considerations must be weighed before you make the decision to create an index.
Note: Updating a table with indexes takes more time than updating a table without (because the indexes also need an update). So you should only create indexes on columns (and tables) that will be frequently searched against.

B-tree Index Structure

The traditional index in the Oracle database is based on a highly advanced algorithm for sorting data called a B-tree. A B-tree contains data placed in layered, branching order, from top to bottom, resembling an upside-down tree. The midpoint of the entire list is placed at the top of the “tree” and is called the root node. The midpoints of each half of the remaining two lists are placed at the next level, and so on

By using a divide-and-conquer method for structuring and searching for data, the values of a column are only a few hops away on the tree, rather than several thousand sequential reads through the list away. However, traditional indexes work best when many distinct values are in the column or when the column is unique.
The algorithm works as follows:
1. Compare the given value to the value in the halfway point of the list. If the value at hand is greater, discard the lower half of the list. If the value at hand is less, discard the upper half of the list.
2. Repeat step 1 for the remaining part of the list until a value is found or the list exhausted.
Along with the data values of a column, each individual node of an index also stores a piece of information about the column value’s row location on disk. This crucial piece of lookup data is called a ROWID. The ROWID for the column value points Oracle directly to the disk location of the table row corresponding to the column value. A ROWID identifies the location of a row in a data block in the datafile on disk. With this information, Oracle can then find all the data associated with the row in the table.

Tip: The ROWID for a table is an address for the row on disk. With the ROWID, Oracle can find the data on disk rapidly.


Bitmap Index Structure
This topic is pretty advanced, so consider yourself forewarned. The other type of index available in Oracle is the bitmap index. Try to conceptualize a bitmap index as being a sophisticated lookup table, having rows that correspond to all unique data values in the column being indexed. Therefore, if the indexed column contains only three distinct values, the bitmap index can be visualized as containing three rows. Each row in a bitmap index contains four columns. The first column contains the unique value for the column being indexed. The next column contains the start ROWID for all rows in the table. The third column in the bitmap index contains the end ROWID for all rows in the table. The last column contains a bitmap pattern, in which every row in the table will have one bit. Therefore, if the table being indexed contains 1,000 rows, this last column of the bitmap index will have 1,000 corresponding bits in this last column of the bitmap index. Each bit in the bitmap index will be set to 0 (off) or 1 (on), depending on whether the corresponding row in the table has that distinct value for the column. In other words, if the value in the indexed column for that row matches this unique value, the bit is set to 1; otherwise, the bit is set to 0. Figure 7-2 displays a pictorial representation of a bitmap index containing three distinct values.

Each row in the table being indexed adds only a bit to the size of the bitmap pattern column for the bitmap index, so growth of the table won’t affect the size of the bitmap index too much. However, each distinct value adds another row to the bitmap index, which adds another entire bitmap pattern with one bit for each row in the table. Be careful about adding distinct values to a column with a bitmap index, because these indexes work better when few distinct values are allowed for a column. The classic example of using a bitmap index is where you want to query a table containing employees based on a GENDER column, indicating whether the employee is male or female. This information rarely changes about a person, and only two distinct possibilities, so a traditional B-tree index is not useful in this case. However, this is exactly the condition where a bitmap index would aid performance. Therefore, the bitmap index improves performance in situations where traditional indexes are not useful, and vice versa.
Tip : Up to 32 columns from one table can be included in a single B-tree index on that table, whereas a bitmap index can include a maximum of 30 columns from the table.
CREATE INDEX
You can create a unique B-tree index on a column manually by using the create index name on table (column) statement containing the unique keyword. This process is the manual equivalent of creating a unique or primary key constraint on a table. (Remember, unique indexes are created automatically in support of those constraints.)
Creates an index on a table. Duplicate values are allowed:
CREATE INDEX index_name
ON table_name (column_name)

Creates a unique index on a table. Duplicate values are not allowed:
CREATE UNIQUE INDEX index_name
ON table_name (column_name)

Creating Function-Based Indexes
To create a function-based index in your own schema on your own table, you must have the CREATE INDEX and QUERY REWRITE system privileges. To create the index in another schema or on another schema’s table, you must have the CREATE ANY INDEX and GLOBAL QUERY REWRITE privileges. The table owner must also have the EXECUTE object privilege on the functions used in the function-based index.
The function-based index is a new type of index in Oracle that is designed to improve query performance by making it possible to define an index that works when your where clause contains operations on columns. Traditional B-tree indexes won’t be used when your where clause contains columns that participate in functions or operations. For example, suppose you have table EMP with four columns: EMPID, LASTNAME, FIRSTNAME, and SALARY. The SALARY column has a B-tree index on it. However, if you issue the select * from EMP where (SALARY*1.08) > 63000 statement, the RDBMS will ignore the index, performing a full table scan instead. Function-based indexes are designed to be used in situations like this one, where your SQL statements contain such operations in their where clauses. The following code block shows a function-based index defined:
SQL> CREATE INDEX ixd_emp_01
  2  ON emp(SAL*1.08);
By using function-based indexes like this one, you can optimize the performance of queries containing function operations on columns in the where clause, like the query shown previously. As long as the function you specify is repeatable, you can create a function-based index around i
DROP Indexes
When an index is no longer needed in the database, the developer can remove it with the drop index command. Once an index is dropped, it will no longer improve performance on searches using the column or columns contained in the index. No mention of that index will appear in the data dictionary any more either. You cannot drop the index that is used for a primary key.
The syntax for the drop index statement is the same, regardless of the type of index being dropped (unique, bitmap, or B-tree). If you want to rework the index in any way, you must first drop the old index and then create the new one. The following is an example:
DROP INDEX employee_last_first_indx_01;