User can able to delete the AR transaction in below cases are met:

  • The invoice in the incomplete status.
  • The invoice doesn’t posted.
  • This is no receipt applied to the invoice.

Note:

  • You might miss your invoice document sequence.
  • Based on company policy, whether you can keep the document or remove from system.

If the Invoice in ‘complete‘ status, create a Credit Memo against this invoice and nullify the transaction.

AR invoice transaction using this package ‘ar_invoice_api_pub.delete_transaction’ in R12

Step 1: Incomplete the invoice.
— For R12 ——
–AR_TRANSACTION_GRP.INCOMPLETE_TRANSACTION

SET SERVEROUTPUT ON;
DECLARE 
   l_return_status    VARCHAR2 (100);
   l_message_count    NUMBER;
   l_message_data     VARCHAR2 (1000);
   lv_error_message   VARCHAR2 (800);
BEGIN
   mo_global.set_policy_context ('S', 800);
   
   fnd_global.apps_initialize(0,51234,222);
   
   ar_transaction_grp.incomplete_transaction
                           (p_api_version           => '1.0',
                            p_init_msg_list         => fnd_api.g_true,
                            p_commit                => fnd_api.g_false,
                            p_validation_level      => fnd_api.g_valid_level_none,
                            p_customer_trx_id       => 198364532,
                            x_return_status         => l_return_status,
                            x_msg_count             => l_message_count,
                            x_msg_data              => l_message_data
                           );
   COMMIT;

   IF l_return_status IN ('E', 'U')
   THEN
      FOR i IN 1 .. l_message_count
      LOOP
         lv_error_message :=
                         lv_error_message || '--' || fnd_msg_pub.get (i, 'F');
         DBMS_OUTPUT.put_line ('l_return_status- ' || l_return_status);
      END LOOP;

      DBMS_OUTPUT.put_line (   'API Failed. Error:'
                            || SUBSTR (lv_error_message, 1, 800)
                           );
   ELSE
      DBMS_OUTPUT.put_line ('AR Invoice Incompleted successfully');
      DBMS_OUTPUT.put_line ('lv_return_status-' || l_return_status);
   END IF;
END ;

Step 2: Check the following Prerequisites:

  1. Check if ‘Allow Transaction Deletion’ flag is Yes, If “No”, check the flag for respective operating unit.
    Navigation : Receivables -> Setup -> System -> System Options
    >> Query for respective operating unit
    >> Click on ‘Trans and Customers’ Tab > Check for ‘Allow Transaction Deletion’ flag.
  2. Transaction Should be incomplete.
  3. There should be no activity against the transaction like it must neither be applied, printed or posted to GL etc.

Step 3: Sample script for invoice deletion

------------------- Create Custom Table ---- For your Deleting Data Set --------------
CREATE TABLE OEAG.XXERP_AR_DELETE_TRANS
AS
   SELECT CUSTOMER_TRX_ID,
          TRX_DATE,
          TRX_NUMBER,
          BILL_TO_CUSTOMER_ID,
          BILL_TO_SITE_USE_ID,
          ORG_ID,
          CREATION_DATE,
          CREATED_BY,
          'N' V_RET_STATUS,
          'N' V_MSG_COUNT,
          'N' V_MSG_DATA,
          'N' V_MESSAGE_TBL
     FROM RA_CUSTOMER_TRX_ALL     
    WHERE ORG_ID = 800 
      AND CUST_TRX_TYPE_ID = 1265      
      AND TRX_DATE = '20-MAR-2019';   

---------------- START --- AR INVOICE DATA DELETE PROGRAM ---------------------
SET SERVEROUTPUT ON;
DECLARE
   CURSOR cur_all_trx
   IS
     
    SELECT ROWID,
             NULL PARTY_NUMBER,
             RCT.ORG_ID,
             RCT.CUSTOMER_TRX_ID,
             RCT.TRX_NUMBER
        FROM OEAG.XXERP_AR_DELETE_TRANS RCT
       WHERE NVL (V_RET_STATUS, 0) <> 'S'
         AND TRX_NUMBER = '900918263';
       

   xv_msg_data     VARCHAR2 (4000) := NULL;
   xv_msg_count    NUMBER := 0;
   v_msg_index     NUMBER := 0;
   xv_ret_status   VARCHAR2 (1) := NULL;
   v_message_tbl   arp_trx_validate.message_tbl_type;
   v_res           VARCHAR2 (4000) := NULL;
   v_res_name      VARCHAR2 (4000) := NULL;
   v_app           VARCHAR2 (4000) := NULL;
   v_user          NUMBER := 1110;
BEGIN
   DBMS_OUTPUT.put_line ('Detele Transaction...');

   FOR c_rec IN cur_all_trx
   LOOP
      DBMS_OUTPUT.put_line ('   Transaction No.: ' || c_rec.trx_number);
      DBMS_OUTPUT.put_line ('   Transaction ID : ' || c_rec.customer_trx_id);
      DBMS_OUTPUT.put_line ('   Org ID         : ' || c_rec.org_id);
      ----------------------------------------------------------------------------
      ---- Setting the org context for the particular session
      apps.mo_global.set_policy_context ('S', c_rec.org_id);

      -- apps.mo_global.init('AR');

      SELECT application_id, responsibility_id
        INTO v_app, v_res
        FROM fnd_responsibility_tl        
       WHERE responsibility_id = 51234;

      ---- Setting the oracle applications context for the particular session
      apps.fnd_global.apps_initialize (v_user, v_res, v_app);
      ----------------------------------------------------------------------------
      xv_ret_status := NULL;
      xv_msg_count := NULL;
      xv_msg_data := NULL;

      --update the Allow Transaction Deletion to Yes to Delete (As mentioned above, better to do it from application)
      UPDATE ar_system_parameters_all
         SET invoice_deletion_flag = 'Y'
       WHERE org_id = c_rec.org_id;

      ar_invoice_api_pub.delete_transaction (
         p_api_name           => 'Delete_Transaction',
         p_api_version        => 1.0,
         p_init_msg_list      => fnd_api.g_true,
         p_commit             => fnd_api.g_true,
         p_validation_level   => fnd_api.g_valid_level_full,
         p_customer_trx_id    => c_rec.customer_trx_id,
         p_return_status      => xv_ret_status,
         p_msg_count          => xv_msg_count,
         p_msg_data           => xv_msg_data,
         p_errors             => v_message_tbl);

      UPDATE OEAG.XXERP_AR_DELETE_TRANS
         SET v_ret_status = xv_ret_status
       WHERE ROWID = c_rec.ROWID;

      UPDATE OEAG.XXERP_AR_DELETE_TRANS
         SET v_msg_count = xv_msg_count
       WHERE ROWID = c_rec.ROWID;


      IF xv_ret_status <> 'S'
      THEN
         DBMS_OUTPUT.put_line ('   Status: ' || xv_ret_status);

         UPDATE OEAG.XXERP_AR_DELETE_TRANS
            SET v_msg_data = v_ret_status
          WHERE ROWID = c_rec.ROWID;

         FOR i IN 1 .. xv_msg_count
         LOOP
            apps.fnd_msg_pub.get (i,
                                  apps.fnd_api.g_false,
                                  xv_msg_data,
                                  v_msg_index);
            DBMS_OUTPUT.put_line ('   Error : ' || xv_msg_data);
         END LOOP;

         DBMS_OUTPUT.put_line ('   ' || xv_msg_data);
      ELSE
         DBMS_OUTPUT.put_line ('   Deleted.');

         -- Revert back to the original value for the deletion flag
         UPDATE ar_system_parameters_all
            SET invoice_deletion_flag = 'N'
          WHERE org_id = c_rec.org_id;
      END IF;

      DBMS_OUTPUT.put_line ('--------------------');
      COMMIT;
   END LOOP;
EXCEPTION
   WHEN OTHERS
   THEN
      DBMS_OUTPUT.put_line ('Error : ' || SQLERRM);
END;
/

Note: User can able to delete the transaction front end also, after completing Step 2.

I will explain how to create a custom KFF. Here I’m using XXCUST_KFF_DEMO table to capture the KFF code combinations.

Following steps needs to perform to create custom KFF.

1) Register the XXCUST_KFF_DEMO table.

Click here to see the code.

Verify the table has created successfully.

Navigation: Application Developer > Application > Database > Table

2) Register the Key Flexfield.

Navigation : Application Developer > Flexfield > Key Flexfields

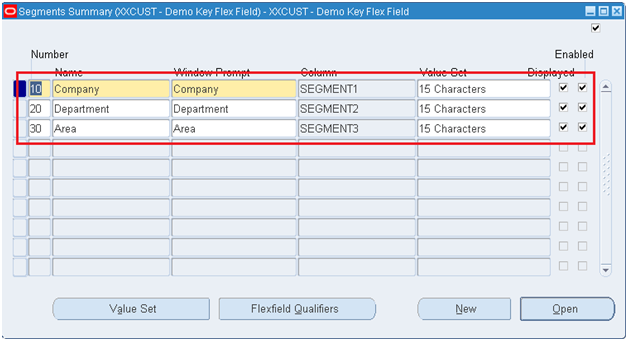
3) Define the structure and segments.

Navigation:  Application Developer > Flexfield > Key Flexfield Segments

Click on Segments button.

Save the created Information.Check the Allow Dynamic Inserts check box if you want to create the combination from the KFF display window. Once you complete all the changes, check the Freeze Flexfield Definition check box.

4) Create a sequence XXCUST_KFF_DEMO_S.
CREATE SEQUENCE XXCUST_KFF_DEMO_S INCREMENT BY 1 START WITH 1 MAXVALUE 999999999 CYCLE NOCACHE;
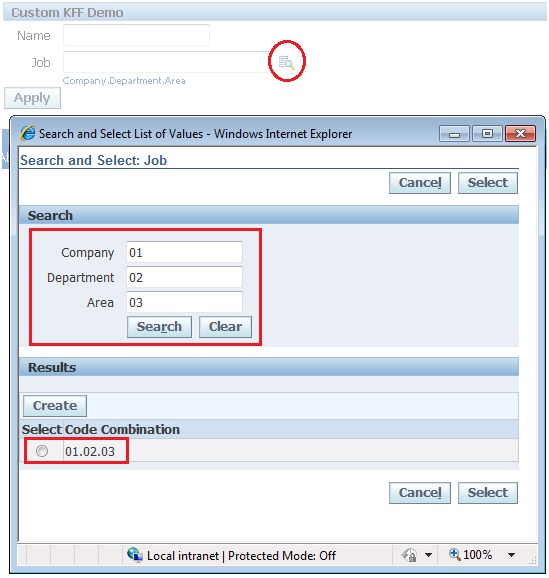
5) create KFF item through OAF Page.

Here I am using a page based on table XXCUST_KFF_TRN.

CREATE TABLE xxcust_kff_trn
(
	NAME			     VARCHAR2(100),
	CCID			     NUMBER,
	CREATED_BY		     NUMBER,
	CREATION_DATE		     DATE,
	LAST_UPDATE_DATE             DATE,         
	LAST_UPDATED_BY              NUMBER,   
	LAST_UPDATE_LOGIN            NUMBER
);

You can see the output below.


Learn how to use Custom Flexfields in Oracle Forms here.

Issue:
When we are using view object (VO) in OA Framework it’s possible that you will run in to the problem java.sql.SQLException: Invalid column type, especially if it’s an LOV VO. When you click on the LOV torch for the first time it is working fine. But whenever when we click on the GO button in the LOV Region it gives an error.

Solution:
What we need to is, change the Binding Style from Oracle Named to Oracle Positional in the View Object declaration. The framework is adding a where clause to the query using bind variables that are typed :n, this is why you need to set Oracle Positional. Now save it run again, then it will solve this issue.

VO Binding Style

This article explains how to insert attachments using Oracle API’s from Back end. Working on attachments need some knowledge of how an attachment functions (Definitions, Entity, Document Category, Entities and Blocks, Primary Keys in attachments) in Oracle Apps. To understand the below API and what it actually does its advisable to read the Attachments Chapter in Developers Guide.

https://docs.oracle.com/cd/E26401_01/doc.122/e22961/T302934T462356.htm

Primary Key information that uniquely identifies the product (such as the INVOICE_ID).

Below API takes single file from a shared drive and inserts into fnd_lobs. Then it’s attached to a particular Id (like check_id, invoice_id..) using the combination of pk1_value, entity name and category.

This sample shows how an attachment API works. You can use it to customize/enhance to requirement.

//Tested in R12.1.3

–Create a Server Directories in Oracle
–This will be done by DBA mostly
–Physical directory must be created inorder to save the files into server
CREATE OR REPLACE DIRECTORY SALE_INVOICE_PATH AS ‘/files/SALE_INVOICE/’;

SET SERVEROUTPUT ON;
DECLARE
l_rowid ROWID;
l_attached_document_id NUMBER;
l_document_id NUMBER;
l_media_id NUMBER;
l_category_id number;
l_pk1_value fnd_attached_documents.pk1_value%type:= 999999; –Primary Key information that uniquely identifies the information
l_description fnd_documents_tl.description%type:= ‘Customer Invoice Attachment’;
l_filename VARCHAR2(240) := ‘Sales_Invoice_14Nov2016.pdf’;
l_file_path varchar2(240) := ‘SALE_INVOICE_PATH’; –Server Directory Path for upload files
l_seq_num NUMBER;
l_blob_data BLOB;
l_blob BLOB;
l_bfile BFILE;
l_byte NUMBER;
l_fnd_user_id NUMBER;
l_short_datatype_id NUMBER;
x_blob BLOB;
fils BFILE;
blob_length integer;
l_entity_name varchar2(100) := ‘CUSTOM_LOAD’; –Must be defined before or use existing ones. Table: FND_DOCUMENT_ENTITIES
l_category_name VARCHAR2(100) := ‘Other’; –Must be defined before or use existing ones.

BEGIN
–Enter USER_ID,RESP_ID,RESP_APPL_ID
fnd_global.apps_initialize (&USER_ID, &RESP_ID, &RESP_APPL_ID);

SELECT fnd_documents_s.NEXTVAL
INTO l_document_id
FROM DUAL;

SELECT fnd_attached_documents_s.NEXTVAL
INTO l_attached_document_id
FROM DUAL;

SELECT NVL (MAX (seq_num), 0) + 10
INTO l_seq_num
FROM fnd_attached_documents
WHERE pk1_value = l_pk1_value AND entity_name = l_entity_name;

— Select User_id
SELECT user_id
INTO l_fnd_user_id
from apps.fnd_user
WHERE user_name = ‘OPERATIONS’; –Username who will be uploading file.

— Get Data type id for Short Text types of attachments
SELECT datatype_id
INTO l_short_datatype_id
FROM apps.fnd_document_datatypes
WHERE NAME = ‘FILE’;

— Select Category id for Attachments
SELECT category_id
INTO l_category_id
FROM apps.fnd_document_categories_vl
WHERE USER_NAME = l_category_name;

— Select nexvalues of document id, attached document id and
SELECT apps.fnd_documents_s.NEXTVAL,
apps.fnd_attached_documents_s.NEXTVAL
into l_document_id,l_attached_document_id
FROM DUAL;

SELECT fnd_lobs_s.nextval
INTO l_media_id
FROM dual;

fils := BFILENAME (l_file_path, l_filename);

— Obtain the size of the blob file
DBMS_LOB.fileopen (fils, DBMS_LOB.file_readonly);
blob_length := DBMS_LOB.getlength (fils);
DBMS_LOB.fileclose (fils);

— Insert a new record into the table containing the
— filename you have specified and a LOB LOCATOR.
— Return the LOB LOCATOR and assign it to x_blob.

INSERT INTO fnd_lobs
(file_id, file_name, file_content_type, upload_date,
expiration_date, program_name, program_tag, file_data,
LANGUAGE, oracle_charset, file_format
)
VALUES (l_media_id, l_filename, ‘application/pdf’,–‘text/plain’,
SYSDATE, NULL, ‘FNDATTCH’, NULL, EMPTY_BLOB (), –l_blob_data,
‘US’, ‘UTF8’, ‘binary’
)
RETURNING file_data
INTO x_blob;

— Load the file into the database as a BLOB
DBMS_LOB.OPEN (fils, DBMS_LOB.lob_readonly);
DBMS_LOB.OPEN (x_blob, DBMS_LOB.lob_readwrite);
DBMS_LOB.loadfromfile (x_blob, fils, blob_length);

— Close handles to blob and file
DBMS_LOB.CLOSE (x_blob);
DBMS_LOB.CLOSE (fils);

DBMS_OUTPUT.put_line (‘FND_LOBS File Id Created is ‘ || l_media_id);

COMMIT;

— This package allows user to share file across multiple orgs or restrict to single org

fnd_documents_pkg.insert_row
(x_rowid => l_rowid,
x_document_id => l_document_id,
x_creation_date => SYSDATE,
x_created_by => l_fnd_user_id,
x_last_update_date => SYSDATE,
x_last_updated_by => l_fnd_user_id,
x_last_update_login => fnd_profile.VALUE(‘LOGIN_ID’),
x_datatype_id => l_short_datatype_id,
X_security_id => 21, –Security ID defined in your Attchments, Usaully SOB ID/ORG_ID
x_publish_flag => ‘N’, –This flag allow the file to share across multiple organization
x_category_id => l_category_id,
x_security_type => 1,
x_usage_type => ‘S’,
x_language => ‘US’,
x_description => l_description,
x_file_name => l_filename,
x_media_id => l_media_id
);

commit;

— Description informations will be stored in below table based on languages.
fnd_documents_pkg.insert_tl_row
(x_document_id => l_document_id,
x_creation_date => SYSDATE,
x_created_by => l_fnd_user_id,
x_last_update_date => SYSDATE,
x_last_updated_by => l_fnd_user_id,
x_last_update_login => fnd_profile.VALUE(‘LOGIN_ID’),
x_language => ‘US’,
x_description => l_description
);
commit;

fnd_attached_documents_pkg.insert_row
(x_rowid => l_rowid,
x_attached_document_id => l_attached_document_id,
x_document_id => l_document_id,
x_creation_date => SYSDATE,
x_created_by => l_fnd_user_id,
x_last_update_date => SYSDATE,
x_last_updated_by => l_fnd_user_id,
x_last_update_login => fnd_profile.VALUE(‘LOGIN_ID’),
x_seq_num => l_seq_num,
x_entity_name => l_entity_name,
x_column1 => NULL,
x_pk1_value => l_pk1_value,
x_pk2_value => NULL,
x_pk3_value => NULL,
x_pk4_value => NULL,
x_pk5_value => NULL,
x_automatically_added_flag => ‘N’,
x_datatype_id => 6,
x_category_id => l_category_id,
x_security_type => 1,
X_security_id => 21, –Security ID defined in your Attchments, Usaully SOB ID/ORG_ID
x_publish_flag => ‘Y’,
x_language => ‘US’,
x_description => l_description,
x_file_name => l_filename,
x_media_id => l_media_id
);
COMMIT;
DBMS_OUTPUT.put_line (‘MEDIA ID CREATED IS ‘ || l_media_id);
end;
/

Learn more on Attachments on this article.

Below are the steps to create Supplier contacts in Oracle EBS R12.
AP_SUP_SITE_CONTACT_INT interface used in 11i for loading supplier contact. Currently in R12 contacts can not be loaded using the interface table.

ap_vendor_pub_pkg.create_vendor_contact API is used in R12 and the program has to be registered as a concurrent program.

### Sample R12 Code

BEGIN
v_party_usg_assignment_id := NULL;
v_relationship_id := NULL;
v_directional_flag := NULL;
v_rel_rowid := NULL;
fnd_file.put_line (fnd_file.LOG,
‘Vendor code :’
|| rec.vendor_name
|| ‘  Vendor site code :’
|| rec.vendor_site_code
|| ‘  Person Last Name : ‘
|| rec.person_last_name
);
l_vendor_contact.vendor_id := rec.vendor_id;
l_vendor_contact.vendor_site_id := rec.vendor_site_id;
l_vendor_contact.org_id := rec.org_id;
l_vendor_contact.person_first_name := rec.person_first_name;
l_vendor_contact.person_middle_name := rec.person_middle_name;
l_vendor_contact.person_last_name := rec.person_last_name;
l_vendor_contact.phone := rec.phone;
l_vendor_contact.email_address := rec.email_address;
p_init_msg_list := fnd_api.g_true;
p_commit := fnd_api.g_false;
x_return_status := NULL;
x_msg_count := NULL;
x_msg_data := NULL;

IF rec.process_flag = ‘I’
THEN
fnd_file.put_line (fnd_file.LOG, ‘Creating contacts….’);
ap_vendor_pub_pkg.create_vendor_contact
(p_api_version             => p_api_version,
p_init_msg_list           => p_init_msg_list,
p_commit                  => p_commit,
x_return_status           => x_return_status,
x_msg_count               => x_msg_count,
x_msg_data                => x_msg_data,
p_vendor_contact_rec      => l_vendor_contact,
x_vendor_contact_id       => l_vendor_contact.vendor_contact_id,
x_per_party_id            => l_vendor_contact.per_party_id,
x_rel_party_id            => l_vendor_contact.relationship_id,
x_rel_id                  => l_vendor_contact.rel_party_id,
x_org_contact_id          => l_vendor_contact.org_contact_id,
x_party_site_id           => l_vendor_contact.party_site_id
);
error_handling (rec.r_id, x_return_status, x_msg_count, x_msg_data);
fnd_file.put_line (fnd_file.LOG, ‘*************’);
END IF;
END;