The foundation of security is access control, which refers to how the system is being accessed and by whom. User security consists of three principal components: authentication, authorization and an audit trail.
Authentication validates the user’s identity, authorization controls the user’s access based on responsibilities assigned, and the audit trail keeps track of the user’s transactions to ensure that the user’s privileges are not being misused.
Authentication
Identifying and verifying who is allowed to access the system is the first line of defense. The most common approach is password-based authentication: if the legitimate user is the only one who knows the password, then whoever just entered the correct password is very likely to be the person authorized to use the account.
In a single-sign on environment, a single password allows access to more than one application, so the consequences of it being discovered or divulged are
proportionately much more serious.
Authorization
On entering the system, the user should only be granted access to the features and specific data needed to perform his job. Routine access to highly sensitive data should only be given to trusted users who need that level of access. The Function Security feature allows the System Administrator to manage the access privileges of individual users. By enforcing tighter security policies for more sensitive accounts, Function Security can mitigate the risk of unauthorized users’ access to highly sensitive information
Audit Trail
Even the most carefully planned user authentication and authorization policies cannot eliminate the risk of exploitation when the attacker is an authorized user. An audit trail can be used to keep track of a user’s transactions to verify that the user is not misusing his access privileges. Oracle E-Business Suite can record details of every user’s login,
including time stamp, session ID, and information about the Function Security rules applying to that session. Information about the identity of the user is also attached to all transactions. This provides a method for detecting the party responsible for any transaction, or determining which users viewed sensitive data in a given time period.

Network Security
An organization may or may not have physical control over the network infrastructure in use. The Internet is the best example of a network where it will not have control, and where extra steps must be taken to ensure security is not compromised.

A common concern regarding use of a public network such as the Internet is the possibility of someone eavesdropping on password transmissions by using a network sniffer. In such a case, though, the concern should be wider, and reflect the possibility of someone eavesdropping on sensitive information in general. In such cases, HTTPS (secure HTTP) connection to the E-Business Suite is recommended. All current browser-based password login screens send the password as a parameter in the HTTP form submission. Using an HTTPS connection will encrypt this information. The best practice is therefore to use HTTPS for all web-based access. On the other hand, if you have control over your network to the point where you can rule out eavesdropping, then password interception should not be an issue.
The main reason not to run HTTPS by default is performance, since it does introduce some overhead. A more strategic way to address this concern is to integrate the Oracle E-Business Suite with Oracle Application Server 10g Single Sign-On (SSO). Here, the SSO server that is responsible for user authentication is a different Web server from the one used with the E-Business Suite. Hence you can run the SSO server in HTTPS mode, while running the E-Business Suite Web server in the better-performing HTTP mode.
Oracle User Management
Oracle User Management (UMX) is a secure and scalable system that enables organizations to define administrative functions and manage users based on specific requirements such as job role or geographic location.
With Oracle User Management, instead of exclusively relying on a centralized administrator to manage all its users, an organization can, if desired, create functional administrators and grant them sufficient privileges to manage a specific subset of the organization’s users. This provides the organization with a more granular level of security, and the ability to make the most effective use of its administrative capabilities.
For example, a new feature in Release 12 provides a login assistance mechanism that is easily accessed from the E-Business Suite Login Page. A user simply clicks on the “Login Assistance” link located below the Login and Cancel buttons, and can then go to a Forgot Password section or Forgot User Name section to have the necessary action
taken automatically, without the need for an administrator to become involved.
Another new feature in Release 12 allows users with the relevant privileges to enable other users to act on their behalf, as delegates, without having to share the account password. For example, managers may need to grant peers or subordinates limited authority to act on their behalf while they are out of the office. This Proxy User feature allows control over the pages, functions, and data security policies that can be granted, and includes an on-screen display that indicates when a user is acting on behalf of another user.
Role Based Access Control
Oracle User Management implements several different layers of security, requiring organizations to specify:

  •  The set of users that will be granted access to specific areas of Oracle Applications
  •  The information these users will require to do their jobs
  •  The extent to which the users can use this information

Oracle’s function and data security models constitute the base layers of this system, and contain the traditional  ystem administrative capabilities.
Organizations can optionally add more layers to the system depending on the degree of flexibility they require. Role Based Access Control (RBAC) enables organizations to create roles based on specific job functions, and to assign these roles the appropriate permissions. With RBAC, administrative privileges and user access are determined by assigning individuals the appropriate roles.
Key features of RBAC include:

  • Delegated Administration – Enables system administrators to delegate some of their administrative privileges to individuals that manage a subset of the organization’s users.
  • Registration Processes – Enable organizations to provide end-users with a method for requesting various levels of access to the system, based on their eligibility.
  • Self-service Requests and Approvals – Enable end users to request initial access or additional access to the system by clicking on links embedded in a Web application.
1. Retain Time for Non-ATPable Items :
In the case of ATP enabled items, the timestamp will always schedule to 23:59:00 as ATP considers all the components and resources available till end of day.
In the case of non-ATPable items, the profile ‘MSC: Retain Time stamp for Non ATPABLE items’ is used.
If this is set to Yes, the timestamp can be saved to the value entered by the user.
The Profile can be set to either Yes or No.
MSC:Retain time for Non-ATPable items set to Yes
————————————————
ATP returns same time stamp as passed to ATP from the Request Date and Time, for all single lines
for non-atpable items or for all sets containing only non-atpable items.
If a set contains mix of atpaple and non atpable items, then ATP continues to return 23:59:00 as
the new timestamp.
MSC:Retain time for Non-ATPable items set to No
———————————————–
If the profile is set to ‘No’, then ATP will also return 23:59:00 as the time stam
2. OM: Add Customer

This profile enables user to allow customer in the create sales order window.
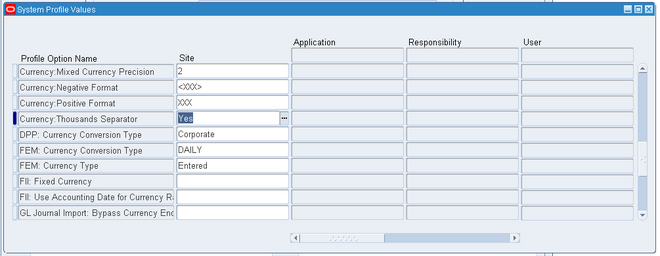
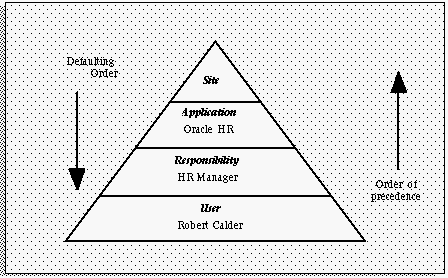
A user profile is a set of changeable options that affect the way your application runs. The system administrator can set user profiles at different levels:

Site level     These settings apply to all users at an installation site.
Application level     These settings apply to all users of any responsibility associated with the application.
Responsibility level     These settings apply to all users currently signed on under the responsibility.
User level     These settings apply to an individual user, identified by their application username.
Important Profiles
1.1. HR: Business Group
1.2  HR: Security Option
1.3: HR: User Type (FOR accessing HRMS functions)
1.4  HR: Cross Business Group

2.1. GL: Set of Books(11i)
2.1  GL:%Ledger%  (R12)

2.3  GL: Data Access Set. This profile option to control the ledgers that can be used by Oracle General Ledger.
3.1. MO: Operating Unit
3.2. MO: Security Profile (R12)
3.3. MO: Default Operating Unit
4.1 Tax: Allow Override of Tax Code
4.2 Tax: Invoice Freight as Revenue
4.3 Tax: Inventory Item for Freight


5.1 Sequential Numbering
5.2 INV: Intercompany Currency Conversion

6.1 RCV: Processing Mode – Batch, Immediate, Online
6.2
QA: PO InspectionOracle Purchasing , Oracle Quality
7.1 Hide Diagnostics menu entry
8.1 OE: Item Flexfield
This profile option indicates the structure of the Item Flexfield (System Items) used by Order Entry. This structure should be the same across all applications in the same database.
This profile option is visible and updatable at the site level.
8.2 OE: Item Validation Organization
This profile option indicates the Oracle Manufacturing organization against which items are validated. You must define all items that can be included in your transactions in this organization.
Set the OE: Item Validation Organization profile at the site level for the inventory organization whose master item number you want to use. This profile option indicates the organization that Receivables uses to validate items.
This profile option is visible and updatable at the site level.
Values set at a higher level cascade as defaults to the lower levels. Values set at a lower level override any default from a higher level. For profile options that need to differ at the operating unit level, including OE: Item Validation Organization, OE: Set of Books, and GL: Set of Books, you must set the values at the responsibility level. Oracle General Ledger windows use the GL Set of Books profile option to determine your current set of books. If you have different sets of books for your operating units, you should set the GL Set of Books profile option for each responsibility that includes Oracle General Ledger windows.
For profile options that need to differ at the set of books level, including Sequential Numbering, set the values at the responsibility level.
Profile options specify default values that affect system processes, system controls, and data entry. In a multiple organization
environment you may want to confine the effect to a specific operating unit. Therefore, you may want to change your profile options to be visible and updatable at the responsibility level.
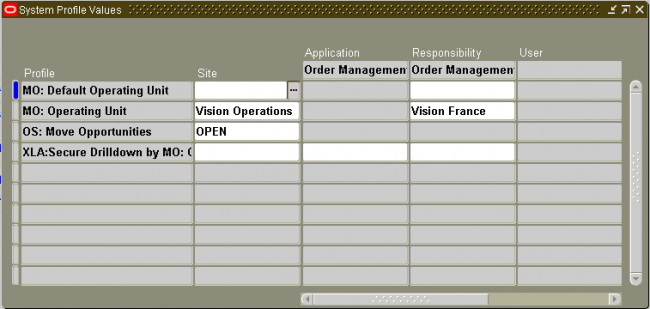
1. MO: Operating Unit = {the users Operating Unit name}
     This points the responsibility to the appropriate Operating Unit.
This the profile which holds the value of operating unit org_id when ever user login into system his org_id is  value is transfered to profile value base on this profile  we get data and put data from databaseUsed primarily in a multiorg environment.
     Set the site level to the desired default operating  unit.
     If there is more than 1 Operating Unit Defined, this profile option must be set at the responsibility level for each responsibility.
Example: Suppose we define a responsibility Purchasing Super User US . Then MO : Operating Unit at this responsibility level determines which Opertaing unit can this responsibility(or the user assigned to this responsibility) acess.


2. OE: Set of Books and GL: Set of Books

Each Responsibility is identified with a set of books using the profile option GL : Set of Books Name, a responsibility can only see the accounting information for that set of books in orcale GL.
3. HR: Business Group
Business Group that is linked to the security profile for a responsibility. This option is used online to control access to records that are not related to organization, position, or payroll.
This option is seeded at Site level with the start-up Business Group. It is view only. Values are derived from the HR:Security Profile user profile option.

HR:Security Profile     Restricts access to the organizations, positions, and payrolls defined in the security profile. This option is seeded at Site level with the view-all security profile created for the Startup Business Group.  The business group you define appears in the list of values when you set up the HR: Security Profile profile option.
Security Groups
Security groups are a method of partitioning data. When you use the standard HRMS security model, you do not use security groups. The business group is the only data partition. Responsibilities are linked to business groups. Therefore, to access different business groups, users must change responsibilities.
If you want one responsibility to be enabled for more that one business group, you must use Cross Business Group responsibility security. In this model, security groups are defined to partition data within a business group. Multiple security groups can then be linked to one responsibility, even if they partition different business groups. To use security groups you must set the user profile option Enable Security Groups to Yes and run the Multiple Security Groups process.
HR: Cross Business Group
In the Oracle HRMS model, the business group is at the country level and a top organization encompasses all business groups in a company worldwide. People, projects, jobs, and organizations can be located in different business groups for different countries and all information can be shared throughout the enterprise.
Oracle Projects allows the visibility of all business groups to one another. For example, you can search staff resources on projects across business groups, and charge any project across the enterprise for a resource.
You control access to single or multiple business groups by setting the profile option HR: Cross Business Group:
• Set the profile option to Yes to allow cross business group access.
• Set the profile option to No to allow only single business group access.

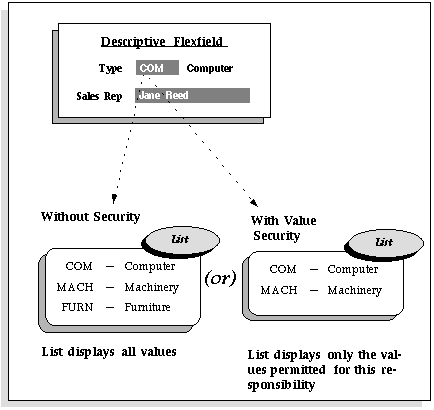
Flexfield Value Security gives you the capability to restrict the set of values a user can use during data entry. With easy-to-define security rules and responsibility level control, you can quickly set up data entry security on your flexfield segments and
report parameters.
Flexfield Value Security lets you determine who can use flexfield segment values and report parameter values. Based on your responsibility and access rules that you define, Flexfield Value Security limits what values you can enter in flexfield pop-up windows and report parameters. Flexfield Value Security gives you greater control over who can use restricted data in your application. When you use Flexfield Value Security, users see only values they are allowed to use; restricted values do not appear in lists of values associated with the flexfield or report parameter.


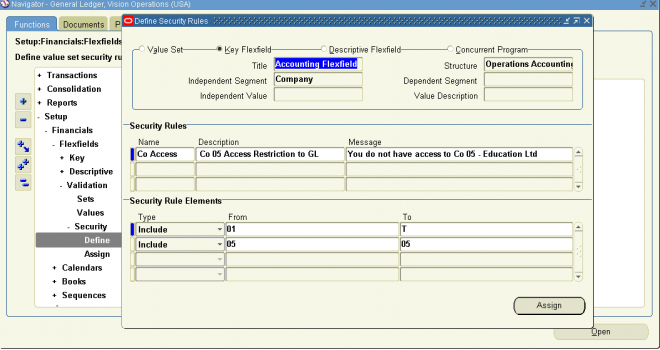
To define security rules

1. In the Segment Values block, identify the value set to which your values belong. You can identify your value set or by the flexfield segment or concurrent program parameter that uses the value set.
2. In the Security Rule region, enter a name and description for your security rule.
3. Enter a message for this security rule. This message appears automatically whenever a user enters a segment value that violates your security rule.
4. Define the security rule elements that make up your rule.
5. Save your changes.

Security Rule Elements

You define a security rule element by specifying a value range that includes both a low and high value for your segment. A security rule element applies to all segment values included in the value range you specify.
You identify each security rule element as either Include or Exclude, where Include includes all values in the specified range, and Exclude excludes all values in the specified range. Every rule must have at least one Include rule element, since a rule automatically excludes all values unless you specifically include them. Exclude rule elements override Include rule elements.
You should always include any default values you use in your segments or dependent value sets. If the default value is secured, the flexfield window erases it from the segment as the window opens, and the user must enter a value manually.
If you want to specify a single value to include or exclude, enter the same value in both the Low and High fields.
Minimum and maximum possible values
The lowest and highest possible values in a range depend on the format type of your value set. For example, you might create a value set with format type of Number where the user can enter only the values between 0 and 100. Or, you might create a value set with format type of Standard Date where the user can enter only dates for the current year (a range of 01-JAN-2001 to 31-DEC-2001, for example). For example, if your format type is Char, then 1000 is less than 110, but if your format type is Number, 110 is less than 1000. The lowest and highest possible values in a range are also operating system dependent. When you use a Char format type for most platforms (ASCII platforms), numeric characters are “less” than alphabetic characters (that is, 9 is less than A), but for some platforms (EBCDIC platforms) numeric characters are “greater” than alphabetic characters (that is, Z is less than 0). The window gives you an error message if you specify a larger minimum value than your maximum value for your platform.
If you leave the low segment blank, the minimum value for this range is automatically the smallest value possible for your segment’s value set. For example, if the value set maximum size is 3 and Right-justify and Zero-fill Numbers is checked, the minimum value is 000. However, if the value set has a maximum size of 3, has Numbers Only checked and Right-justify and Zero-fill Numbers unchecked, the minimum value is 0.
If you leave the high segment blank, the maximum value for this range is automatically the largest value possible for your segment’s value set. For example, if the value set maximum size is 3 and Numbers Only is checked, the maximum value is 999. However, if the value set maximum size is 5, and Numbers Only is checked, the maximum value is 99999.
Suggestion: Use blank segments to specify the minimum or maximum possible values for a range to avoid having operating system dependent rules.
Note that security rules do not check or affect a blank segment value (null value).
To define security rule elements
1. In the Security Rule Elements block, select the type of security rule element. Valid types are:
Include  Your user can enter any segment value that falls in the following range. 
Exclude  Your user cannot enter any segment value that falls in the following range. 
2. Enter the low (From) and high (To) ends of this value range. Your value does not have to be a valid segment value.
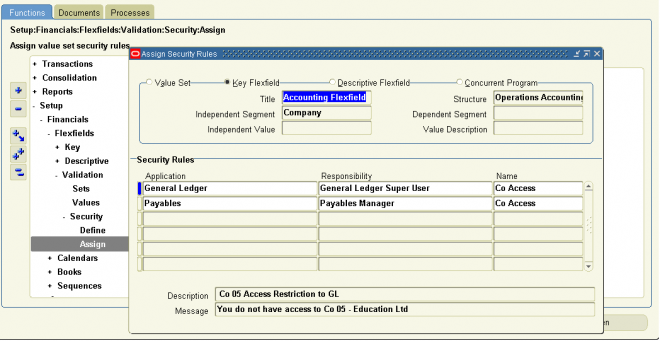
Assign security rules

1. Navigate to Assign Security Rules window.
2. In the Assign Security Rules block, identify the value set to which your values belong. You can identify your value set or by the flexfield segment or concurrent program parameter that uses the value set.
3. In the Security Rules block, enter the application and responsibility name that uniquely identifies the responsibility to which you want to assign security rules.
4. Enter the name of a security rule you want to assign to this responsibility.
5. Save your changes.