Requirement: change the Executable field into uppercase within the Concurrent Program Executable screen
Follow these steps to make the Executable field uppercase using CUSTOM.pll:
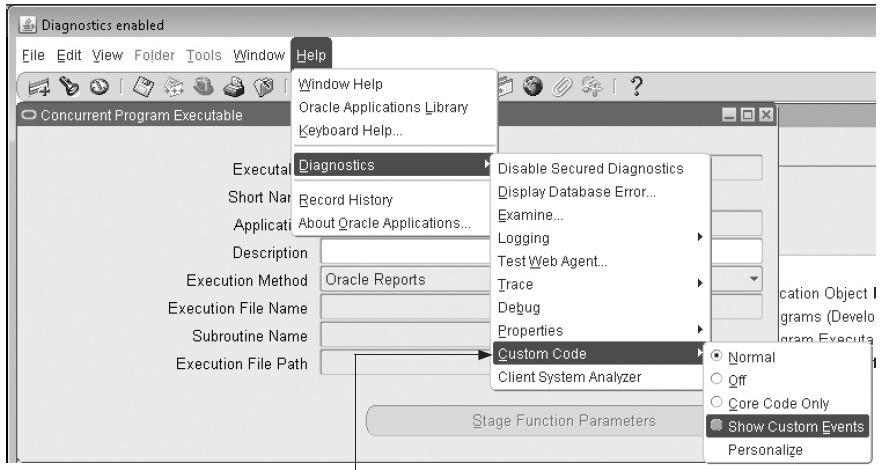
1. Enable show custom events: Log in to the Application Developer responsibility and enable Show Custom Events. Check the blog post for enabling custom events:
Custom events can be enabled through the below navigation:
Once you enable show custom events, oracle will display the name of each and every event that can be trapped using CUSTOM.pll. Using this technique, you can identify the custom event that you need to trap to achieve the desired result.
2. Gather information: A message box will appear when this form is opened, indicating that the form name is FNDCPMPE, the block name is FND_EXECUTABLES, the field name is USER_EXECUTABLE_NAME, and the event name is WHEN-NEW-FORM-INSTANCE. Note down the names of these components as these will be required in programming CUSTOM.pll. To double-check the name of field, navigate to the Executable field and use the Help/Diagnostics/Examine menu to see the name.
3. Write code in CUSTOM.pll: Open Oracle Forms Builder, highlight PL/SQL Libraries, and navigate from the menu to File | Open. Open the CUSTOM.pll file and expand the nodes. Within the node Attached Libraries, you will see FNDSQF and APPCORE2. Write your logic in a procedure called event, using the following sample syntax:
procedure event(event_name varchar2) is
form_name varchar2(30) := name_in(‘system.current_form’);
block_name varchar2(30) := name_in(‘system.cursor_block’);
begin
if form_name=’FNDCPMPE’ then
if event_name=’WHEN-NEW-FORM-INSTANCE’ then
app_item_property2.set_property(‘FND_EXECUTABLES.USER_EXECUTABLE_NAME’,CASE_RESTRICTION, UPPERCASE);
end if;
end if;
end event;
OR you can even write your extensions in a package.event(event_name) and call this procedure in package body of custom.event.
After making the programming changes to CUSTOM.pll, scroll down to the bottom of the package body Custom and make these changes to the version history of CUSTOM.pll:
This code should appear as a sublisting under #3fdrcsid(‘$Header: CUSTOM.pld 120.1 2009/03/03 18:43:00 appldev ship $’);
4. Transfer CUSTOM.pll to $AU_TOP/resource: Log in to the forms server and change the directory to $AU_TOP/resource. Ensure you have a backup of CUSTOM.pll either in the source control system or on the file system. Next, transfer CUSTOM.pll from your desktop to $AU_TOP/resource.
5. Generate CUSTOM.pll: Use the command frmcmp_batch, replacing the apps password with the relevant value on your system. After running this command, CUSTOM.plx will be created in $AU_TOP/resource:
cd $AU_TOP/resource
##For R12 use frmcmp_batch
frmcmp_batch module=CUSTOM.pll userid=apps/appspassword output_
file=./CUSTOM.plx compile_all=special module_type=LIBRARY
batch=yes
##For 11i Use f60gen command as shown below
f60gen module=CUSTOM.pll userid=apps/appspassword output_file=./
CUSTOM.plx module_type=LIBRARY
6. Test your changes: Log out and log back in to the Concurrent Program Executable screen. You will notice that it is no longer possible to enter the concurrent program executable name using lowercase letters.
Concepts: Using the Custom Library
Customizing Oracle E-Business Suite with the CUSTOM Library
The CUSTOM library allows extension of Oracle E-Business Suite without modification of Oracle E-Business Suite code. You can use the CUSTOM library for customizations such as Zoom (such as moving to another form and querying up specific records), enforcing business rules (for example, vendor name must be in uppercase letters), and disabling fields that do not apply for your site.
You write code in the CUSTOM library, within the procedure shells that are provided. All logic must branch based on the form and block for which you want it to run. Oracle E-Business Suite sends events to the CUSTOM library. Your custom code can take effect based on these events.
Important: The CUSTOM library is provided for the exclusive use of Oracle E-Business Suite customers. The Oracle E-Business Suite products do not supply any predefined logic in the CUSTOM library other than the procedure shells described here.
Writing Code for the CUSTOM Library
The CUSTOM library is an Oracle Forms Developer PL/SQL library. It allows you to take full advantage of all the capabilities of Oracle Forms Developer, and integrate your code directly with Oracle E-Business Suite without making changes to Oracle E-Business Suite code.
The as-shipped CUSTOM library is located in the AU_TOP/resource directory (or platform equivalent). Place the CUSTOM library you modify in the AU_TOP/resource directory in order for your code to take effect.
After you write code in the CUSTOM procedures, compile and generate the library using Oracle Forms. Then place this library into $AU_TOP/resource directory (or platform equivalent). Subsequent invocations of Oracle E-Business Suite will then run this new code.
Warning: If there is a .plx (compiled code only) for a library, Oracle Forms Developer always uses the .plx over the .pll. Therefore, either delete the .plx file (so your code runs directly from the .pll file) or create your own .plx file using the Oracle Forms compiler. Using the .plx file will provide better preformance than using the .pll file. Depending on your operating system, a .plx may not be created when you compile and save using the Oracle Forms Developer. Form Builder. In this case, you must generate the library using the Oracle Forms Developer compiler from the command line (using the parameter COMPILE_ALL set to Yes).
Be aware of the open form environment in which Oracle E-Business Suite operates. Also, each running form has its own database connection.
The following considerations and restrictions apply to the CUSTOM library and any libraries you attach to CUSTOM:
- You cannot use any SQL in the library. However, you can use a record group to issue SELECT statements, and you can use calls to stored procedures for any other DML operations such as updates, inserts, or deletes.
- Oracle Forms global variables in your code are visible to all running forms.
Altering Oracle E-Business Suite Code
Frequently you need to know the names of blocks and items within Oracle E-Business Suite forms for your CUSTOM logic. You should use the Examine feature available on the Help->Diagnostics menu while running the form of interest; it will give you easy access to all object names. You should not open Oracle E-Business Suite forms in the Oracle Forms Developer to learn this information.
You should exercise caution when changing any properties or values of items in the form from which CUSTOM logic is invoked.
The CUSTOM library is intended to be a mechanism to augment Oracle code with your own. Using the CUSTOM library to alter Oracle code at runtime may bypass important validation logic and may jeopardize the integrity of your data. You should thoroughly test all logic you add to the CUSTOM library before using it in a production environment.


Recent Comments