This document explains the basic setup needed to setup TDS for suppliers in R12.

Setup Steps
1. Pan Number at the Legal Entity level
When Legal Entity is created, enter the Pan Number in the “Pan” field. This field is mandatory for India territory.

2. Attach Inventory Organization in Location
Create the inventory organization and attach it with the location. Only those locations with inventory organization attached will appear in the location field of organization additional information form.

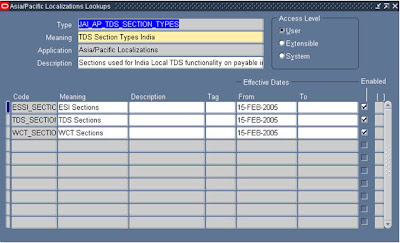
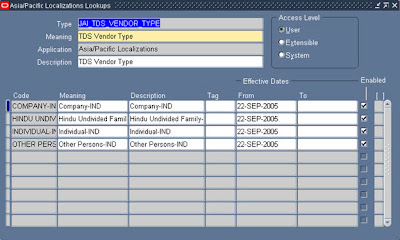
3. TDS Lookups (Seeded values)
We need to make sure that the following seeded values are available in Asis/Pacific Localization lookups.
  1. JAI_AP_TDS_SECTION_TYPES
  2. JAI_TDS_SECTION
  3. JAI_TDS_VENDOR_TYPE
  • TDS Vendor type is used for categorizing vendors from TDS perspective.
  • TDS Vendor type and TDS section code determines TDS rate and surcharge based on TDS thresholds defined
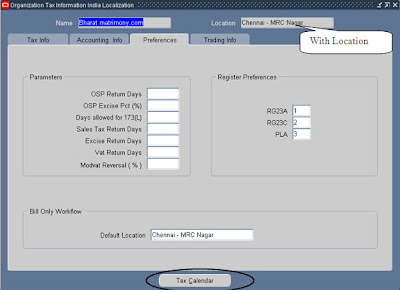
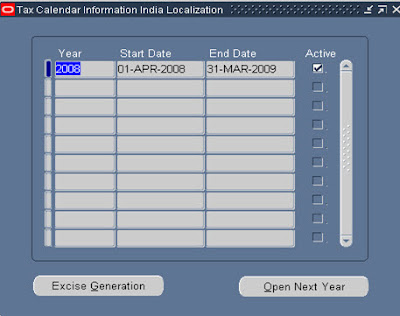
4. Create Organization Additional Information and Tax calendar for the organization
For all inventory organizations, additional localization information needs to be maintained.
  1. We need to define two records here for each organization, one with location and another without location.
  2. Excise details are mandatory for manufacturing organization
  3. For trading organization, excise tab details should not be filled and trading information tab should be entered.
  4. Pan No, Tan No, Ward No are currently redundant and not used
  5. Only one tax calendar can be active at a time.


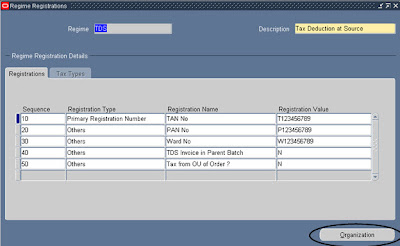
5. Create Regime Registration for TDS
Query the recode with Regime code as TDS. All the details except registration value in the registration tab will be defaulted. Enter appropriate registration value against the registration name. These details would get defaulted for the operating units and can be changed, if required.
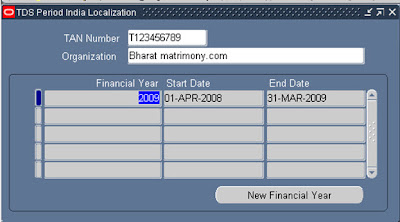

6. Enter TDS Period

We need to enter the TDS period for calculating the TDS amount for the period. TAN number will be available in the LOV only if regime registration is completed for TDS.

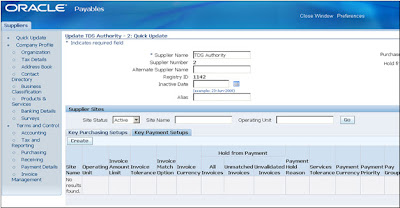
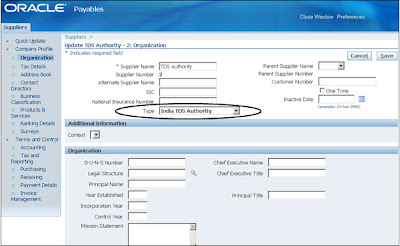
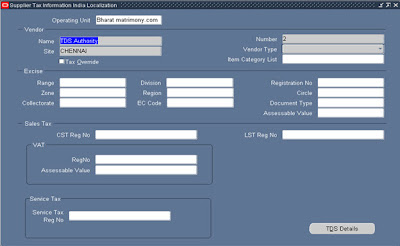
7. Create TDS Authority as Supplier
We need to create a supplier with supplier type as “India TDS Authority”. Enter all the mandatory fields like payment method, payment terms etc.
Other suppliers are entered as usual.
8. Create a Tax definition
We need to create different tax codes for different section codes and tax rates. Enter the basic percentage in the Percentage field and enter additional surcharge details. System will automatically calculate the total percentage. If any lower TDS is involved for certain forms like Form C, enter the certificate name and original tax percent.

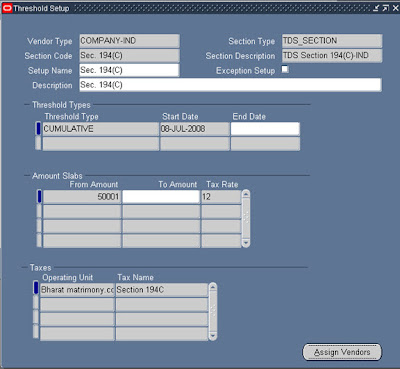
9. Create Threshold Setup
Threshold is defined for each section by TDS vendor type. Thresholds applicable to specific vendors are defined as exception setups and vendors are assigned manually to this setup.
There are two types of Thresholds
  1. Single – Applicable to a Single transaction
  2. Cumulative – In this case, TDS is applicable only when the cumulative purchases made from the supplier in one financial year exceeds specified limit i.e, Cumulative threshold amount.
Multiple thresholds with different tax rates may exist. For example, tax rate is 12 percent for the cumulative amount below 10L and tax rate of 12.24 percent for the cumulative amount above 10L.
Before cumulative threshold is reached, single invoice amount greater than the threshold limit for a single invoice attracts TDS at predefined rate
Threshold Amount = Total Invoice Amount – Total Invoice Cancelled Amount – Total Invoice Apply Amount + Total Invoice Unapply Amount


10. Create Supplier Additional Information

We need to add Pan Number, TAN number and TDS Details for each supplier. We should create two records for each supplier, one without supplier site and another with supplier site. Pan number should be confirmed at the supplier level and it can not be modified thereafter.
Enable invoice approval checkbox, if TDS invoice created for the supplier should be in approved status.
Enter the default TDS Section and/or Tax name, if TDS tax code should be automatically defaulted in the invoice for this supplier. Tax code defaulting logic is given below.
If default section and default tax name are not given in the supplier additional information and if tax name is not manually entered in the invoice, then TDS will not be calculated and no TDS invoice will be generated.


11. Review and Complete DFF and Profile Settings

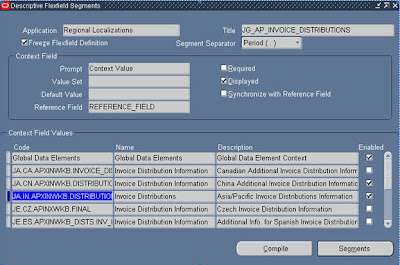
TDS tax code is now captured in Global Descriptive Flexfield in the invoice distribution screen. We need to make sure that the DFF JG_AP_INVOICE_DISRIBUTIONS is enabled.
Also define the following profile option values at the responsibility level
Profile Options
Values
JG: Application
Payables
JG: Product
Asia Pacific Localization
JG: Territory
India
The country used against the Legal entity / Operating unit has to be India
Invoice Transaction
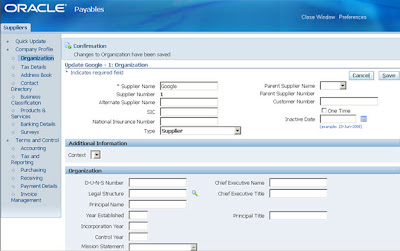
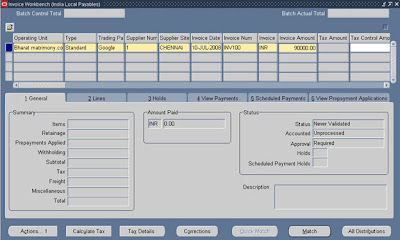
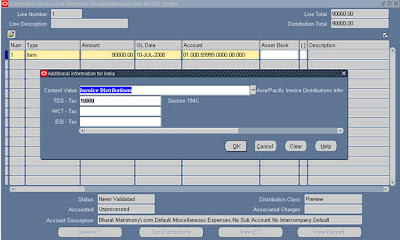
Let us now create an invoice for the “Google” supplier.
Invoice Amount – 90000
TDS Tax rate – 12% if the invoice amount is above 50001
Hence the TDS Invoice amount will be 90000 * 0.12 = 10800
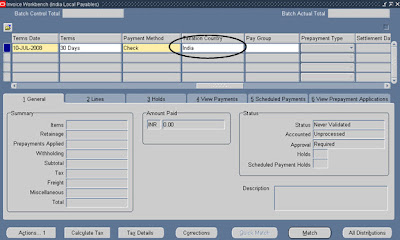
Make sure that the taxation country is defaulted as ‘India

As soon as the invoice distribution details are saved, the tax code ID is defaulted in DFF as shown below. The user can change the tax code, if required.
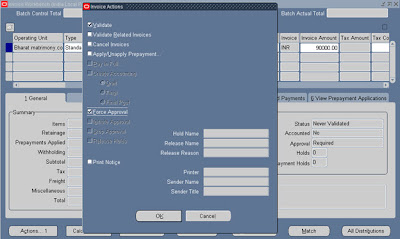
When the invoice is validated, system will run a concurrent program which will create TDS invoice (Credit Memo) for the supplier and another standard invoice for the TDS authority.

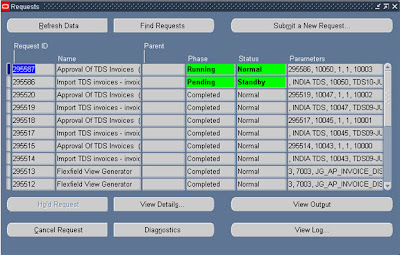
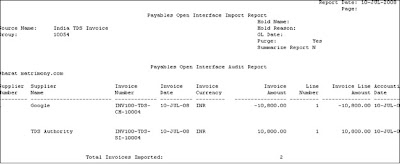
Click on ‘View Output’ for ‘Import TDS Invoices’ concurrent program to check for any errors. The report shows all the imported and error lines.
The invoice number format for the credit memo for the supplier and standard invoice for the TDS authority is given below
Supplier Credit Memo: (Original Invoice Number)-TDS-CM-(Serial Number)
Invoice for TDS Authority: (Original Invoice Number)-TDS-SI-(Serial Number)
References
  1. Oracle Financials for India – Implementation Guide
  2. Oracle Metalink Docs
Auto Invoice??
Auto Invoice is a tool that can be used to import and validate transaction data from other financial systems from which one can create invoices, debit memos, credit memos, and on-account credits. It rejects transactions with invalid information to insure the integrity of the data. This fits well with in Oracle ERP or to integrate with any third party application.

What Module data can be integrated?

Oracle Order Management
Oracle Project Accounting
Oracle services

To make fully functional what else required?
Loader program
Validation program

Top 10 reasons for using Auto Invoice
1. Powerful Interface Tool
2. Supports Oracle & Non-Oracle Systems
3. Import Large Amount of Data
4. Calculate or Import Tax
5. Group Lines & Invoices
6. Online Error Correction
7 .Lines Validation
8. Derive GL Date
9 .Import Flex fields
10.Import or Derive Accounting Info

What is inside AutoInvoice?

AutoInvoice is a tool consists of 3 main programs. Each program will have unique nature of work to do and they are called internally except Purge program whose execution is derived on the setup otherwise ready to execute stand alone.

Master (RAXMTR)
Import (RAXTRX)
Purge (RAXDEL)

1. Auto Invoice Master program RAXMTR

Selects and marks records in the interface tables to be processed based on the parameters the user entered and then calls the AutoInvoice Import program. Auto Invoice Master program has no report output.

•Gathers statistics, it means it gathers the stats on interface tables and set the stats on certain indices on interface tables
•Marks interface records for processing by marking request_id
•Submits multiple workers for Parallel Processing by creating instances for request.

2. Auto Invoice Import Program Validates the selected record and creates transaction if it passes validation. Any record that fails validation is left in the interface table with an error code. Depending on the setup, related records may be rejected as well. This program has an output file called Auto Invoice Execution report, which you can view by clicking the View Report button in the Requests window.

Working of Auto invoice 
Validates data
Inserts records
Deletes interface data
Only when system option purge set to ‘Y’

3. Auto Invoice Purge Program Deletes records from the interface tables. If you set the Purge Interface Table system option to No in Define System Option window, Auto Invoice does not delete processed records from the interface tables after each run,and we must submit Auto Invoice Purge Program periodically to clean up the interface tables. This program only deletes transaction lines that have been successfully imported.

•Deletes all rows where interface_status =‘P’

•Ra_interface_lines

•Ra_interface_distributions

•Ra_interface_salescredits

Oracle Receivable’s Auto Invoice program will be used to import and validate Invoices.

custom feeder program is required to transfer data from the Advantage extract files and populate the Auto Invoice interface tables (RA_INTERFACE_LINES_ALL and RA_INTERFACE_DISTRIBUTIONS_ALL).If there is need to run populate sales credit into RA_INTERFACE_SALESCREDITS_ALL table.

When run, AutoInvoice produces the AutoInvoice Execution Report and the AutoInvoice Validation Report.
Any entries which failed validation can be reviewed in Oracle Receivables’ AutoInvoice Interface Exceptions window. Depending on the error, changes may need to be made in Receivables, the feeder program or the imported records in the interface tables.

How Autoinvoice Execution works
Normally, Auto Invoice can be divided into three major phases

Pre-grouping: here the validates all of the line level data takes place
Grouping: groups lines based on the grouping rules and validates header level data
Transfer :validates information that exists in Receivables tables

What happen when AutoInvoice run?
Once the Auto invoice Program gets called, the following activity takes place is part of execution process. This can be analyzed by debug options.

Line, accounting, and sales credit information for each line populates 3 interface tables
Lines are ordered and grouped
Tax is calculated
GL date is determined
GL accounts are assigned using Auto Accounting
Tax, freight, commitments, and credit memos are linked to transaction lines
All transactions are batched
Validated lines are used to create the transaction

How Data is flowing?

Select, insert and update and delete take place on certain tables once it is logged out.

Selects
– RA_INTERFACE_LINES_ALL
– RA_INTERFACE_DISTRIBUTIONS_ALL
– RA_INTERFACE_SALESCREDITS_ALL

Updates/Insert

– RA_INTERFACE_ERRORS_ALL
– RA_CUSTOMER_TRX_ALL
– RA_CUSTOMER_TRX_LINES_ALL
– AR_PAYMENT_SCHEDULES_ALL
– AR_RECEIVABLE_APPLICATIONS_ALL

Inserts
– RA_INTERFACE_ERRORS_ALL

AutoInvoice Exception Handling
Records that fail validation are called ‘Exceptions’

Exceptions stay in Interface Tables which is RA_INTERFACE_ERRORS_ALL
Errors can be corrected in the Exception Handling window
Once corrections are made, Auto invoice must be resubmitted
Records that pass validation get transferred to Receivables tables

AutoInvoice Exception Handling Windows

-Interface Exception window displays exception messages associated with all invalid records
-Interface Lines window displays records that fail validation, provides an error message and can be used to correct the errors
-The Line Errors windows displays errors associated with a specific line, and can only be opened from Interface Lines window
-Interface Exceptions window displays Interface Id, Exception Type, Error Message and Invalid Value associated to the error
-Data cannot be edited in this window, but error can be viewed and corrected by clicking the Details button
-Error Message and Column name with invalid data are displayed in the Message column, and the invalid value that needs to be corrected is displayed in the Invalid Value column

Setup Steps [39]

1. Check GL Prerequisites 
2. Define Profiles 
3. Choose Set of Books 
4. Define Payment Terms 
5. Define Payables Lookups – Pay Group, Vendor Types, Source, TAX TYPE 
6. Define Tax Codes 
7. Define Financial Options
8. Define Payables Options 
9. Define Withholding Tax Groups 
10. Maintain Tax Certificates and Exceptions 
11. Define Tolerances 
12. Define Invoice Approvals 
13. Maintain Distribution Sets 
14. Define Automatic Payment Programs 
15. Define Payment Formats 
16. Define Payment Interest Rates 
17. Define Countries & Territories 
18. Set Up Bank Information 
19. Define Expense Report Template 
20. Run Template Update Script 
21. Define Locations 
22. Enter Employees 
23. Define Reporting Entities 
24. Define Income Tax Regions 
26. Set Up Aging Periods 
27. Define Special Calendars

28. Define Report Sets 
29. Control Period Statuses 
30. Implement Sequential Numbering 
31. Descriptive Flexfields
32. Enter Suppliers 
33. Assigning Benefits Defaults
34. Set-up P-Card for Procurement 
35. Define Recovery Rules 
36. Define Tax Groups 
37. Define Reporting Rules (Regional Localizations) 
38. Define VAT Registers (Regional Localizations) 
39. Define Bank Charges 

Step 1 [Oracle Required / ERP Required]
Check GL Prerequisites
Level: Enterprise &Operating Unit
Purpose: To define AP system guidelines to control how AP works.

Step 2 [Oracle Required / ERP Required]
Define Profiles 

Level: Enterprise

Change responsibility to System Administrator
Navigator: Profile > System
Purpose: To set profile options.

Step 3 [Oracle Required / ERP Required]

Choose Set of Books

Level: Operating Unit

Change responsibility to Payables Manager

Navigator: Setup > Set of Books > Choose
Purpose: This is to ensure AP can use the accounting calendar for day to day transactions.

Step 4 [Oracle Required / ERP Required ]

Define Payment Terms 

Level: Enterprise
Navigator: Setup > Invoice > Payment Terms
Purpose: Define payment terms to reflect the way your business is done

Step 5.1 [Oracle Required / ERP Required]
Define Payables Lookups – Pay Group

Level: Enterprise
Navigator: Setup > Lookups > Purchasing
Purpose: Create and maintain Lookups for PAY GROUP. Create additional lookups as business requires.

Step 5.2 [Oracle Required / ERP Required]

Define Payables Lookups – Vendor Types

Level: Enterprise
Navigator: Setup > Lookups > Purchasing
Purpose: Create and maintain Lookups for VENDOR TYPE – this step is already completed for standard Oracle Vendor Types.

Step 5.3 [Oracle Required / ERP Required]
Define Payables Lookups – Source 

Level: Enterprise
Navigator: Setup > Lookups > Payables
Purpose: Create and maintain Lookups for SOURCE – this step is already completed for standard Oracle Source Types.

Step 5.4 [Oracle Required / ERP Required]
Define Payables Lookups – TAX TYPE 

Level: Enterprise
Navigator: Setup > Lookups > Payables
Purpose: Create and maintain Lookups for TAX TYPE – this step is already completed for standard Oracle Tax Types.

Step 6 [Oracle Optional / ERP Mandatory ]

Define Tax Codes 

Level: Operating Unit
Navigator: Setup > Tax > Codes
Purpose: To define the taxes used to record invoice taxes paid to vendors and to tax authorities

Step 7 [Oracle Required / ERP Required ]
Define Financial Options 

Level: Operating Unit
Navigator: Setup > Options > Financials
Purpose: Define the options and defaults used throughout Oracle Applications such as Accounts Payable, Purchasing, and Assets. Defaults can be overridden at the time thevendors, employees and other information are entered.

Step 8 [Oracle Required / ERP Required]

Define Payables Options

Level: Operating Unit
Navigator: Setup > Options > Payables
Purpose: Set control options and defaults used throughout, the system of AP, which will simplify vendor entry, invoice entry, and initiating automatic payment processing.
Defaults can be overridden at the time that vendors, invoices, expense report, or payments are entered.

Step 9 [Oracle Optional / ERP Optional]

Define Withholding Tax Groups

Level: Operational
Navigator: Setup > Tax > Withholding > Groups
Purpose: To define a Withholding Tax Group to be used to assign one or more Withholding Tax type tax names to an invoice or distribution line. Must use this form if there is more than one Withholding Tax type tax name to a tax group, otherwise choose Yes in the Create Tax Group in the Withholding Tax Details region of the Define Tax Names form.

Step 10 [Oracle Optional / ERP Required]
Maintain Tax Certificates and Exceptions

Level: Operational
Navigator: Setup > Tax > Withholding > Certificates
Purpose: Define a Withholding Tax type tax name rate exception for a vendor site. Define a certificate to specify a rate exception for the Withholding Tax type tax name for all invoices of a vendor site.

Step 11 [Oracle Optional / ERP Required ]

Define Tolerances

Level: Operating Unit
Navigator: Setup > Invoice > Tolerances
Purpose: Define the matching and tax tolerances to be used to allow for variances between invoice, purchase order, receipt, and tax information. Tolerances determine whether or not the system places matching or tax holds on an invoice during the AutoApproval process.

Step 12 [Oracle Optional / ERP Required ]

Define Invoice Approvals

Level: Enterprise
Navigator: Setup > Invoice > Hold and Release Names
Purpose: Define the invoice approval codes that are used to hold or release invoice payments. Oracle has many seeded values. Use this form to add any additional approval codes that you will need to run your business.

Step 13 [Oracle Optional / ERP Optional ]

Maintain Distribution Sets

Level: Operating Unit
Navigator: Setup > Invoice > Distribution Sets
Purpose: Create and maintain Distribution Sets. Distribution Sets are used to facilitate invoice entry by reducing or eliminating manual entry of invoice distribution lines.

Step 14 [Oracle Required / ERP Required ]

Define Automatic Payment Programs

Level: Enterprise
Navigator: Setup > Payment > Programs
Purpose: Define and view payment programs that are used to create payment documents such as check, or electronic funds transfers (EFT).

Step 15 [Oracle Required / ERP Required]

Define Payment Formats

Level: Enterprise
Navigator: Setup > Payment > Formats
Purpose: Define the payment formats needed to create payment documents

Step 16 [Oracle Optional / ERP Required ]
Define Payment Interest Rates

Level: Enterprise
Navigator: Setup > Payment > Interest Rates
Purpose: Define the interest rate the system uses to calculate and pay interest on overdue invoices.

Step 17 [Oracle Optional / ERP Required]
Define Countries & Territories

Level: Enterprise
Navigator: Setup > Countries
Purpose: Define the interest rate the system uses to calculate and pay interest on overdue invoices.

Step 18 [Oracle Required/ERP Required ]
Set Up Bank Information

Level: Operating Unit WAVE 1 and 2 SITES ONLY!!
Navigator: Setup > Payment > Banks
Purpose: To enter bank branches, bank accounts, and payment documents for your set of books. If you are a Titan site, please refer to the COS/Titan/Financials AP Setup Document for details on mandatory bank setup for use with Titan. Any other additional banks can be defined here.

Step 19 [Oracle Optional / ERP Optional]
Define Expense Report Template

Level: Operating Unit
Navigator: Setup > Invoice > Expense Report Templates
Purpose: To define expense report templates.

Step 20 [Oracle Optional / ERP Optional ]

Run Template Update Script

Level: Operating Unit
Purpose: To set the includes tax flag on the custom expense report templates created using dataload.

Step 21 [Oracle Optional/ERP Required]

Define Locations

Level: Enterprise
Navigator: Employees > Locations
Purpose: Enter each physical site where employees work, and/or addresses for other organizations

Step 22 [Oracle Required / ERP Required ]

Enter Employees

Level: Operating Unit
Navigator: Employees > Enter Employees
Purpose: Enter, maintain, and view basic personal employee information and addresses. Can only use this form if Oracle HRMS is not fully installed.

Step 23 [Oracle Optional / ERP Optional ]

Define Reporting Entities

Level: Operating Unit
Navigator: Setup > Tax > ReportingEntities
Purpose: Define as many reporting entities as your business needs. A reporting entity is any person or organization that has a unique Tax Identification Number (TIN).

Step 24 [Oracle Optional / ERP Optional ]

Define Income Tax Regions

Level: Operating Unit
Navigator: Setup > Tax > Regions
Purpose: Define tax regions if using 1099 Combined Filing Program Reporting. This is only applicable to the US.

Step 26 [Oracle Required / ERP Required ]

Set Up Aging Periods

Level: Enterprise
Navigator: Setup > Calendar > Aging Periods
Purpose: Define the aging periods to use for the Invoice aging Report

Step 27 [Oracle Optional / ERP Optional ]

Define Special Calendars

Level: Enterprise
Navigator: Setup > Calendar > Special Calendar
Purpose: Define period types which the system uses for special functions such as Key Indicator Reporting, recurring payment, period definitions, or period-to-date reporting for withholding taxes. This is completely separate from the periods defined in the Accounting Calendar window for the AP Accounting periods.

Step 28 [Oracle Optional / ERP Optional ]

Define Report Sets

Level: Operating Unit – operational specific to user and country
Navigator: Other > Requests > Set
Purpose: Define and maintain private report sets. A report set consists of reports that you specify to run as a group, either one at a time in order (sequential), or at the same time in any order (parallel). You can view and update your private report sets. Private reports sets are report sets with a defined owner.

Step 29 [Oracle Required / ERP Required ]

Control Period Statuses

Level: Operating Unit – operational – initial set-ups must show the current period all future periods are controlled within country.
Navigator: Accounting > Control Payables Periods
Purpose: Change and review the status of the accounting periods in AP or your set of books.

Step 30 [Oracle Optional / ERP Optional ]

Implement Sequential Numbering

Level: Operating Unit

Change Responsibility to Sysadmin

Navigator:
Purpose: Assigns sequential numbers as voucher numbers to the invoices and payments created. A voucher number is a unique reference to an invoice or payment.
Must be completed by an associate with a System Administrator responsibility.

Step 31 [Oracle Optional / ERP Optional ]

Descriptive Flexfields

Level: Enterprise
Navigator: Setup > Flexfields > Descriptive > Segments

Step 32 [Oracle Required / ERP Required ]

Enter Suppliers

Level: Operating Unit

Change Responsibility to Payables Manager

Navigator: Suppliers > Entry
Purpose: Enter vendors, vendor sites, and vendor site contacts. Define multiple vendor sites for each vendor and multiple personal contacts for each vendor site.

Step 33 [Oracle Optional / ERP Required]

Assigning Benefits Defaults

Level: Enterprise
Navigator: Setup > Organizations
Purpose: To add a default value of NCR Payroll Default to the Setup Business Group organization

Step 34 [Oracle Optional / ERP Required] — for countries with multiple taxes on a single expense receipt

Set-up P-Card for Procurement
Level: Inventory Org
Navigator: Suppliers > Entry
Purpose: To enable the use of Procurement Cards In order to use P-Cards for Internet Procurement, you must check the box for ‘Procurement Card’ by site under the General Tab.

Step 35 [Oracle Optional / ERP Required] — for countries with multiple taxes on a single expense receipt

Define Recovery Rules

Level: Operating Unit
Navigator: Setup > Tax > Recovery Rules (MUST BE DONE PRIOR TO TAX CODES (STEP 6)
Purpose: Use a tax recovery rule if the recovery rate varies or there are multiple tax rates on a single receipt or invoice, depending on the following distribution attributes: Distribution account, Invoice date, or Condition (for example, supplier type)

Step 36 [Oracle Optional / ERP Required] — for countries with multiple taxes on a single expense receipt

Define Tax Groups
Level: Operating Unit
Navigator: Setup > Tax > Groups
Purpose: Use the Tax Groups window to group multiple, conditional taxes. Tax groups let countries with multiple taxes automatically calculate each applicable tax within Payables, Receivables and Oracle Order Management.

Step 37 [Oracle Required / ERP Required ]

Define Reporting Rules (Regional Localizations)

Level: Operating Unit

Change Responsibility to Belgian AP Localizations

Navigator: VAT > Reporting Rules

Purpose: OU specific VAT reporting rules. Load the rules using the dataload sheet attached.

Step 38 [Oracle Required / ERP Required ]

Define VAT Registers (Regional Localizations)

Level: Operating Unit
Change Responsibility to Italian AP Localizations

Navigator: VAT Register
Purpose: OU specific VAT registers. Enter the 4 different VAT Registers.

Step 39 [Oracle Required / ERP Required]

Define Bank Charges

As Payables Manager responsibility

Level: Operating Unit
Navigator: Setup > Payment > Bank Charges
Purpose: OU specific bank charges. Enter the bank charge transfer rules as documented below.

Q:  What formula should I use to balance AP to GL? 
A:  Use the following as an example of how to balance. In this example, you are closing your accounting period for April and you have just posted your final invoice and payment batches to your general ledger system.

To reconcile your accounts payable activity for April, make the following calculation:“Accounts Payable Trial Balance” as of March 31+   “Posted Invoice Register” for the period between April 1 and April 30–    “Posted Payment Register” for the period between April 1 and April 30

=   “Accounts Payable Trial Balance” as of April 30 
Reconciling AP to GL is accomplished with the use of the following reports.
“Posted Invoice Register”
“Posted Payment Register”
“Accounts Payable Trial Balance” (current and last period)
These reports ensure that your Trial Balance accurately reflects your accounts payable liability by matching the Posted invoices and payments with the AP liability account. You can also compare your AP liability accounts to GL by doing a query of the accounts in GL to identify the account or accounts out of balance. The trial balance total should be the same as your GL liability account.
If not:

Run the GL “Account Analysis” report for the liability account and for the date range in question. Look for transactions with a source other than Payables. This can quickly pinpoint any transactions incorrectly charged to the account. Make sure that you have not made manual journal entries to your liability account in General Ledger.When you identify the accounts you go back to AP and do a query on the account to find the invoices out of balance.

The last step is to create a journal entry in GL to balance the account or accounts that is out of balance.

Q: How is the as-of-date used in the “Accounts Payable Trial Balance” report? 

A: The as-of-date is used to determine which invoices and payments should be included on the report.  Any invoices or payments with an accounting date AFTER the entered as-of-date will not be displayed on this report. 

How many types of Invoices we can create in Oracle Payables?
A. Standard
B. Debit Memo
C. Credit Memo
D. Pre-Payment
E. Expense Report
F. Withholding Tax Invoice
G. Miscellaneous Invoice
Describe the 4-Way Matching?
2 – Way Matching: The Invoice Amount Should match with PO, (Invoice with PO)
3 – Way Matching: The Receipts Should match with Invoice, (Invoice, PO with Receipts)
4 – Way Match: The Goods Should match with Inspection/Accepted (Invoice, PO, Inspections & Receipts)
2-Way (Invoice to Purchase Order)
Quantity billed vs. quantity ordered on shipment line
Invoice unit price vs. purchase order line unit price
3-Way (Invoice to Purchase Order and Receipt)
2-Way match criteria AND
Quantity billed vs. quantity received
Item = Receipt Required
4-Way (Invoice to Purchase Order and Receipt and Inspection)
3-Way match criteria AND
Quantity billed vs. quantity accepted
Note: Quantity accepted = (Quantity received – quantity rejected)
Item = Inspection Required
How many Holds we have?
System Holds: Tax, Quantity Match, Po amount with Invoice Amount
Manual Holds: Invoice Limit, Hold on Invoice
Can you Release Manual Holds? If Yes, How?
Yes. Holds – Release Holds
How many ways you can pay the Invoice Amount?
Apply in Full
Schedule Payments
Installments
What is the difference between Debit and Credit Memo?
Debit Memo will raise the Customer
Credit Memo will raise the Vendor
Can you create a Duplicate Vendor ?
No
Vendor Number Should be Generate Automatic or Manually?
Both, Manual And Automatic
How many key flexfields are there in Payables?
No key flexfields in PO,AP

What are Payment Terms?
Payables uses payment terms to automatically calculate due dates, discount dates, and discount amounts for each invoice you enter. Payment terms will default from the supplier site. If you need to change the payment terms and the terms you want to use are not on the list of values, you can define additional terms in the Payment Terms window.
What are the Payment Methods available?
• Check – You can pay with a manual payment, a Quick payment, or in a payment batch.
• Clearing – Used for recording invoice payments to internal suppliers.
• Electronic – You generate an electronic payment file that you deliver to your bank to create payments. Use Electronic if the invoice will be paid using EFT or EDI.
• Wire – Used to manually record a wire transfer of funds between your bank and your supplier’s bank.
What are the line types of an Invoice?
Item: Item lines capture the details of the goods and services billed on your invoice.
Freight: Freight lines capture the details of your freight charges.
Miscellaneous: Miscellaneous lines capture the details of other charges on your invoices such as installation or service.
Tax: Payables integrates with Oracle E-Business Tax to automatically determine and calculate the applicable tax lines for your invoices.
What are the Invoice Distribution Types?
Item
Freight
Miscellaneous
Tax
Withholding
Prepayment
What are Holds in AP?
Holds can be placed by the system and some holds can be placed manually. Holds prevent payment and, sometimes, accounting of an invoice. Payables applies holds to invoices that fail the Invoice Validation process. Release holds from invoices to allow payment and accounting entry creation for the invoices.
What are the Interface Tables in AP?
AP_INVOICES_INTERFACE
AP_INVOICE_LINES_INTERFACE
AP_INTERFACE_CONTROLS
————————————–
AP_SUPPLIERS_INT
AP_SUPPLIER_SITES_INT
AP_SUP_SITE_CONTACT_INT
AP_SUPPLIER_INT_REJECTIONS
What is the API to cancel single AP Invoice?
AP_CANCEL_PKG.AP_CANCEL_SINGLE_INVOICE
What is the API to find invoice status?
AP_INVOICES_PKG.GET_APPROVAL_STATUS
Give some of the Oracle Payables interface?
a) Credit Card Transaction Interface
b) Invoice Import Interface
c) Payables Open Interface
d) Purchase Order Matching
What are the key tables where supplier bank information are stored?
IBY_EXTERNAL_PAYEES_ALL
IBY_EXTERNAL_PAYERS_ALL
IBY_EXT_BANK_ACCOUNTS
IBY_PMT_INSTR_USES_ALL
What is meant by with-holding tax invoice?
A separate tax invoice generated for withholding tax amount. Later this invoice will be knocked of when making the payment made to the authority.
What are all the Modules Interacting with AP?
Cash Management
Oracle iExpenses
General Ledger
Oracle Assets
Subledger Accounting (R12)
HRMS
Project Accounting
Purchasing/iprocurement
Global Accounting Engine (11i)
What are the mandatory setups in AP?
1- Financial Options
2- Define Suppliers
3- Define Payment Terms
4- Define Payment Methods
5- Define Banks and Banks Accounts And Banks Accounts Documents
6- Open AP Accounts Periods
What is pay date basis?
The Pay Date Basis for a supplier determines the pay date for a supplier’s invoices.
• Due
• Discount
What is the difference between quick payment and manual payment?
Quick Payment: It allows you to make a single payment against one or more invoices at a time to one supplier through payables.
Manual Payment: This is the process of entering the check details which has been paid manually in some emergency requirements into the payment form and selecting the invoices of the concerned supplier and check whether the total of the invoices and the paid amount at the header are same and save.
What is terms date basis?
Terms Date Basis is to calculate due date.
Due date is calculated 4way. Eg: payment term is 30days
  • Due date = Sysdate + 30days
  • Due date = Invoice date + 30days
  • Due date = Goods Receive Date + 30days
  • Due date = Invoice Received date + 30days
How you will transfer payables to general ledger?
When the payable accounting entries are created, then run the program called ‘Payables Transfer to GL’ Program, which sends the invoice entries and payable entries to GL interface. Then submit a request called Journal import to import journal entries to GL.
What are Aging Periods?
Aging periods are nothing but the periods that we setup to control and maintain the supplier outstanding bill towards the invoice. From this we can able to study the due date of the supplier form the generation of invoice.
What is a “Mixed” Invoice and how do I enter one?
Mixed Invoices are invoices or credit/debit memos for which you can perform both positive and negative matching to purchase orders and to other invoices.
For example, you can enter an invoice for -$100 with Invoice Type Mixed. You can match to an invoice for $-200, and match to a purchase order for $100.
To enter a Mixed invoice:
1. Enter the invoice or credit/debit memo in the Invoices Summary, and enter Mixed as the invoice Type. You can enter either a positive or negative invoice amount.
2. Match to purchase orders, and/or invoices.