Developing XML Publisher Report – Using Data Template as Data Source
Background:
Developing XML Publisher Report – Using Data Template(.xml) as Data Source and Template(.rtf) as Layout.
Note that, we can use .rdf file as data source. But for this demo we are using Date XML Template.
 Prerequisite for the below Example:
1. Create a table
CREATE TABLE demo_products
( product_code NUMBER,
product_name VARCHAR2 (100));
2. Insert Values
INSERT INTO demo_products
VALUES (569, ‘Oracle Cost Management’);
3. Issue Commit
Step1: Define Data Template:
The data template is the method by which you communicate your request for data to the data engine.
The data template is an XML document that consists of four basic sections:
- Define parameters: In which parameters are declared in child <parameter> elements
- Define triggers:
- Define data query: In which the SQL queries are defined in child <sqlStatement> elements
- Define data structure: In which the output XML structure is defined
Create Data Template: (Save this file as XXDPDT.xml)
<?xml version=”1.0″ encoding=”UTF-8″?>
<dataTemplate name=”demoProductsDT” description=”Demo Products Details” version=”1.0″>
<parameters>
<parameter name=”p_product_id” datatype=”number”/>
</parameters>
<dataQuery>
<sqlStatement name=”DQ”>
<![CDATA[ SELECT product_code, product_name FROM demo_products
WHERE product_code = NVL(:p_product_id,product_code) ]]>
</sqlStatement>
</dataQuery>
<dataStructure>
<group name=”G_DP” source=”DQ”>
<element name=”PRODUCT_CODE” value=”product_code”/>
<element name=”PRODUCT_NAME” value=”product_name”/>
</group>
</dataStructure>
</dataTemplate>
- This Data Template selects the product details from the demo_products table. It uses a bind parameter to find the product name against the product code.
- For each bind parameter in the query , we need to define a Parameter in the Concurrent Program
Step 2: Create Data Definition & Associate with Data Template
Navigation: XML Publisher Administrator -> Data Definitions -> Create Data Definition
Screen 1 : Create Data Definition
Enter the data definition Details and click on Apply. Note down the Code.
The code should be used as the short name of the concurrent program.
 Screen 2: Associate Data Template
View Data Definition
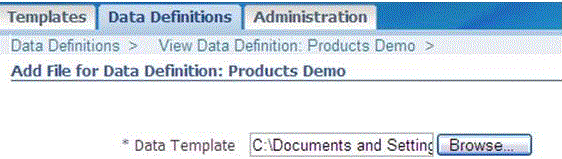
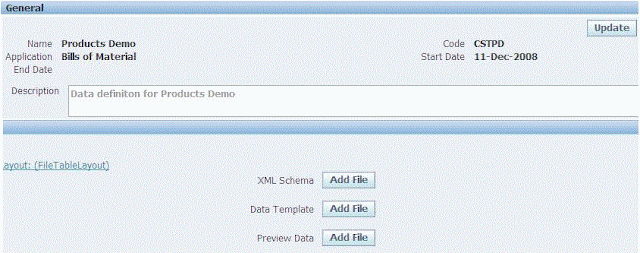 Click on ‘Add File’ button to upload Data Template file that was created through step 1
 Screen 3: Data Definiton
Data Template is associated with Data Definition
 Step 3: Define a Concurrent Program to generate the Data XML output.
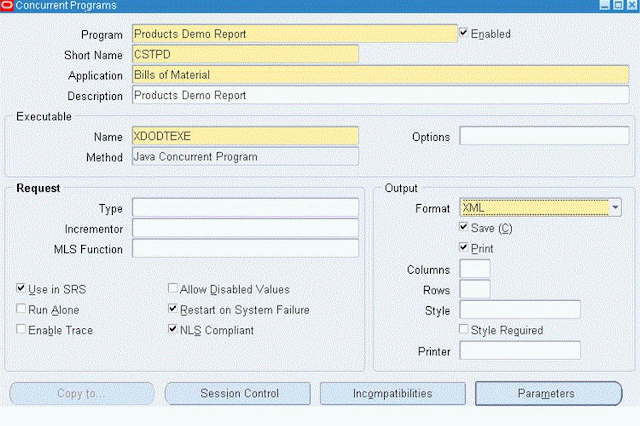 Note:
1. Output format should be XML
Note:
1. Output format should be XML
2. Short Name in the concurrent program and Code in the data definition should be same.
Screen 2: Concurrent Program – Parameters
For each parameter in the Data Template, define a parameter in the concurrent program.
The Data Template parameter name should match the concurrent program parameter token
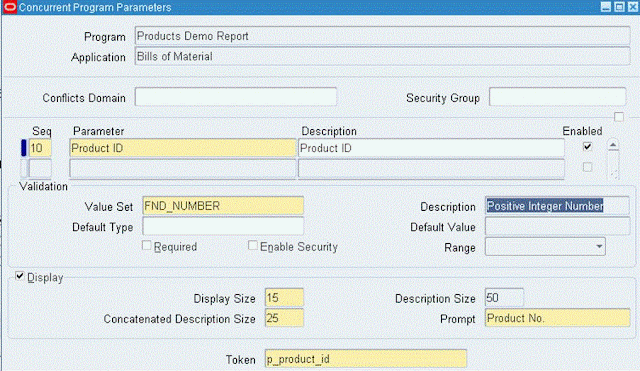 Note:
Token is p_product_id. This is the bind parameter we have used in date template. For every bind parameter used in the data template, we have to define parameter in the concurrent program.
Screen 3: Associate the Concurrent Program to a request group.
Note:
Token is p_product_id. This is the bind parameter we have used in date template. For every bind parameter used in the data template, we have to define parameter in the concurrent program.
Screen 3: Associate the Concurrent Program to a request group.
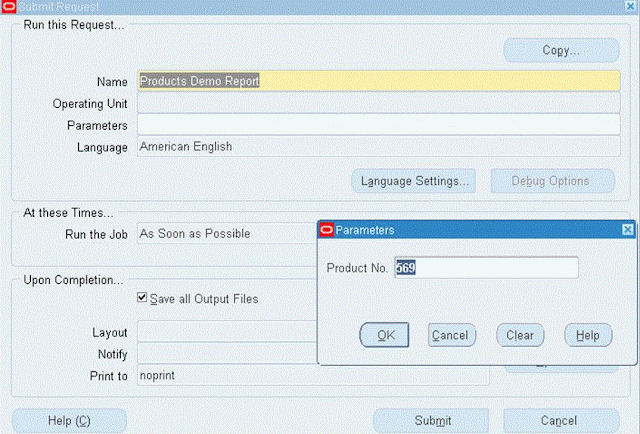
 Screen 4: Execute the concurrent program “Product Demo Report”and click on the output button get the Data XML. Save the XML file. We will use it to generate the RTF Template.
 Screen 5: Concurrent Program Output
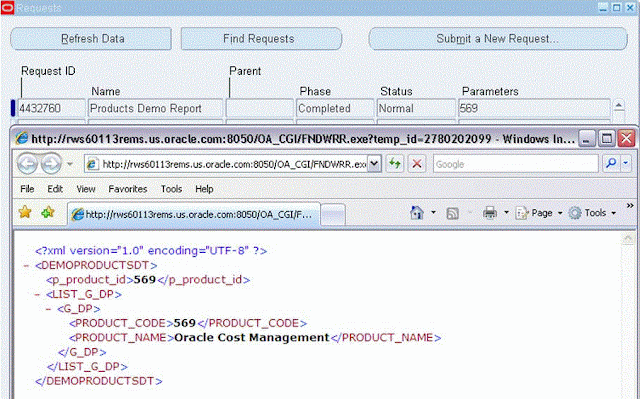 Note:
We are getting the output in xml because we didn’t define template & associated yet.
Step 4: Define the RTF Template using the Generated Data XML
Note:
We are getting the output in xml because we didn’t define template & associated yet.
Step 4: Define the RTF Template using the Generated Data XML
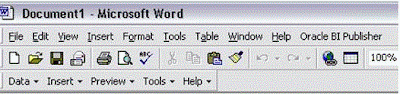
Pre-requisite : Install XML Publisher Desktop
After installation following Menus & Toolbars gets added to the MS Word.
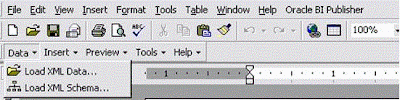
 Load XML Data generated by Concurrent Program
Data -> Load XML Data
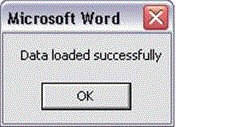
 Message after loading the data
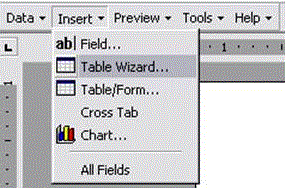
 Using the Table Wizard as below to create the ‘Table Report Format’ with the columns of demo_products.
Final Output layout look like this.
 Save this file with .rtf extension
Step 5: Registering the Template with BI Publisher
Navigation: XML Publisher Administrator -> Templates -> Create Template
Save this file with .rtf extension
Step 5: Registering the Template with BI Publisher
Navigation: XML Publisher Administrator -> Templates -> Create Template

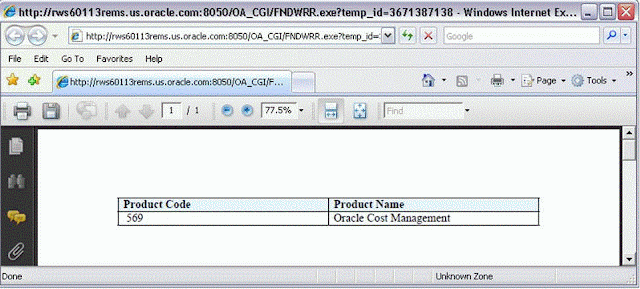
Step 6: Run the concurrent program to see the output
Note:
As already mentioned output format can be anything. Here it is pdf. We can select format that we want at the runtime.
References:
http://www.oracle.com/technology/products/xml-publisher/index.htm
http://www.oracle.com/technetwork/middleware/bi-publisher/overview/index.html
http://xdo.us.oracle.com
Oracle® XML Publisher Administration and Developer’s Guide
FAQ:
What is XDODTEXE used in the Executable section of Concurrent Program?
XDODTEXE is a BI Publisher Data Template Executable. The purpose of this executable is to identify data template file (.xml) and execute the data template to generate the raw xml data, that later can be used by BI Publisher formatting engine to format as as per the layout (RTF, PDF etc).
This executable will be used by all the BI Publisher reports (Concurrent Program) which are using Data Template to generate the xml data.
Developing XML Publisher Report – Using Data Template(.xml) as Data Source and Template(.rtf) as Layout.
Note that, we can use .rdf file as data source. But for this demo we are using Date XML Template.
CREATE TABLE demo_products
( product_code NUMBER,
product_name VARCHAR2 (100));
2. Insert Values
INSERT INTO demo_products
VALUES (569, ‘Oracle Cost Management’);
3. Issue Commit
Step1: Define Data Template:
The data template is the method by which you communicate your request for data to the data engine.
The data template is an XML document that consists of four basic sections:
- Define parameters: In which parameters are declared in child <parameter> elements
- Define triggers:
- Define data query: In which the SQL queries are defined in child <sqlStatement> elements
- Define data structure: In which the output XML structure is defined
<dataTemplate name=”demoProductsDT” description=”Demo Products Details” version=”1.0″>
<parameters>
<parameter name=”p_product_id” datatype=”number”/>
</parameters>
<dataQuery>
<sqlStatement name=”DQ”>
<![CDATA[ SELECT product_code, product_name FROM demo_products
WHERE product_code = NVL(:p_product_id,product_code) ]]>
</sqlStatement>
</dataQuery>
<dataStructure>
<group name=”G_DP” source=”DQ”>
<element name=”PRODUCT_CODE” value=”product_code”/>
<element name=”PRODUCT_NAME” value=”product_name”/>
</group>
</dataStructure>
</dataTemplate>
- This Data Template selects the product details from the demo_products table. It uses a bind parameter to find the product name against the product code.
- For each bind parameter in the query , we need to define a Parameter in the Concurrent Program
Step 2: Create Data Definition & Associate with Data Template
Navigation: XML Publisher Administrator -> Data Definitions -> Create Data Definition
Screen 1 : Create Data Definition
Enter the data definition Details and click on Apply. Note down the Code.
The code should be used as the short name of the concurrent program.
View Data Definition
Data Template is associated with Data Definition
2. Short Name in the concurrent program and Code in the data definition should be same.
The Data Template parameter name should match the concurrent program parameter token
Pre-requisite : Install XML Publisher Desktop
After installation following Menus & Toolbars gets added to the MS Word.
Data -> Load XML Data

Final Output layout look like this.


Step 6: Run the concurrent program to see the output

Note:
References:
http://www.oracle.com/technology/products/xml-publisher/index.htm
http://www.oracle.com/technetwork/middleware/bi-publisher/overview/index.html
http://xdo.us.oracle.com
Oracle® XML Publisher Administration and Developer’s Guide
FAQ:
What is XDODTEXE used in the Executable section of Concurrent Program?
XDODTEXE is a BI Publisher Data Template Executable. The purpose of this executable is to identify data template file (.xml) and execute the data template to generate the raw xml data, that later can be used by BI Publisher formatting engine to format as as per the layout (RTF, PDF etc).
This executable will be used by all the BI Publisher reports (Concurrent Program) which are using Data Template to generate the xml data.
Recent Comments