There are several complicated things you may need to do with flexfields in your forms but one of them is simple and very common: create a foreign key on the accounting flexfield. It is easy to get lost in the Oracle Application Developer’s Guide because it tries to cover comprehensively what can be done with flexfields. But there is nothing to show you the basics step-by-step, which is what we will attempt in this article.
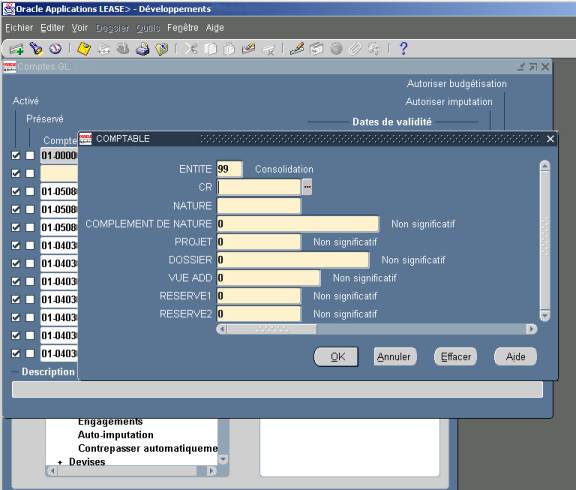
The end result of what we show is illustrated in Figure 1: one field that brings up the standard flexfield popup when the user asks for a list of values.
A basic conceptual understanding of what flexfields are is necessary in order to understand what follows. There is a very good 2-3 page explanation in the chapter “Flexfields” of the Oracle Application Developer’s Guide.
Step 1: Create a FK Column
First you need to define a column in the base table maintained by your form. This column will be the foreign key on the unique ID of the combination table, in our case: GL_CODE_COMBINATIONS. So you need a number(38) mandatory column in your table.
Step 2: Create a Flexfield hidden item
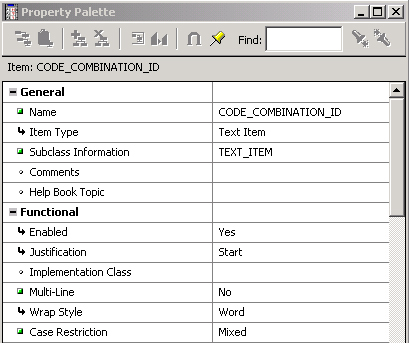
In your form you need to create a hidden item for the FK column. This field needs to be hidden, that is set to canvas null. It should use the TEXT_ITEM property class which comes from the Oracle Application template. Set the query length to 2000 just to be on the safe side. Figure 2 shows an example of such hidden ID.
Figure 2: Hidden field to hold the Flexfield reference.
Step 3: Create a Flexfield display item
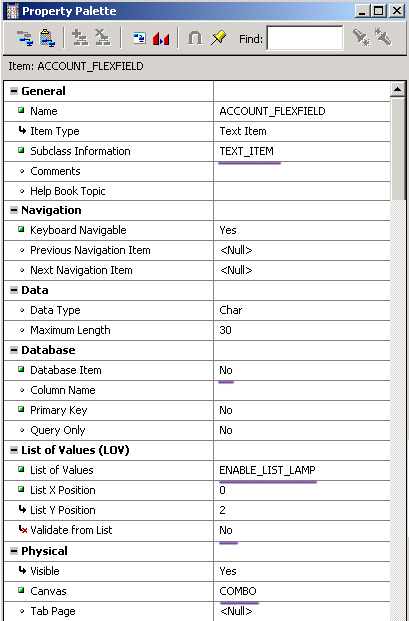
Now we want to create a non-database text item that will display the concatenated values of the segments of the accounting field. This item should use the TEXT_ITEM property class and be assigned to the appropriate canvas where you want users to see it. You then need to assign to it the dummy LOV ‘ENABLE_LIST_LAMP’ which comes from the Oracle Application template. Make sure that property ‘Validate from list’ is set to No. This ensures that the List lamp works properly for your flexfield. Figure 3 shows an example of such displayed field. We only show the most relevant item properties.
Figure 3: Displayed field to show the concatenated values of the Flexfield.
Step 4: Create the Flexfield definition
Then there is a little bit of PL/SQL to do in order to define your flexfield. This is done with the WHEN-NEW-FORM-INSTANCE trigger. It is always a good practice to do the actual work in a procedure or package as is illustrated in listing A. There are several reasons for this but this is out of the scope of this article. Note: the code in listing A is an abbreviated version of the real code: we have left out the comments and the error handling in order to keep this article as short as possible.
Listing A: Dynamic Flexfield definition
procedure initialize is cursor get_cao is select to_char(id_flex_num) from fnd_id_flex_structures where id_flex_structure_code = ‘ACCOUNTING_FLEXFIELD’ and id_flex_code = ‘GL#’; v_cao varchar2(1000); begin open get_cao; fetch get_cao into v_cao; if get_cao%notfound then v_cao := ‘101’; end if; close get_cao; app_standard.event(‘WHEN-NEW-FORM-INSTANCE’); fnd_key_flex.define( BLOCK=>’COMBO’, FIELD=>’ACCOUNT_FLEXFIELD’, APPL_SHORT_NAME=>’SQLGL’, CODE=>’GL#’, NUM=>v_cao, ID=>’CODE_COMBINATION_ID’, DESCRIPTION=>”, TITLE=>’____ Your nice user friendly title here _____’, VALIDATE=>’FULL’, QBE_IN=>’Y’, DERIVE_ALWAYS=>’Y’, updateable => ”, VRULE=>’\nSUMMARY_FLAG\nI\nAPPL=SQLGL;NAME=GL_NO_PARENT_SEGMENT_ALLOWED\nN’, where_clause => ‘summary_flag != ”Y”’, QUERY_SECURITY =>’Y’); end initialize;
Step 5: Code several event triggers
Then, all that is left to do is to program a few events:
- WHEN-VALIDATE-ITEM
- WHEN-NEW-ITEM-INSTANCE
- POST-QUERY
- PRE-QUERY
- KEY-LISTVAL
The code is shown in Listing B.
We always try to put this code in the form level triggers as it is more convenient and consistent than doing it at block or item level, especially when you have more than one foreign key flexfield in the form. Only in the case of very large and complicated forms would we do otherwise.
If you are updating someone else’s form, you may need to check that no block or item triggers are overriding your form level triggers. Check also the execution style of your form level triggers. Whether your trigger should fire in mode Before, After or Override will depend on your context.
Listing B: Event programming for the Flexfields.
WHEN-VALIDATE-ITEM if ( :system.mode = ‘NORMAL’ ) then fnd_flex.event( ‘WHEN-VALIDATE-ITEM’ ); end if;WHEN-NEW-ITEM-INSTANCE app_standard.event(‘WHEN-NEW-ITEM-INSTANCE’); fnd_flex.event(‘WHEN-NEW-ITEM-INSTANCE’ );POST-QUERY–Loads the flexfields (in our case, it populates–the concatenated field on execute query). FND_FLEX.EVENT(‘POST-QUERY’);PRE-QUERY–If you don’t do this, whatever query criteria you may enter in— the concatenated flex field, it is not taken into account. FND_FLEX.EVENT(‘PRE-QUERY’ );KEY-LISTVAL APP_STANDARD.EVENT(‘KEY-LISTVAL’); FND_FLEX.EVENT(‘KEY-LISTVAL’ );
i’m getting ORA-01403: no data found error