Flexfield Value Security gives you the capability to restrict the set of values a user can use during data entry. With easy-to-define security rules and responsibility level control, you can quickly set up data entry security on your flexfield segments and
report parameters.
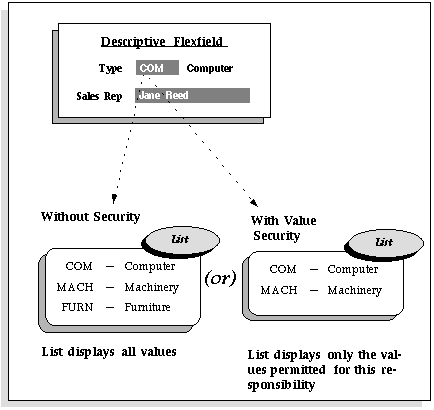
Flexfield Value Security lets you determine who can use flexfield segment values and report parameter values. Based on your responsibility and access rules that you define, Flexfield Value Security limits what values you can enter in flexfield pop-up windows and report parameters. Flexfield Value Security gives you greater control over who can use restricted data in your application. When you use Flexfield Value Security, users see only values they are allowed to use; restricted values do not appear in lists of values associated with the flexfield or report parameter.


To define security rules

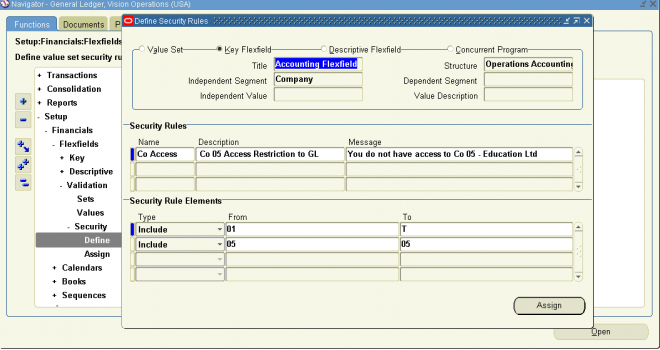
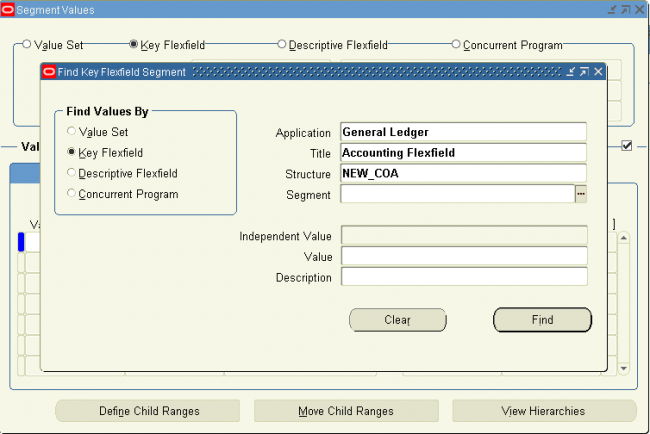
1. In the Segment Values block, identify the value set to which your values belong. You can identify your value set or by the flexfield segment or concurrent program parameter that uses the value set.
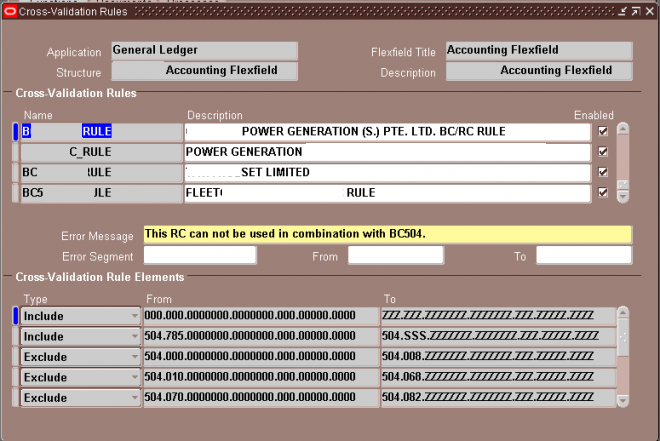
2. In the Security Rule region, enter a name and description for your security rule.
3. Enter a message for this security rule. This message appears automatically whenever a user enters a segment value that violates your security rule.
4. Define the security rule elements that make up your rule.
5. Save your changes.

Security Rule Elements

You define a security rule element by specifying a value range that includes both a low and high value for your segment. A security rule element applies to all segment values included in the value range you specify.
You identify each security rule element as either Include or Exclude, where Include includes all values in the specified range, and Exclude excludes all values in the specified range. Every rule must have at least one Include rule element, since a rule automatically excludes all values unless you specifically include them. Exclude rule elements override Include rule elements.
You should always include any default values you use in your segments or dependent value sets. If the default value is secured, the flexfield window erases it from the segment as the window opens, and the user must enter a value manually.
If you want to specify a single value to include or exclude, enter the same value in both the Low and High fields.
Minimum and maximum possible values
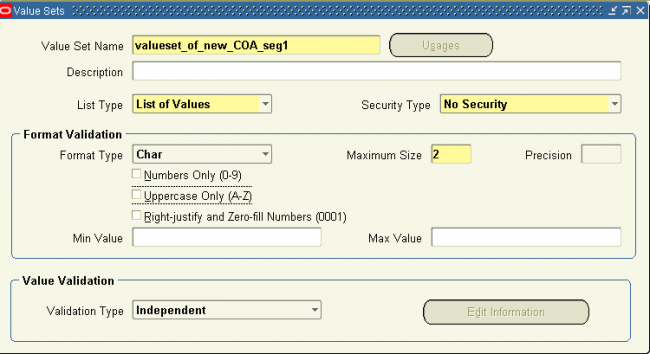
The lowest and highest possible values in a range depend on the format type of your value set. For example, you might create a value set with format type of Number where the user can enter only the values between 0 and 100. Or, you might create a value set with format type of Standard Date where the user can enter only dates for the current year (a range of 01-JAN-2001 to 31-DEC-2001, for example). For example, if your format type is Char, then 1000 is less than 110, but if your format type is Number, 110 is less than 1000. The lowest and highest possible values in a range are also operating system dependent. When you use a Char format type for most platforms (ASCII platforms), numeric characters are “less” than alphabetic characters (that is, 9 is less than A), but for some platforms (EBCDIC platforms) numeric characters are “greater” than alphabetic characters (that is, Z is less than 0). The window gives you an error message if you specify a larger minimum value than your maximum value for your platform.
If you leave the low segment blank, the minimum value for this range is automatically the smallest value possible for your segment’s value set. For example, if the value set maximum size is 3 and Right-justify and Zero-fill Numbers is checked, the minimum value is 000. However, if the value set has a maximum size of 3, has Numbers Only checked and Right-justify and Zero-fill Numbers unchecked, the minimum value is 0.
If you leave the high segment blank, the maximum value for this range is automatically the largest value possible for your segment’s value set. For example, if the value set maximum size is 3 and Numbers Only is checked, the maximum value is 999. However, if the value set maximum size is 5, and Numbers Only is checked, the maximum value is 99999.
Suggestion: Use blank segments to specify the minimum or maximum possible values for a range to avoid having operating system dependent rules.
Note that security rules do not check or affect a blank segment value (null value).
To define security rule elements
1. In the Security Rule Elements block, select the type of security rule element. Valid types are:
Include  Your user can enter any segment value that falls in the following range. 
Exclude  Your user cannot enter any segment value that falls in the following range. 
2. Enter the low (From) and high (To) ends of this value range. Your value does not have to be a valid segment value.
Assign security rules

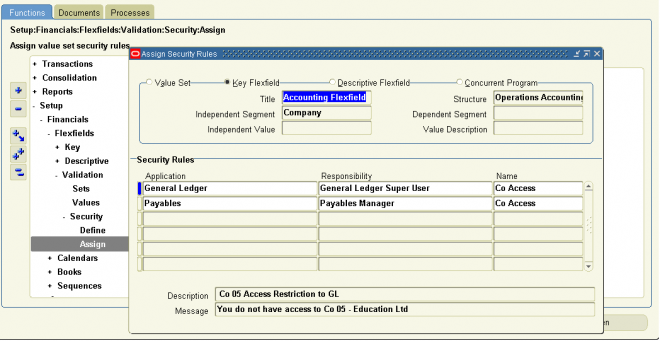
1. Navigate to Assign Security Rules window.
2. In the Assign Security Rules block, identify the value set to which your values belong. You can identify your value set or by the flexfield segment or concurrent program parameter that uses the value set.
3. In the Security Rules block, enter the application and responsibility name that uniquely identifies the responsibility to which you want to assign security rules.
4. Enter the name of a security rule you want to assign to this responsibility.
5. Save your changes.

Applications need to construct Accounting Flexfield combinations automatically for various purposes. The Account Generator feature uses Oracle Workflow technology to provide applications with the ability to construct key flexfield combinations automatically using customized construction criteria. Each site can customize how they want to build key flexfield combinations.
Benefits of the Account Generator using Oracle Workflow
Automatic construction of key flexfield combinations speeds users’ data entry.
Automatic construction of key flexfield combinations improves accuracy of data entry because users do not need to determine what key flexfield combination to enter.
Each site can customize rules for the construction of key flexfield combinations to match the existing way of doing business.

Attention: The Account Generator replaces the Release 10 FlexBuilder feature. Information on upgrading from FlexBuilder is covered later in this chapter.

Use the Account Generator Processes window to assign Account Generator processes to Accounting Flexfield structures.
This window is under the navigation path Application > Flexfield > Accounts in the “System Administrator” responsibility.
To choose your Account Generator process:
1. Select the structure to which you want to assign a process. You can choose the application, flexfield title, structure, and description using View > Find…
2. Specify the Oracle Workflow Item Type containing the process.
3. Specify the process you want to use to generate the accounts.
The default process, as specified in the product-specific documentation, will default in. If you want to use a different process, enter the name of the process you wish to use. For example, if you want to use the process derived from FlexBuilder, specify “Generate Account Using FlexBuilder Rules” instead.
Application  : The application which uses the Accounting Flexfield structure. A list of values is available for this field.
Flexfield Title  : The title of the Accounting Flexfield. A list of values is available for this field.
Structure : The Accounting Flexfield structure for which the Account Generator will be creating combinations.
Item Type : The Oracle Workflow item type which contains the process which will generate the code combinations.
Process : The process within the above item type which will be used to create the code combinations. The default process, as specified in the product-specific documentation, will default in.

The code you use to identify a general ledger (GL) account in Oracle.
    * Accounting (Key) Flexfield segment one of up to 30 different sections of the accounting flexfield, which together make up a GL account code.
    * Accounting Flexfield structure – the combination of key flexfield segments defined to make up the account code combinations. If a segment(s) is added or removed or re-arranged, the result is a different structure.
The basic steps in defining a key Flexfields are as given below. You may or may not use all the steps. The detailed explanation is being followed after the steps.
1. Define & fix the structure of your COA/AFF or any other flex field.
we ‘ll design a flex field of the form
.new_COA_seg2.new_COA_seg3
2. Define the value sets for all the three segments
Navigation : GL > Set up > Financials > Flex field > Validation > Sets


Similarly definie value set for other two segments
3. Define the flex field
Navigation : GL > Set up > Financials > Flex field > key > Segment

Select the application as GL and title as account flexifield. click on OK

Enter the name of new flex field and save it. Click on segments to enter the segments of the FF
 
Enter the name of the new three segments  with the coumn name segmen1, 2 & 3. Assign the corresponding value set. Save it and click on Open to open one segment.

Verify the segment1 contents and modify if necessary. Click on qualifiers

Enter the qualifier as Cost center, Natural account or as required.  Repeat this step for all the segments and close the key flexfield segment window.

enable the fields allow dynamic inserts & cross-validate segments. Also enable the freeze flexfield definition and click on complie.

4. Filling value sets
Navigation : GL > Set up > Financials > Flex field > key > Values

When a user finishes entering segment values in a flexfield pop-up window, the flexfield checks whether the values make up a valid combination before updating the database. If the user entered an invalid combination, a diagnostic error message appears, and the cursor returns to the first segment assumed to contain an invalid value.
Cross-validation rules control combinations of values within a particular key flexfield structure. Cross-validation applies to combinations users attempt to create using either the combinations form or foreign key forms (using dynamic inserts).
Cross-Validation Rules and Existing Combinations
Cross-validation rules have no effect on combinations that already exist when you define your cross-validation rules.
Suppose you define a new cross-validation rule, but have existing entries in your combinations table that violate the rule. Since the existing combinations pre-date the rule, your flexfield continues to treat them as valid. However, if your end user tries to create a new combination that violates your new rule, your flexfield returns an error message and rejects the combination.
If you want to prevent users from using previously-existing combinations that are no longer valid according to your cross-validation rules, you can always manually disable those combinations using the combinations form.
Dynamic Insertion and Cross-Validation
Your use of cross-validation is separate from (and in addition to) your use of dynamic inserts.
By allowing dynamic inserts, you can let users create new combinations automatically upon entering the combination in a foreign key form (any form other than the combinations form) and in the combinations form itself.
If you want greater control, you can disallow dynamic inserts. You can thus restrict the creation of new combinations to certain authorized people who have access to the combinations form on their menu. You simply turn dynamic insertion off using the Define Key Flexfield Segments form. Depending on the key flexfield you use, you can still create new combinations using one of your product setup forms (the combinations form). For example, if you use the Accounting Flexfield, you can enter new combinations using the Define Accounting Flexfield Combination form.
In either case, however, there is no inherent protection against a user creating an invalid new combination. Cross-validation rules ensure that nobody can create invalid new combinations from either foreign key forms or the combinations form, regardless of whether you allow dynamic inserts.
As you consider the controls you want over your key flexfield combinations, determine whether you need cross-validation rules at all. To provide an extra level of security, use cross-validation rules even if you turn dynamic insertion off. This allows you to double-check new combinations that even your authorized personnel enter using the combinations form.
Changing your key flexfield structure after defining rules
Changing an existing key flexfield structure may adversely affect the behavior of any cross-validation rules you have for that structure, so you should be sure to manually disable or redefine any cross-validation rules to reflect your changed structure. Flexfield structure changes that make your existing rules invalid include:
          o changing the order of segments
          o adding a new segment
          o disabling a segment
          o changing segment lengths
For example, if you change a six-segment structure to contain only five segments, you would not be able to use any new five-segment code combinations since any rules existing for the old six-segment structure would be violated.
Cross-Validation Rules Window
Your flexfield checks cross-validation rules while attempting to create a new combination of flexfield values (for example, a new Accounting Flexfield combination). Your cross-validation rules have no effect on flexfield combinations that already exist. If you want to disable an existing combination, you must disable that combination specifically using the appropriate window. For example, you can disable an existing Accounting Flexfield combination using the Define Accounting Flexfield Combinations window.
    Suggestion: We recommend that you define many rules that each have few rule elements rather than a few rules that each have many rule elements. The more rules you provide, the more specific you can make your error message text.
Your flexfield checks cross-validation rules only if you set Cross-Validate Multiple Segments to Yes using the Define Key Flexfield Segments window.
If you make changes to your cross-validation rules, you need to either change responsibilities or exit from your application and sign on again in order for the changes to take effect.
Oracle Applications provides many key flexfields, such as the Accounting Flexfield, Location Flexfield and System Items Flexfield. In this essay, we use the Accounting Flexfield to present suggestions for designing your cross-validation rules, but you can use cross-validation rules for any key flexfield structure that has cross-validation enabled.
Use the Key Flexfield Segments window to define your flexfield structure and segments and specify Yes in the Cross-Validate Multiple Segments field for your flexfield structure.
To define cross-validation rules:

  1. Select the name and structure of your key flexfield for which you wish to define cross-validation rules. Your list only contains structures with the field Cross-Validate Multiple Segments set to Yes on the Key Flexfield Segments window.
  2. Enter a unique name and a description for your cross-validation rule.
  3. Enter your error message text for this cross-validation rule.                                                                                  Your flexfield automatically displays this error message on the message line whenever a new combination of segment values violates your cross-validation rule. You should make your error messages as specific as possible so that your users can correct any errors easily.
  4. Enter the name of the segment most likely to have caused this cross-validation rule to fail. Your flexfield leaves the cursor in this segment whenever a new segment combination violates this cross-validation rule to indicate where your user can probably correct the error. If you do not specify an error segment name, your flexfield leaves the cursor in the first segment of the flexfield window following a violation of this rule.
  5. If you want to have the rule effective for a limited time, you can enter a start date and/or an end date for the rule. The rule is valid for the time including the From and To dates.
  6. Define the cross-validation rule elements that make up your rule. See: Defining Cross-validation Rule Elements.
  7. Save your changes.


Defining Cross-validation Rule Elements

Use this block to define the cross-validation rule elements that make up your cross-validation rule. You define a cross-validation rule element by specifying a value range that includes both a low and high value for each key segment. A cross-validation rule element applies to all segment values included in the value ranges you specify. You identify each cross-validation rule element as either Include or Exclude, where Include includes all values in the specified ranges, and Exclude excludes all values in the specified ranges. Every rule must have at least one Include rule element, since a rule automatically excludes all values unless you specifically include them. Exclude rule elements override Include rule elements.
 Suggestion: We recommend that you define one all-encompassing Include rule element and several restricting Exclude rule elements.
Select the type of cross-validation rule element. Valid types are:
Include     Your user can enter any segment value combinations that fall in the following range.
Exclude     Your user cannot enter any segment value combinations that fall in the following range.
When you enter the From (low) field, this window automatically displays a window that contains a prompt for each segment in your flexfield structure. You enter both the low and high ends of your value range in this window. After you finish entering your ranges, this zone displays your low segment values in concatenated window in the Low field and displays your high segment values similarly in the High field.
Enter the low end and the high end of your segment combination range. Neither the low nor the high combination has to be a valid key flexfield combination, nor do they need to be made up of valid segment values.
Note that a blank segment value (null value) is considered to fall within a range that has one or both ends specified as a blank. However, if all of your segments require a value, you would not be able to create a combination with a blank segment anyhow.
You may use blank minimum or maximum segment values to create cross-validation rules that can test for blank segments (that are not already required to have a value). For example, if you allow a null value for your last optional segment but not the second-to-last optional segment, you would use a blank minimum or maximum value for the last segment but fill in a value (such as 000 or 999) for both the minimum and maximums for the second-to-last optional segment.
If you want to specify a single combination to include or exclude, enter the same combination in both the Low and High fields.
Disabled rules are ignored when your key flexfield validates a combination of segment values. Deleting the rule has the same effect, but you can re-enable a disabled rule.