A user profile is a set of changeable options that affect the way your application runs. The system administrator can set user profiles at different levels:

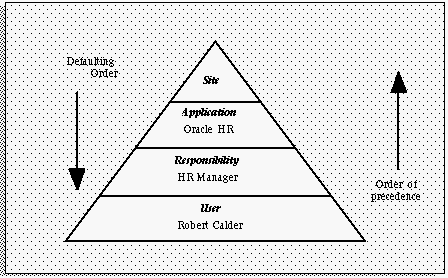
Site level     These settings apply to all users at an installation site.
Application level     These settings apply to all users of any responsibility associated with the application.
Responsibility level     These settings apply to all users currently signed on under the responsibility.
User level     These settings apply to an individual user, identified by their application username.
Important Profiles
1.1. HR: Business Group
1.2  HR: Security Option
1.3: HR: User Type (FOR accessing HRMS functions)
1.4  HR: Cross Business Group

2.1. GL: Set of Books(11i)
2.1  GL:%Ledger%  (R12)

2.3  GL: Data Access Set. This profile option to control the ledgers that can be used by Oracle General Ledger.
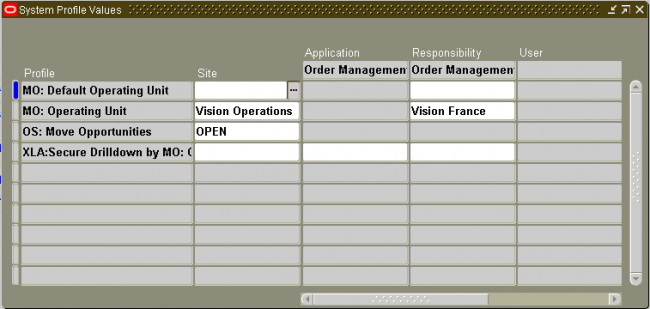
3.1. MO: Operating Unit
3.2. MO: Security Profile (R12)
3.3. MO: Default Operating Unit
4.1 Tax: Allow Override of Tax Code
4.2 Tax: Invoice Freight as Revenue
4.3 Tax: Inventory Item for Freight


5.1 Sequential Numbering
5.2 INV: Intercompany Currency Conversion

6.1 RCV: Processing Mode – Batch, Immediate, Online
6.2
QA: PO InspectionOracle Purchasing , Oracle Quality
7.1 Hide Diagnostics menu entry
8.1 OE: Item Flexfield
This profile option indicates the structure of the Item Flexfield (System Items) used by Order Entry. This structure should be the same across all applications in the same database.
This profile option is visible and updatable at the site level.
8.2 OE: Item Validation Organization
This profile option indicates the Oracle Manufacturing organization against which items are validated. You must define all items that can be included in your transactions in this organization.
Set the OE: Item Validation Organization profile at the site level for the inventory organization whose master item number you want to use. This profile option indicates the organization that Receivables uses to validate items.
This profile option is visible and updatable at the site level.
Values set at a higher level cascade as defaults to the lower levels. Values set at a lower level override any default from a higher level. For profile options that need to differ at the operating unit level, including OE: Item Validation Organization, OE: Set of Books, and GL: Set of Books, you must set the values at the responsibility level. Oracle General Ledger windows use the GL Set of Books profile option to determine your current set of books. If you have different sets of books for your operating units, you should set the GL Set of Books profile option for each responsibility that includes Oracle General Ledger windows.
For profile options that need to differ at the set of books level, including Sequential Numbering, set the values at the responsibility level.
Profile options specify default values that affect system processes, system controls, and data entry. In a multiple organization
environment you may want to confine the effect to a specific operating unit. Therefore, you may want to change your profile options to be visible and updatable at the responsibility level.
1. MO: Operating Unit = {the users Operating Unit name}
     This points the responsibility to the appropriate Operating Unit.
This the profile which holds the value of operating unit org_id when ever user login into system his org_id is  value is transfered to profile value base on this profile  we get data and put data from databaseUsed primarily in a multiorg environment.
     Set the site level to the desired default operating  unit.
     If there is more than 1 Operating Unit Defined, this profile option must be set at the responsibility level for each responsibility.
Example: Suppose we define a responsibility Purchasing Super User US . Then MO : Operating Unit at this responsibility level determines which Opertaing unit can this responsibility(or the user assigned to this responsibility) acess.


2. OE: Set of Books and GL: Set of Books

Each Responsibility is identified with a set of books using the profile option GL : Set of Books Name, a responsibility can only see the accounting information for that set of books in orcale GL.
3. HR: Business Group
Business Group that is linked to the security profile for a responsibility. This option is used online to control access to records that are not related to organization, position, or payroll.
This option is seeded at Site level with the start-up Business Group. It is view only. Values are derived from the HR:Security Profile user profile option.

HR:Security Profile     Restricts access to the organizations, positions, and payrolls defined in the security profile. This option is seeded at Site level with the view-all security profile created for the Startup Business Group.  The business group you define appears in the list of values when you set up the HR: Security Profile profile option.
Security Groups
Security groups are a method of partitioning data. When you use the standard HRMS security model, you do not use security groups. The business group is the only data partition. Responsibilities are linked to business groups. Therefore, to access different business groups, users must change responsibilities.
If you want one responsibility to be enabled for more that one business group, you must use Cross Business Group responsibility security. In this model, security groups are defined to partition data within a business group. Multiple security groups can then be linked to one responsibility, even if they partition different business groups. To use security groups you must set the user profile option Enable Security Groups to Yes and run the Multiple Security Groups process.
HR: Cross Business Group
In the Oracle HRMS model, the business group is at the country level and a top organization encompasses all business groups in a company worldwide. People, projects, jobs, and organizations can be located in different business groups for different countries and all information can be shared throughout the enterprise.
Oracle Projects allows the visibility of all business groups to one another. For example, you can search staff resources on projects across business groups, and charge any project across the enterprise for a resource.
You control access to single or multiple business groups by setting the profile option HR: Cross Business Group:
• Set the profile option to Yes to allow cross business group access.
• Set the profile option to No to allow only single business group access.

Flexfield Value Security gives you the capability to restrict the set of values a user can use during data entry. With easy-to-define security rules and responsibility level control, you can quickly set up data entry security on your flexfield segments and
report parameters.
Flexfield Value Security lets you determine who can use flexfield segment values and report parameter values. Based on your responsibility and access rules that you define, Flexfield Value Security limits what values you can enter in flexfield pop-up windows and report parameters. Flexfield Value Security gives you greater control over who can use restricted data in your application. When you use Flexfield Value Security, users see only values they are allowed to use; restricted values do not appear in lists of values associated with the flexfield or report parameter.


To define security rules

1. In the Segment Values block, identify the value set to which your values belong. You can identify your value set or by the flexfield segment or concurrent program parameter that uses the value set.
2. In the Security Rule region, enter a name and description for your security rule.
3. Enter a message for this security rule. This message appears automatically whenever a user enters a segment value that violates your security rule.
4. Define the security rule elements that make up your rule.
5. Save your changes.

Security Rule Elements

You define a security rule element by specifying a value range that includes both a low and high value for your segment. A security rule element applies to all segment values included in the value range you specify.
You identify each security rule element as either Include or Exclude, where Include includes all values in the specified range, and Exclude excludes all values in the specified range. Every rule must have at least one Include rule element, since a rule automatically excludes all values unless you specifically include them. Exclude rule elements override Include rule elements.
You should always include any default values you use in your segments or dependent value sets. If the default value is secured, the flexfield window erases it from the segment as the window opens, and the user must enter a value manually.
If you want to specify a single value to include or exclude, enter the same value in both the Low and High fields.
Minimum and maximum possible values
The lowest and highest possible values in a range depend on the format type of your value set. For example, you might create a value set with format type of Number where the user can enter only the values between 0 and 100. Or, you might create a value set with format type of Standard Date where the user can enter only dates for the current year (a range of 01-JAN-2001 to 31-DEC-2001, for example). For example, if your format type is Char, then 1000 is less than 110, but if your format type is Number, 110 is less than 1000. The lowest and highest possible values in a range are also operating system dependent. When you use a Char format type for most platforms (ASCII platforms), numeric characters are “less” than alphabetic characters (that is, 9 is less than A), but for some platforms (EBCDIC platforms) numeric characters are “greater” than alphabetic characters (that is, Z is less than 0). The window gives you an error message if you specify a larger minimum value than your maximum value for your platform.
If you leave the low segment blank, the minimum value for this range is automatically the smallest value possible for your segment’s value set. For example, if the value set maximum size is 3 and Right-justify and Zero-fill Numbers is checked, the minimum value is 000. However, if the value set has a maximum size of 3, has Numbers Only checked and Right-justify and Zero-fill Numbers unchecked, the minimum value is 0.
If you leave the high segment blank, the maximum value for this range is automatically the largest value possible for your segment’s value set. For example, if the value set maximum size is 3 and Numbers Only is checked, the maximum value is 999. However, if the value set maximum size is 5, and Numbers Only is checked, the maximum value is 99999.
Suggestion: Use blank segments to specify the minimum or maximum possible values for a range to avoid having operating system dependent rules.
Note that security rules do not check or affect a blank segment value (null value).
To define security rule elements
1. In the Security Rule Elements block, select the type of security rule element. Valid types are:
Include  Your user can enter any segment value that falls in the following range. 
Exclude  Your user cannot enter any segment value that falls in the following range. 
2. Enter the low (From) and high (To) ends of this value range. Your value does not have to be a valid segment value.
Assign security rules

1. Navigate to Assign Security Rules window.
2. In the Assign Security Rules block, identify the value set to which your values belong. You can identify your value set or by the flexfield segment or concurrent program parameter that uses the value set.
3. In the Security Rules block, enter the application and responsibility name that uniquely identifies the responsibility to which you want to assign security rules.
4. Enter the name of a security rule you want to assign to this responsibility.
5. Save your changes.

The code you use to identify a general ledger (GL) account in Oracle.
    * Accounting (Key) Flexfield segment one of up to 30 different sections of the accounting flexfield, which together make up a GL account code.
    * Accounting Flexfield structure – the combination of key flexfield segments defined to make up the account code combinations. If a segment(s) is added or removed or re-arranged, the result is a different structure.
The basic steps in defining a key Flexfields are as given below. You may or may not use all the steps. The detailed explanation is being followed after the steps.
1. Define & fix the structure of your COA/AFF or any other flex field.
we ‘ll design a flex field of the form
.new_COA_seg2.new_COA_seg3
2. Define the value sets for all the three segments
Navigation : GL > Set up > Financials > Flex field > Validation > Sets


Similarly definie value set for other two segments
3. Define the flex field
Navigation : GL > Set up > Financials > Flex field > key > Segment

Select the application as GL and title as account flexifield. click on OK

Enter the name of new flex field and save it. Click on segments to enter the segments of the FF
 
Enter the name of the new three segments  with the coumn name segmen1, 2 & 3. Assign the corresponding value set. Save it and click on Open to open one segment.

Verify the segment1 contents and modify if necessary. Click on qualifiers

Enter the qualifier as Cost center, Natural account or as required.  Repeat this step for all the segments and close the key flexfield segment window.

enable the fields allow dynamic inserts & cross-validate segments. Also enable the freeze flexfield definition and click on complie.

4. Filling value sets
Navigation : GL > Set up > Financials > Flex field > key > Values

Oracle Accounts Payable’s is part of Oracle Financials, which is part of Oracle’s E-Business Suite.
Oracle Payables business process flow is setup, suppliers, invoices and payments, inquiry and reporting and period-end processing. The Oracles Payables business flow is setup, supplier entry, invoice entry, payments or disbursements generation, inquiry and reporting and period-end processing. Each organization must define its specific operating environment.
What are all the Modules Interacting with AP? 
Cash Management
Oracle iExpenses
General Ledger
Oracle Assets
Subledger Accounting (R12)
HRMS
Project Accounting
Purchasing/iprocurement
Global Accounting Engine (11i)
Define Payment Terms and their Types
Payment Terms are defined to automatically create payment schedule lines for an invoice.  The due date for every invoice    shall be determined by the Payment Term associated with it. Multiple scheduled lines and multiple levels of discount can be defined in payment terms. There is no limit to number of Payment Terms that can be defined for an organization.
While scheduling, the payment term determines the following with regard to an invoice:
a.    Number of installments in which the invoice needs to be settled
b.    Amount in each installment
c.    Due Date of each installment
d.    Discounts available for early payment of each installment.
Navigation: Setup> Invoice> Payment Terms
The due date of every installment is determined by TERMS DATE BASIS. The Terms Date can be any of Invoice Date, Invoice Received Date, Goods Received Date or Systems Date. In a case where the PO Payment term differs from the Invoice payment term, the payment term which has better ranking shall take precedence. Changing the Payment Terms in an invoice after the payment lines are scheduled changes the scheduled payment lines. 
What is terms date basis?
Terms Date Basis is to calculate due date.
Due date is calculated 4way. Eg: payment term is 30days
  • Due date = Sysdate + 30days
  • Due date = Invoice date + 30days
  • Due date = Goods Receive Date + 30days
  • Due date = Invoice Received date + 30days
How many types of Invoices we can create in Oracle Payables?
A. Standard
B. Debit Memo
C. Credit Memo
D. Pre-Payment
E. Expense Report
F. Withholding Tax Invoice
G. Miscellaneous Invoice
What are the types of Invoice Matching in AP
Invoice matching can be two-way (invoice to PO), three-way (invoice to PO to receipt) and four-way (invoice to PO to receipt to inspection of goods)
What is the difference between Debit and Credit Memo?
Debit Memo will raise the Customer.
Credit Memo will raise the Vendor.
How many Holds AP have?
System Holds: Tax, Quantity Match, Po amount with Invoice Amount
Manual Holds: Invoice Limit, Hold on Invoice

Can you Release Manual Holds? If Yes, How?
Yes. Holds – Release Holds

How many ways you can pay the Invoice Amount?
Apply in Full
Schedule Payments
Installments

How many key flexfields are there in Payables?
No key flexfields in PO,AP
What are the mandatory setups in AP?
1- Financial Options
2- Define Suppliers
3- Define Payment Terms
4- Define Payment Methods
5- Define Banks and Banks Accounts And Banks Accounts Documents
6- Open AP Accounts Periods
What is pay date basis?
The Pay Date Basis for a supplier determines the pay date for a supplier’s invoices.
• Due
• Discount
What are the Payment Methods available?
• Check – You can pay with a manual payment, a Quick payment, or in a payment batch.
• Clearing – Used for recording invoice payments to internal suppliers.
• Electronic – You generate an electronic payment file that you deliver to your bank to create payments. Use Electronic if the invoice will be paid using EFT or EDI.
• Wire – Used to manually record a wire transfer of funds between your bank and your supplier’s bank.
What is the difference between quick payment and manual payment?
Quick Payment: It allows you to make a single payment against one or more invoices at a time to one supplier through payables.
Manual Payment: This is the process of entering the check details which has been paid manually in some emergency requirements into the payment form and selecting the invoices of the concerned supplier and check whether the total of the invoices and the paid amount at the header are same and save.
What are Aging Periods?
Aging periods are nothing but the periods that we setup to control and maintain the supplier outstanding bill towards the invoice. From this we can able to study the due date of the supplier form the generation of invoice.
Steps to transfer the data from AP to GL
 R12
     a) Run Create Accounting with the parameter Transfer to GL as Yes.
     b) Run Create Accounting with the parameter Transfer to GL as No and run Tranfer Journal
        Entries to GL.
        1. Create Accounting
        2. Transfer to GL (includes Journal Import)
        3. Post to GL
     Parameters:
        a. Error Only : Yes (Only erred events will be picked up. Try to use No)
        b. Report : In Detail (if we make it detail then it will show with the detail output.)
 11i
     a) If AX is installed
         Submit AX Posting Manager.
         1. Translate Events
         2. Tranfer to GL
         3. Journal Import
         4. Post to GL.
     b) If AX is not installed
         1.Payables accounting process
         2.Payables transfer to general ledger
         3.Journal import
         4.Post journals
Oracle Technical AP Tables
What are the Interface Tables in AP?
AP_INVOICES_INTERFACE
AP_INVOICE_LINES_INTERFACE
AP_INTERFACE_CONTROLS
————————————–
AP_SUPPLIERS_INT
AP_SUPPLIER_SITES_INT
AP_SUP_SITE_CONTACT_INT
AP_SUPPLIER_INT_REJECTIONS
What is the API to cancel single AP Invoice?
AP_CANCEL_PKG.AP_CANCEL_SINGLE_INVOICE
What is the API to find invoice status?
AP_INVOICES_PKG.GET_APPROVAL_STATUS
When a user finishes entering segment values in a flexfield pop-up window, the flexfield checks whether the values make up a valid combination before updating the database. If the user entered an invalid combination, a diagnostic error message appears, and the cursor returns to the first segment assumed to contain an invalid value.
Cross-validation rules control combinations of values within a particular key flexfield structure. Cross-validation applies to combinations users attempt to create using either the combinations form or foreign key forms (using dynamic inserts).
Cross-Validation Rules and Existing Combinations
Cross-validation rules have no effect on combinations that already exist when you define your cross-validation rules.
Suppose you define a new cross-validation rule, but have existing entries in your combinations table that violate the rule. Since the existing combinations pre-date the rule, your flexfield continues to treat them as valid. However, if your end user tries to create a new combination that violates your new rule, your flexfield returns an error message and rejects the combination.
If you want to prevent users from using previously-existing combinations that are no longer valid according to your cross-validation rules, you can always manually disable those combinations using the combinations form.
Dynamic Insertion and Cross-Validation
Your use of cross-validation is separate from (and in addition to) your use of dynamic inserts.
By allowing dynamic inserts, you can let users create new combinations automatically upon entering the combination in a foreign key form (any form other than the combinations form) and in the combinations form itself.
If you want greater control, you can disallow dynamic inserts. You can thus restrict the creation of new combinations to certain authorized people who have access to the combinations form on their menu. You simply turn dynamic insertion off using the Define Key Flexfield Segments form. Depending on the key flexfield you use, you can still create new combinations using one of your product setup forms (the combinations form). For example, if you use the Accounting Flexfield, you can enter new combinations using the Define Accounting Flexfield Combination form.
In either case, however, there is no inherent protection against a user creating an invalid new combination. Cross-validation rules ensure that nobody can create invalid new combinations from either foreign key forms or the combinations form, regardless of whether you allow dynamic inserts.
As you consider the controls you want over your key flexfield combinations, determine whether you need cross-validation rules at all. To provide an extra level of security, use cross-validation rules even if you turn dynamic insertion off. This allows you to double-check new combinations that even your authorized personnel enter using the combinations form.
Changing your key flexfield structure after defining rules
Changing an existing key flexfield structure may adversely affect the behavior of any cross-validation rules you have for that structure, so you should be sure to manually disable or redefine any cross-validation rules to reflect your changed structure. Flexfield structure changes that make your existing rules invalid include:
          o changing the order of segments
          o adding a new segment
          o disabling a segment
          o changing segment lengths
For example, if you change a six-segment structure to contain only five segments, you would not be able to use any new five-segment code combinations since any rules existing for the old six-segment structure would be violated.
Cross-Validation Rules Window
Your flexfield checks cross-validation rules while attempting to create a new combination of flexfield values (for example, a new Accounting Flexfield combination). Your cross-validation rules have no effect on flexfield combinations that already exist. If you want to disable an existing combination, you must disable that combination specifically using the appropriate window. For example, you can disable an existing Accounting Flexfield combination using the Define Accounting Flexfield Combinations window.
    Suggestion: We recommend that you define many rules that each have few rule elements rather than a few rules that each have many rule elements. The more rules you provide, the more specific you can make your error message text.
Your flexfield checks cross-validation rules only if you set Cross-Validate Multiple Segments to Yes using the Define Key Flexfield Segments window.
If you make changes to your cross-validation rules, you need to either change responsibilities or exit from your application and sign on again in order for the changes to take effect.