PURPOSE
There are a variety of reasons for pending transactions. This paper will serve as a guide for troubleshooting and resolving pending transactions preventing an accounting period from being closed.
VIEWING PENDING TRANSACTIONS
You can view the number of pending transactions by navigating to the Inventory Accounting Periods form.
Navigate > Cost > Accounting Close Cycle > Inventory Accounting Periods
Put your cursor on the appropriate open accounting period and click on the [Pending]
button. There are three zones titled “Resolution Required”, “Resolution Recommended” and “Unprocessed Shipping Transactions”.


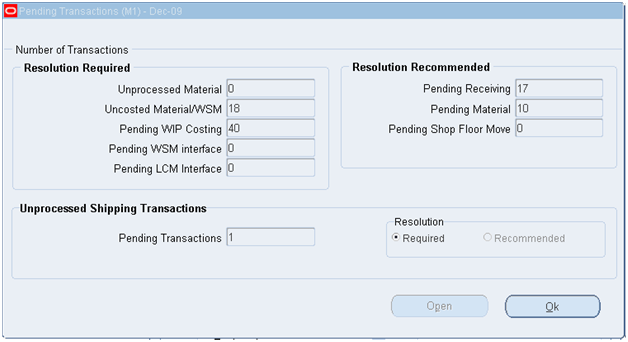
The Resolution Required zone displays the number of Unprocessed material, Uncosted material/WSM, Pending WIP Costing, Pending WSM interface and Pending LCM Interface transactions existing in this period. Transactions appearing in this zone must be resolved before the period can be closed.
The Resolution Recommended zone displays the number of Pending Receiving, Pending Material and Pending Shop Floor Move transactions existing in this period. Transactions appearing in this zone will not prevent closing of the accounting period.
However, once the accounting period is closed, unresolved transactions in this zone cannot be processed because they have a transaction date for a closed period.
The Unprocessed Shipping Transactions zone displays the number of Pending Transactions existing in this period. Transactions appearing in this zone must be resolved before the period can be closed, depending if the Resolution „Required or „Recommended is checked.
Resolution Required Transactions:
Unprocessed Material” indicate there are unprocessed material transactions in the MTL_MATERIAL_TRANSACTONS_TEMP table .
Uncosted Material/WSM” indicates there are transactions in the MTL_MATERIAL_TRANSACTIONS table with unprocessed accounting entries.
“Pending WIP Costing” transactions indicate there are unprocessed resource and overhead accounting transactions in the WIP_COST_TXN_INTERFACE table.
“Pending WSM interface” indicate there are pending transactions in the WSM_SPLIT_MERGE_TXN_INTERFACE table.
Pending LCM interface” indicated there are pending transactions in the CST_LC_ADJ_INTERFACE table.
Resolution Recommended Transactions:
“Pending Receiving” transactions indicate there are unprocessed purchasing transactions in the RCV_TRANSACTIONS_INTERFACE table. These transactions include purchase order receipts and returns for inventory. These transactions are not included in your receiving value if they are not resolved prior to closing the period.
“Pending Material” transactions indicate there are unprocessed material transactions in the MTL_TRANSACTIONS_INTERFACE table.
“Pending Shop Floor Move” transactions indicate there are unprocessed shop floor move transactions in the WIP_MOVE_TXN_INTERFACE table.
Unprocessed Shipping Transactions
“Pending Transactions” in the Unprocessed Shipping Transactions zone indicate there are transactions in the WSH_DELIVERY_DETAILS table in a status of shipped.
UNPROCESSED MATERIAL TRANSACTIONS
To resolve Unprocessed Material transactions, you need to determine and fix what is preventing a record from being processed through the
MTL_MATERIAL_TRANSACTIONS_TEMP table. Details of transactions can be viewed through the Applications by navigating to the Pending Transactions form.
 Inventory > Transactions > Pending Transactions

By using the Pending Transactions window, you can view, edit, correct and resubmit
unprocessed material transactions. There are five tabs to select the type of information: Error, Location, Source, Intransit and Others, which provide detailed
information on the transactions.
The Main Descriptive fields give detailed information on they type of transaction:
Primary UOM, Primary UOM of the item
Secondary UOM, The secondary unit of measure. If the item is under dual unit of measure control, the secondary unit of measure and the secondary quantity populate automatically.
Qty, Quantity of this transaction in terms of the UOM.
Date, Transaction date
Item Description, Inventory item description
Error Explanation, detailed explanation of error
Lot/Serial (Used if transaction is associated with a Lot or Serial number)
Submit, When checked and saved the erred transaction line will be resubmitted. If the line is not in error it can not be resubmitted using the Submit check box but will have to be resubmitted through a sqlplus script. All erred transactions can be selected to be resubmitted by clicking on „Tools resubmit all.
Fields Common to all Tabs:
Item, Inventory item referenced by the line item.
Transaction Qty, Quantity of this transaction.
Transaction UOM, Unit of measure used in the transaction.
Transaction Type, Displays the transaction type.
Fields in Error Tab region are as follows:
Secondary Quantity, Transaction quantity in secondary unit of measure if the item
is under dual of unit of measure control.
Secondary UOM, Secondary unit of measure if the item is under dual of unit of measure control.
Overcompletion Transactions, Overcompletion quantity
Transaction Date, Date the transaction was entered for processing.
Transaction Header Id, Line items header ID used to group transactions in concurrent manager.
Transaction Temp Id, Transaction line identifier used to join to lot or serial table when under these controls
Transaction Mode, Method used to process the line item, such as concurrent processing.
Process flag, indicates whether the row has been processed by the concurrent manager. The process flag codes are:
1 = Pending
2 = Running
3 = Error
Transaction Status, Status of the transaction: Select Pending or Suggested. Pending
indicates transactions that are ready to be allocated. Suggested indicates transactions
that have been detailed and are ready to be transacted.
Error Code, Code describing the error on the last attempt to process the line item.
Error Explanation, Full explanation of the error that occurred when attempting to process the line item
Fields in Location Tab region are as follows:
Revision, Revision of the inventory item referenced by the line item.
Org Code, Organization code of the organization referenced by the line item.
Subinventory, Subinventory referenced by the line item.
Locator, Locator referenced by the line item.
Transfer Subinv, Destination subinventory.
Transfer Org Code, Organization code of the destination organization.
Transfer Location, Destination location.
Owning Party, Owning Party identifier
Planning Org, Planning Party identifier
Supplier, supplier name
Cartonized LPN, Sequential LPN Id generated by cartonization – used by WMS only
Lot Number, Lot number
Lot Expiration Date, Lot expiration date
Serial Number, Serial Number
 
Fields in Source Tab region are as follows:
Transaction Action, The transaction action
Transaction Source Type, Source type of the transaction, such as WIP Job or Schedule
Source, Source of the transaction, such as account number or Job name
Distribution Account, Distribution account for the line item
Transaction Cost, Cost to process the transaction
Transaction Reference, Reference text describing the transaction
Reason Name, The transaction reason.
Fields in the Intransit Tab region are as follows:
Shipment Number, Shipment number for the line item
Transfer Cost, Cost to process the transfer
Transportation Cost, Cost to physically transfer the material, such as freight carrier charges
Transportation Account, General ledger distribution account that collects the costs associated with using the freight carrier for the transfer
Freight Code, Freight carrier for the transaction
Containers, Number of containers in which the material is stored for the transfer
Waybill Airbill, The waybill or airbill number for the transfer
Expected Arrival Date, Date you expect to receive the material at the destination organization
Fields in the Others Tab region are as follows:
Line Code, Request ID assigned by the concurrent manager to the line item
Employee Code, Employee who entered the transaction
Operation Seq Num, Number associated with the job or schedule referenced by the line item
Department Code, Oracle Work in Process department code for the line item
Transaction Source Line ID, Oracle Work in Process line description for the item
Transaction Source Delivery ID, Line item detail identifier of the demand source
Encumbrance Amount, Amount encumbered, reserved against funds, when the purchase order or requisition was approved
New Average Cost, Recalculated average unit cost for the item
Cost Group ID, Cost group identifier
Value Change, Amount used to increment the current inventory value.
Percentage Change, Percentage used to update the item cost.
Location Code, Ship–to location
Source Project Number, The source project number
Source Task Number, The source task number
Project Number, The project number
Task Number, The task number
To Project Number, The to project number
To Task Number, The to task number
Expenditure Type, The expenditure type
Expenditure Org, The expenditure organization
Resubmitting Unprocessed Material Transactions:
In the Pending Transactions window either check the transactions Resubmit check box
to resubmit one record or chose Resubmit All from the Tools Menu and selectively deselect individual transaction you do not want to resubmit, save your work. Transactions can also be resubmitted via the following SQL statement:
Update MTL_MATERIAL_TRANSACTIONS_TEMP
Set PROCESS_FLAG = „Y,
LOCK_FLAG = „N,
TRANSACTION_MODE = 3,
ERROR_CODE = NULL
Where TRANSACTION_HEADER_ID = „& TRANSACTION_HEADER_ID;
The “Process transaction interface”(short name INCTCM) is the manager that will launch the “Inventory transaction worker” (short name INCTCW) to process the transactions in the MTL_MATERIAL_TRANSACTIONS_TEMP table. If the error message in the Pending Transactions window is not clear reviewing the log file of the “Inventory transactions Worker” may provide more information that could help in resolving the error.
Uncosted Material Transactions
To resolve uncosted Material Transactions/WSM you need to determine and fix what is preventing a record from being processed through the MTL_MATERIAL_TRANSACTIONS table. Details of uncosted transactions can be viewed through the Applications by navigating to the Material Transactions form.
Cost > View Transactions > Material Transactions
 
In the find Parameter Window the „Transaction Datesfields should be populated with the date range of the Period that is being closed and the „Costed field from the list of values should be populated with „Error or „No. The erred transactions are the ones that will need to be corrected and the transactions that are not costed will need to be costed to close the period.
By using the Material Transaction window, you can view and resubmit erred costed transactions. There are five tabs to select the type of information: Location, Intransit,
Reason, Reference, Transaction ID, Transaction Type and Consumption Advice which provide detailed information to help you resolve erred and uncosted transactions.
The Main Descriptive fields give detailed information on they type of transaction:
Item Description, Inventory item description
Primary UOM, Transaction quantity in terms of the primary uom of the item
Secondary UOM, The secondary unit of measure. If the item is under dual unit of measure control, the secondary unit of measure and the secondary quantity populate automatically.
Primary Qty, Transaction quantity in terms of primary uom of the item
Secondary Quantity, Quantity of this transaction in terms of the Secondary UOM
Date, Transaction date
Distributions (to view distributions of costed transactions)
Lot/Serial (Used if transaction is associated with a Lot or Serial number)
Fields common to all Tabs:
Item, Inventory item reference by the line item
Transaction UOM, Unit of measure used in the transaction
Transaction Quantity, Quantity of this transaction
Transaction ID, Displays the item, transfer transaction ID
Transaction Date, Date the transaction was entered for processing
Source Type, Source type of the transaction, such as WIP Job or Schedule
Source, Source of the transaction, such as account number
Transaction Type, Displays the transaction type
Fields in the Location Tab are as follows:
Subinventory, Subinventory referenced by the line items
Locator, Locator referenced by the line item
Location, If the transaction type is move order issue or issue to project, you can enter
the ship to organization.
Revision, Revision of the inventory item referenced by the line item
Transfer Subinventory, Destination subinventory
Transfer Locator, Destination Locator
Transfer Org, The Destination Organization
Owning Party, The third-party owner of the inventory.
Planning Party, The vendor that manages the inventory.
Supplier, Supplier
Primary Quantity, Transaction quantity in terms of primary uom of the item
Primary UOM, Transaction quantity in terms of the primary uom of the item
Secondary Quantity, Quantity of this transaction in terms of the Secondary UOM
Secondary UOM, Secondary unit of measure if the item is under dual of unit of measure control.
Fields in the Intransit Tab are as follows:
Shipment Number, Shipment number for the line item
Waybill/Airbill, The waybill or airbill number for the transfer
Freight Code, Freight carrier for the transaction
Containers, Number of containers in which the material is stored for the transfer
Fields in the Reason, Reference Tab are as follows:
Reason, The transaction reason
Reference, Reference text describing the transaction
Costed, Indicates the costing status
Transferred to Projects, Indicates the transfer to cost status
Error Code, Code describing the error on the last attempt to process the line items
Error Explanation, Full explanation of the error that occurred when attempting to process the line item
Supplier Lot, Supplier lot number.
Source Code, Source of the transaction, such as account number.
Source Line ID, Line level transaction source id
Fields in the Transaction ID Tab are as follows:
Transfer Transaction ID, Transaction id of the opposing transfer transaction
Parent Transaction ID, Parent Transaction Identifier
Logical Transactions Created, Identifies recrords created by Create Deferred Logical Transactions concurrent request
Logical Transaction, A Logical transaction is an accounting event that represents
the financial transaction between two operating units without the physical movement of goods.
Operating Unit, The legal entity
Organization, Organization the transaction occurred in
Transaction Header, Number used to group transactions in the concurrent manager
Receiving Transaction ID, Receiving transaction cross reference
Move Transaction ID, Move transaction cross reference
Completion Transaction ID, Completion transaction cross reference
Department Code, Oracle Work in Process department code for the line item
Operation Sequence, Operation sequence number within a routing
Source Project Number, the source project number
Source Task Number, the source task number
Project Number, the project number
Task Number, the task number
To Project Number, the to project number
To Task Number, the to task number
Expenditure Type, the expenditure type
Expenditure Org., the expenditure organization
Error Code, code describing the error on the last attempt to process the line item
Error Explanation, full explanation of the error that occurred when attempting to process the line item
Fields in the Transaction Type tab are as follows:
Transaction Action, the transaction action
Field in the Consumption Advice tab are as follows:
Revision, Revision of the inventory item referenced by the line item
From Owning Party, Transfer owning organization identifier
Creation Status, Consumption Status
Error Explanation, Error explanation
Resubmitting Uncosted Transactions:
In the Material Transactions Form transactions that are costed in error can be resubmitted by clicking on “Tools, Select All” and then clicking on “Tools, Submit all” or Submit the number of transactions found through the search criteria in the find window. The erred and uncosted transactions can also be resubmitted through the following sqlplus statement:
First shut down the Cost Manger
Update MTL_MATERIAL_TRANSACTIONS
Set COSTED_FLAG = „N, TRANSACTION_GROUP_ID = NULL
Where COSTED_FLAG is not null;
The “Cost Manger” (module CMCTCM) is the manager that will launch the “Material cost transaction worker” (module CMCMCW) for a standard costing environment or the “Actual Cost Worker” (module CMCACW) for an average, fifo,lifo or perpetual costing environment. If the error message in the Material Transaction form is not clear or not available reviewing the log file of the “Cost Worker” may provide more information that could help in resolving the error. Changing the de-bug profile options; MRP:Debug Mode set to “Yes” and CST: Cost update debug level set to “Full” will provide more information in the log when set prior to the Cost Worker processing.
In an Average , FIFO or LIFO costing organization if there is one transaction that is in error the Cost Manager will not launch a Cost Worker to process the uncosted transactions. This is standard functionality because in an Average, FIFO or LIFO costing organization the item cost is recalculated during receiving transactions and if they are not costed in order the item cost would not be correct.
In the Organization Parameter screen under the Costing Information tab there is a field “Cost Cutoff Date” and a Cost Manager will not launch any Cost Workers past this date. This is most commonly used to update item cost and all transactions past the cost cutoff date will be transacted at the new cost, once the Cost Cutoff Date is changed.
Pending WIP Costing transactions
(Resource and Overhead Transactions)
Resolving Pending WIP Cost transactions is a process of determining and fixing what is preventing a record form being processed through the WIP_COST_TXN_INTERFACE table. Details of pending transactions can be viewed through the applications by navigating to the pending resource transaction form.
WIP > Resource Transactions > Pending Resource Transactions

In the Pending Resource Transaction window you can view, update and resubmit resource transactions that have failed validation and remain in the WIP_COST_TXN_INTERFACE table. You can also resubmit and delete transactions whose concurrent process has failed and have a processing phase of Complete and a process status of Error. There are seven tabs to select the type of information: Processing, Source, Concurrent Request, Job or Schedule Name, Operation, Resource, Transaction, Comments and Project Information which provide detailed information to help in resolving pending resource transactions.
Erred transactions will have the Transaction Id And Group ID populated and the Status will be “Error”. Pending transactions will have the Transaction ID and Group ID fields blank and the Status will be “Pending”.
To view error details for failed resource transactions, select the transaction and click on the [Error] button. The Pending Resource Transaction error window appears. Column indicates the name of the column in the resource transaction interface table (WIP_COST_TXN_INTERFACE) THAT FAILED VALIDATION. Message indicates why the transaction failed.
 
Fields Common to all Tabs:
Transaction ID, Transaction Identifier
Fields in Processing Tab:
Group Id, Transaction group identifier
Phase, Transaction processing phase
Status, Transaction processing status
Fields in Source Tab:
Source Code, Code of the shop floor control system that generated the transaction record (null if created by Oracle Work in Process)
Source Line, Identifier used by source shop floor control system (null if created by Oracle Work in Process)
Created By, Username of person that created the record
Fields in Concurrent Request Tab:
Request ID, Request Id
Phase, Transaction processing phase
Status, Transaction processing status
Message, Concurrent Message
Fields in Job or Schedule Name Tab:
Organization, Organization identifier
Job or Schedule Name, WIP job or repetitive assembly name
Line, WIP line identifier
Assembly, Inventory item identifier of assembly that job or schedule creates
Fields in Operation Name Tab:
Op Seq, Operation sequence number within a routing
Dept, Department Identifier
Res Seq, Resource sequence number
Name, Resource code
Type, Resource type
Employee Number, Employee number
Fields in Resource Tab:
Activity, Activity name
Charge Type, Method of charging the resource
PO Number, Purchase order Identifier that the receipt is against
Currency, Unique Identifier for the currency
Actual Rate, Actual rate of the resource
Fields in Transaction Tab:
UOM, Unit of measure used for transaction
Quantity, Transaction quantity
Date, Date transaction was performed
Type, Transaction type
Fields in Comments Tab:
Reason, Standard transaction reason name
Reference, Transaction reference descriptive text
Fields in Project Information Tab:
Project Number, Project Identifier
Task Number, Project task Identifier
Resubmitting Failed or Pending Resource Transactions
In the Pending Resource Transactions window either check the transactions Resubmit check box to resubmit one record or chose Select All for Resubmit from the Special Menu and selectively deselect individual transaction you do not want to resubmit, save your work. Erred transactions can also be resubmitted via the following SQL statement:
Update WIP_COST_TXN_INTERFACE
Set GROUP_ID = NULL,
TRANSACTION_ID = NULL,
REQUEST_ID = NULL,
PROCESS_STATUS = 1
Where PROCESS_STATUS = 3;
This will resubmit records in PROCESS_STATUS = 3 (Error), nulling out the transaction id, group id and concurrent request id and change the process status to pending.
The “Cost Manager” (short name CMCTCM) is the manager that will launch the “Resource Cost Worker” (short name CMCCTW) or the “Overhead Cost Worker” (short 14 name CMCOCW) to process the resource or resource overhead transactions in the WIP_COST_TXN_INTERFACE table. If the error message in the Pending Resource Transaction screen widow is not clear reviewing the log file of the “Cost Worker” may provide more information that could help in resolving the error. Changing the de-bug profile options; MRP: Debug Mode set to “Yes” and CST: Cost update debug level set to “Full” will provide more information in the log when set prior to the Worker processing.
Pending WSM interface
To resolve transactions in the WSM interface, you need to determine and fix what is preventing a record from being processed through the WSM_SPLIT_MERGE_TXN_INTERFACE table.
The user inserts rows into WSM_SPLIT_MERGE_TXN_INTERFACE (WSMTI),
WSM_STARTING_JOBS_INTERFACE (WSJI), and WSM_RESULTING_JOBS_
INTERFACE (WRJI) tables. Transactions in WSMTI are joined with the
transactions in WSJI and WRJI by the HEADER_ID column in these tables.
Errors and Validations:
Whenever any one row errors out within a given group, the PROCESS_STATUS
of the entire group is set to ERROR. But only the transactions that actually
erred out will have the ERROR_MESSAGE column containing the error
message.
Errors and warnings, if any, will be written into the WSM_INTERFACE_
ERRORS table. Appropriate messages will be given in the parent and child
interface tables to refer to WSM_INTERFACE_ERRORS table when there is any error.
Resubmitting Pending WSM Interface transactions:
To resubmit the erred transactions for processing, the user has to rectify the
error and change the PROCESS_STATUS of the required transactions from 3
(ERROR) to 1 (PENDING). Launching the concurrent process Import WIP Lot Transactions (Navigation path; Responsibility, Shop Floor Management > Run Request > Import WIP Lot Transactions) will process the records in the WSM_SPLIT_MERGE_TXN_INTERFACE table by Group_id.
Pending LCM Interface Transactions
To resolve pending Landed Cost Management (LCM) transactions you need to determine and fix what is preventing a record from being processed through the CST_LC_ADJ_INTERFACE table. Details of transactions can be viewed through the Applications by navigating to the Pending Landed Cost Adjustment form.
Cost Responsibility > View Transactions > Pending Landed Cost Adjustments

The Pending Landed Cost Adjustment Transactions window can be used to view pending
landed cost adjustment transactions. You can also use this window to resubmit any
erred pending adjustment transactions.
There are three tabs; Processing, Transaction, Source, to view information on the pending records and an Errors button to view the error if the transactions is in error;
Fields common to all tabs;
Transaction Id, Unique landed cost transaction identifier
Fields in the Processing TAB:
Group Id, Landed cost adjustment processor group id
Phase, Process phase: 1-Pending, 2-Validated, 3-Errored
Status, Process status: 1-Pending, 2-Running
Fields in Transaction TAB:
Item, Inventory Item name
Item Description, Inventory Item description
Organization, Destination inventory organization
Transaction Date, Landed cost adjustment transaction date
Prior Landed Cost, Prior landed cost
New Landed Cost, New landed cost
Fields in the Source TAB:
Rcv Transaction, Parent receipt transaction for LCM shipment
PO Number, Purchase order number
PO Line Num, Purchase order line number
Receipt Number, Receipt number that the PO is received on
Receipt Line Number, Receipt line number the PO is received on
Resubmitting Pending Landed Cost Adjustment Transactions
Select the Resubmit checkbox for each erred transaction that you want to resubmit,
and click save. You can also select the Resubmit checkboxes for all rows by clicking
Tools > Select All for Resubmit.
The Landed Cost Adjustment Processor process the records in the CST_LC_ADJ_INTERFACE table creating Landed Cost Adjustment-Receive, and landed Cost Adjustment-Deliver accounting events and corresponding accounting entries and the average / layer cost update transactions for adjusting the net delivered quantity for LCM shipments in Inventory.
The Cost Manager launches the Landed Cost Adjustment processor every time it runs. The landed Cost Processor is launched conditionally, based on whether there exist transactions in the interface table.
Resolution Recommended Transactions
Pending Receiving Transactions:
Pending Receiving Transactions are transactions that have not processed through the RCV_TRANSACTIONS_INTERFACE table. These transactions can be viewed and deleted through the „Transaction Status Summary form:
Purchasing > Receiving > Transactions Status Summary
 

A find window will appear and to query all of the unprocessed transactions for that period select from the field Source Type „All, from the Transactions Details tab input the start and completion dates of the period in question and click „Find: 17 18
Using the Transaction Statuses window, pending transactions can be viewed and deleted. There are four tabs to select: Transactions, Details, Order Information, Outside Services.
The Main Descriptive fields give detailed information on the type of transaction that the cursor is on:
Receipt, Receipt number
Supplier, Source of the receipt
Description, Item description
Errors, Error message
Order, Order Number
Parent Type, Parent transaction type
Routing, Receiving routing name
Fields common to all Tabs:
Quantity, Transaction quantity
UOM, Primary unit of measure of the item
Fields in Details Tab:
Transaction Date, Date of transaction
Reason, Standard transaction reason identifier
Comments, Comments
Packing Slip, Packing slip number
Fields in Order Information Tab:
Order Type, Purchase order types
Order Num, Purchase order number
Rel, Purchase order release number
Line, Purchase order line number
Shipment, Purchase order shipment number
Supplier, Vendor
Customer, Customer
Qty Ordered, Ordered quantity
UOM, Ordered UOM
Due Date, Expected due date
Fields in Outside Services Tab:
Job/Schedule, WIP Job or Schedule name
Line, WIP line identifier
Operation Sequence, WIP operation sequence number within a routing
Department, WIP department name
Resolving Pending Receiving Transactions:
In resolving Pending Receiving Transactions the status and quantity received of the actual purchase order of the receiving transaction should be reviewed. If after reviewing the Purchase Order if the status is closed or complete and the purchase order quantity is equal to the quantity received then most likely the Pending Receiving transaction is a duplicate. Duplicate transactions can be deleted through the „Transaction Status Summaryscreen by clicking on the transaction line and then clicking on the delete icon.
If after reviewing the Purchase Order of the Pending Receiving Transactions it is determined that the transaction should be processed it is recommended that a new receipt is created and processed. The original Pending Receiving Transaction should be deleted through the „Transaction Status Summary screen.
Receiving transactions are process through the RCV_TRANSACTIONS_INTERFACE table by submitting the „Receiving Transactions Processor(short name RVCTP).
Pending Material Transactions
Resolving Pending Material Transactions is a process of determining and fixing what is preventing a record from being processed through the MTL_TRANSACTIONS_INTERFACE table. Details of pending transactions can be viewed through the application by navigating to the Transaction Open Interface form:
Inventory > Transactions > Transaction Open Interface

Using the Transaction Open Interface window, you can view, edit, correct and resubmit transactions received through the open interface. There are four tabs to view information: Error, Location, Source, Intransit and Other which provide detailed information to help you resolved pending transactions. Select a tabbed region to display a type of information:
Error: Interface transaction error information.
Location: Interface transaction location information.
Source: Interlace source information
Intransit: Interface intransit shipping information.
Others: Miscellaneous header and costing information.
The Main Descriptive fields give detailed information on the type of transaction that the cursor is on:
Primary UOM, Transaction quantity in terms of the primary uom of the item
Qty, Transaction quantity in primary unit of measure
Date, Transaction Date
Item Description, Inventory item description
Error Explanation, Full explanation of the error that occurred when attempting to process the line item
Lot/Serial (Button), Used if transaction is associated with a Lot or Serial Number
Submit (Box), When checked and saved the erred transaction line will be resubmitted, if the line is not in error it can not be resubmitted using the Submit check box but will have to be resubmitted through a sqlplus script. All erred transactions can be selected to be resubmitted by clicking on „Tools resubmit all.
Fields Common to all Tabs:
Item, Inventory item referenced by the line item.
Transaction Source Type, Source type of the transaction, such as WIP Job or Schedule.
Fields in the Erred Tabbed Region:
Error Code, Code describing the error on the last attempt to process the line item.
Error Explanation, Full explanation of the error that occurred when attempting to process the line item.
Header ID, Line items transaction header ID.
Interface ID, Interface ID that is assigned by the external system to track a set of transactions through the Oracle Inventory transaction interface processor.
Lock Flag, Indicates if the row and its child rows are locked to update from other processes.
Process Flag, Indicates whether the row has been success-fully processed by the concurrent manager, is available for processing, or processed with an error.
Request ID, Line items request ID
Transaction Mode, Method used to process the line item, such as concurrent processing.
Fields in the Location Tabbed Region:
Locator, Locator referenced by the line item.
LPN, The LPN put away. This field will display if you have Oracle
Warehouse Management installed, and you are working with a WMS enabled organization.
Org, Organization code of the organization referenced by the line item.
Name, Organization Name
Revision, Revision of the inventory item referenced by the line item.
Subinventory, Subinventory referenced by the line item.
Transaction Date, Date the transaction was entered for processing.
Transaction Quantity, Quantity of the transaction
Transaction UOM, Unit of measure used in the transaction.
Transfer Locator, Destination location.
Transfer Org, Organization code of the destination organization
Transfer Org Name, Organization name of the destination organization
Transfer Subinventory, Destination subinventory.
Supplier, Supplier
Planning Org, Planning Organization Code
Source Tabbed Region:
Transaction Source, Source of the transaction, such as account number.
Distribution Account, Distribution account for the line item.
Reason Name, The transaction reason.
Source Code, Source of the transaction, such as account number
Source Line ID, User–entered line ID of the source code for the line item.
Transaction Action Name, The transaction action
Transaction Cost, Cost to process the transaction.
Transaction Reference, Reference text describing the transaction
Transaction Type, The transaction type.
Intransit Tabbed Region:
Containers, Number of containers in which the material is stored
Expected Arrival Date, Date you expected to receive the material at the destination organization
Freight Code, The freight carrier for the transfer
Shipment Number, Number uniquely identifying the item or items transferred
Transfer Cost, Cost to process the transfer
Transportation Account, General ledger account charged with the value entered in the Transportation Cost field
Transportation Cost, Cost to physically transfer the material, such as freight carrier charges
Waybill Airbill, The waybill or airbill number for the transfer
Others Tabbed Region:
Department, Oracle Work in Process department code for the line item
Employee Code, Employee who entered the transaction
Encumbrance Account, Account used by Oracle Purchasing to receive the item
Encumbrance Amount, Amount encumbered, reserved against funds, when the purchase order or requisition was approved
Expenditure Org, The expenditure organization
Expenditure Type, The expenditure type.
Demand Source Header ID, Source of the demand for the line item, such as an account number.
Demand Source Delivery, Line item detail identifier of the demand source.
Demand Source Line, Line number from the demand source, such as Sales Order line number.
New Average Cost, Recalculated average unit cost for the item.
Operation Seq Number, Number associated with the job or schedule referenced by the line item
Percentage Change, Percentage used to update the item cost.
Project Number, The project number.
Source Project Number, The source project number.
Source Task Number, The source task number.
Task Number, The task number.
To Project Number, The to project number.
To Task Number, The to task number.
Transaction Source Delivery ID, Line item detail identifier of the demand source.
Transaction Source Line ID, User–entered line ID of the source code for the line item.
Value Change, Amount used to increment the current inventory value.
Resubmitting Pending Material Transactions
In the Transaction Interface window, check the Submit option next to the transactions you want to resubmit or choose Resubmit All. If you have many transaction to resubmit, use the Resubmit All button to select all transactions for processing and then selectively
deselect individual transaction you do not want to resubmit. Save your work to submit the transactions for processing.
The erred records can also be resubmitted via the following SQL statement:
Update MTL_TRANSACTIONS_INTERFACE
Set PROCESS_FLAG = 1,
LOCK_FLAG = 2,
TRANSACTION_MODE = 3,
ERROR_CODE = NULL
Where PROCESS_FLAG = 3
The “Process transaction interface” (short name INCTCM) is the manager that will launch the “Inventory transaction worker” (short name INCTCW) to process the transactions in the MTL_TRANSACTIONS_INTERFACE table. If the error message in the Transactions Interface window is not clear reviewing the log file of the “Inventory transactions Worker” may provide more information that could help in resolving the error. (See note 148651.1 How to get Debug Information for Inventory Material Transactions)
Pending Shop Floor Move
Resolving unprocessed Move Transactions is a process of determining and fixing what is preventing a record from being processed through the WIP_MOVE_TXN_INTERFACE table. Details of pending move transactions can be viewed through the applications by navigating to the pending move transactions form:
WIP > Move Transactions > Pending Move Transactions

Through the Pending Move Transactions window you can view, update, delete, and resubmit Move transaction records that have failed validation and remain in the Open Move Transaction Interface table (WIP_MOVE_TXN_INTERFACE). You can also resubmit transactions whose concurrent process has failed and have a processing phase of Complete and process status of Error. You can view error messages associated with failed records. Error messages can assist you in updating failed records before resubmission.
There are seven tabs to select information on the move transaction; Processing, Source, Concurrent Request, Job or Schedule Name, Operations, Transactions and Comments and Scrap Account which provide detailed information to help you resolve pending move transactions.
Fields Common to all Tabs:
Resubmit(check Box), When Checked and saved the erred transaction line will be resubmitted, if the line is not in error it can not be resubmitted using the Submit check box but will have to be resubmitted through a sqlplus script.
Transactions Id, Transaction Identifier
Errors(button), The error details of an erred transactions can be viewed by selecting the transaction and then clicking on the Errors button. Column indicates the name of the column in the wip move transaction interface that failed validation. Message indicates why the transactions failed.
Fields in Source Tab:
Source Code, Code of the shop floor control system that generated the transaction record (null if created by Oracle Work in Process)
Source Line, Identifier used by source shop floor control system (null if created by Oracle Work in Process)
Created By, User name of the person who created the record
Fields in Concurrent Request:
Request ID, Line items request ID
Phase, Transaction processing phase
Status, Transaction processing status
Message, Concurrent Message
Fields in Job or Schedule Name:
Organization, Organization code
Job or Schedule Name, WIP job or repetitive assembly name
Line, Line name
Assembly, Inventory item Identifier for the assembly the job or schedule creates
Fields in Operations Tab:
From Operation:
Seq, From operation sequence number
Department, From department code
Step, From intra-operation step
To Operation:
Seq, To operation sequence number
Department, To department code
Step, To intra-operation step
Fields in Transaction Tab:
UOM, Unit of measure used in transaction
Quantity, Transaction quantity (between operations)
Overcompletion Quantity, Overcompletion quantity specified in the transaction UOM
Date, Date transaction was performed
Type, Transaction type
Fields in Comments and Scrap Account Tab:
Reason, Standard transaction reason name
Reference, Transaction reference descriptive text
Scrap Account, General Ledger account charged when material is scrapped Erred transactions will have the Transactions ID and Group ID populated and the Status will be “Error”. Pending transactions will have the Transactions ID and Group Id fields blank and the Status will be “Pending”.
Resubmitting Failed Move Transactions:
In the Pending Move Transactions window, either check the transactions Resubmit check box to resubmit one record or chose Select All from the Special Menu. Now save your work. The records can also be resubmitted using the following SQL statement:
Update WIP_MOVE_TXN_INTERFACE
Set GROP_ID = NULL,
TRANSACTIONS_ID = NULL,
PROCESS_STATUS = 1
Where TRANSACTION_ID = „&TRANSACTION_ID;
When you resubmit a record, the system nulls the Transactions ID, Group ID and changes the processing status to “Pending”.
Deleting Pending Move Transactions Records:
To delete pending move transactions, in the Pending Move Transactions window, select the transaction choose Delete from the Edit Menu. You can delete failed records that have a processing status of Error regardless of their processing phase. When you delete transaction records, their corresponding error messages are also deleted.
UNPROCESSED SHIPPING TRANSACTIONS
To resolve unprocessed shipping transactions, you need to determine and fix the shipping transactions that are in a status of shipped in the WSH_DELIVERY_DETAILS table. Details of the Shipping transactions in a status of shipped can be viewed through the application by navigating to the Transaction screen through Order Management and quarrying on the status „Shipped and the Date of period:
Order Management > Shipping > Transactions


The Shipping Transactions window provides a consolidated workbench for three
major shipping functions: planning, pick releasing, and ship confirming. It enables
you to plan and manage trips, stops, deliveries, delivery lines, and LPNs
(containers). There are four tabs to select they type of information: Trips, Stops, Contents by Delivery, Contents by Line/Lpn.
Transactions that are in a in a status of „Shipped have been shipped confirmed but have not yet been interfaced to Oracle Inventory. These must be processed and resolved before the period is closed. The concurrent process “Order Management Interface” (short name WSHOMIS) and the concurrent process “Inventory Interface –SRS” (short name WSHINVIS) populate Inventory Interface and Order Management Interface and upon completing successfully the status of the line changes to “Invoice Eligible”. These concurrent processes can be submitted through the applications by navigating to:
Order Management > Shipping > Interface > Run
Run the Order Management Interface-SRS first then the Inventory Interface-SRS. These concurrent processes can be submitted by Trip Stop. The Trip Stop of the pending shipping transaction can be found in the Shipping Transactions window under the Stops tab in the Trip column. Reviewing the log file will supply an error message if the concurrent process does not complete successfully.
Conclusion:
The key steps to resolving pending transactions are:
-Locate the transactions
-Find the error message to determine what is preventing the transactions from processing.
-Resolve the error
-Resubmit the pending record.
If transactions are pending but not in error the transaction will need to be resubmitted via an SQL statement.
Oracle E-Business Suite 12 Financials is a solution that provides out-of-the-box features to meet global financial reporting and tax requirements with one accounting, tax, banking, and payments model, and makes it easy to operate shared services across businesses and regions.
we will start with recipes for creating Items.
 We will cover:
                  — Creating Items

  • Exploring Item attributes
  • Creating Item templates
  • Exploring Item controls

Introduction

An organization’s operations include the buying and selling of products and services. Items can represent the products and services that are purchased and sold in an organization. Let’s start by looking at the Item creation process.
The following diagram details the process for creating Items:

1. The Item Requester (the person who requests an Item) completes an Item Creation Form, which should contain information such as:

  • Costing information
  • Pricing Information
  • Item and Product Categories
  • Details of some of the Item attributes
  • The inventory organization details
  1. Once complete, a message is sent to the Master Data Manager (the person who maintains the master data) to create the Item. The message could be sent by fax, e-mail, and so on.
  2. The Master Data Manager reviews the form and enters the details of the Item into Oracle E-Business Suite by creating the Item. Once complete, a message is sent to the Item Requester.
  3. The Item Requester reviews the Item setup on the system.

Let’s look at how Items are created and explore the underlying concepts concerning the creation of Items.

Creating Items

Oracle Inventory provides us with the functionality to create Items. Sets of attributes are assigned to an Item. The attributes define the characteristics of the Item. A group of attributes values defines a template, and a template can be assigned to an Item to automatically define the set of attribute values.
An Item template defines the Item Type. For example, a Finished Good template will identify certain characteristics that define the Item as a finished good, with attributes such as “Inventory Item” and “Stockable” with a value of “Yes”. Let’s look at how to create an Item in Oracle Inventory. We will also assign a Finished Good template to the Item.

Getting ready

Log in to Oracle E-Business Suite R12 with the username and password assigned to you by the System Administrator. If you are working on the Vision demonstration database, you can use OPERATIONS/WELCOME as the USERNAME/PASSWORD:

  1. Select the Inventory Responsibility.
  2. Select the V1 Inventory Organization.

How to do it…

Let’s list the steps required to create an Item:


 Navigate to Items | Master Items. Please note that Items are defined in the Master Organization.

  1. Enter the Item code, for example, PRD20001.
  2. Enter a description for the Item:

 Select Copy From from the tools menu (or press Alt+T). We are going to copy the attributes from the Finished Good template:


  1. We can also copy attributes from an existing Item.
  2. Enter Finished Good and click on the Apply button (or press Alt+A) and click on the Done button.
  3. Save the Item definition by clicking on the Save icon (or press Ctrl+S).

How it works…

Items contain attributes and attributes contain information about an Item. Attributes can be controlled centrally at the Master Organization level or at the Inventory Organization level.

There’s more…

Once the Item is created, we need to assign it to a category and an inventory organization.

Assigning Items to inventory organizations

For us to be able to perform transactions with the Item in the inventory, we need to assign the Item to an inventory organization. We can also use the organization Item form to change the attributes at the organization level. For example, an Item may be classified as raw materials in one organization and finished goods in another organization.

  1. From the Tools menu, select Organization Assignment.
  2. Select the inventory organization for the Item. For example, A1–ACME Corporation. Click on the Assigned checkbox.


 Save the assignment.

Assigning Items to categories

When an Item is created, it is assigned to a default category. However, you may want to perform transactions with the Item in more than one functional area, such as Inventory, Purchasing, Cost Management, Service, Engineering, and so on. You need to assign the Item to the relevant functional area. A category within a functional area is a logical classification of Items with similar characteristics.

  1. From the Tools menu, select Categories.
  2. Select the Categories Set, Control Level, and the Category combination to assign to the Item:       

Save the assignment.

Exploring Item attributes

There are more than 250 Item attributes grouped into 17 main attribute groups. In this recipe, we will explore the main groups that are used within the financial modules.

How to do it…

Let’s explore some Item attributes:
Search for the Finished Good Item by navigating to Items | Master Items:

  1. Click on the Find icon. You then enter the Item code and click on the Find button to search for the Item.
  2. Select the tabs to review each of the attributes group:

  1. In the Main tab, check that the Item Status is Active. We can also enter a long description in the Long Description field.
  2. The default value of the primary Unit of Measure (UOM) can be defined in the INV: Default Primary Unit of Measure profile option. The value can be overwritten when creating the Item. The Primary UOM is the default UOM used in other modules. For example, in Receivables it is used for invoices and credit memos.


In the Inventory tab, check that the following are enabled:

  • Inventory Item: It enables the Item to be transacted in Inventory. The default Inventory Item category is automatically assigned to the Item, if enabled.
  • Stockable: It enables the Item to be stocked in Inventory.
  • Transactable: Order Management uses this flag to determine how returns are transacted in Inventory.
  • Reservable: It enables the reservation of Items during transactions. For example, during order entry in Order Management. 


 In the Costing tab, check that the following are enabled: 
Costing: Enables the accounting for Item costs. It can be overridden in the Cost Management module, if average costing is used.
Cost of Goods Sold Account: The cost of goods sold account is entered. This is a general ledger account. The value defaults from the Organization parameters.

  1. In the Purchasing tab, enter a Default Buyer for the purchase orders, a List Price, and an Expense Account. Check that the following are enabled:
    • Purchased: It enables us to purchase and receive the Item.
    • Purchasable: It enables us to create a Purchase Order for the Item.
    • Allow Description Update: It enables us to change the description of the Item when raising the Purchase Order.
    • RFQ Required: Set this value to Yes to enable us to require a quotation for this Item.
    • Taxable: Set this value to Yes with the Input Tax Classification Code as VAT–15%. This can be used with the default rules in E-Tax.
    • Invoice Matching: Receipt Required–Yes. This is to allow for three-way matching.
  2. In the Receiving tab, review the controls.


 In the Order Management tab, check that the following are enabled:

  • Customer Ordered: This enables us to define prices for an Item assigned to a price list.
  • Customer Orders Enabled: This enables us to sell the Item.
  • Shippable: This enables us to ship the Item to the Customer.
  • Internal Ordered: This enables us to order an Item via internal requisitions.
  • Internal Orders Enabled: This enables us to temporarily exclude an Item from internal requisitions.
  • OE Transactable: This is used for demand management of an Item.


 In the Invoicing tab, enter values for the Accounting Rule, Invoicing Rule, Output Tax Classification Code, and Payment Terms. Enter the Sales Account code and check that the Invoiceable Item and Invoice Enabled checkboxes are enabled.

An Item template is a set of attributes that enable the ‘quick’ creation of an Item. In this recipe, we will create an Item template that can be used to create many similar Items. We will copy from the Finished Good template to our new template called ACME Finished Good.

Getting ready

Log in to Oracle E-Business Suite and select the Inventory responsibility.

How to do it…

Let’s list the steps required to create an Item template:

  1. Navigate to Setup | Items | Templates.
  2. Select the Inventory Organization.


 From the Find Item Templates form, click on New button or press Alt+N.

In the Template field, enter the name of the new template; for example, enter ACME Finished Good.
In the Description field, enter a suitable description, for example, enter ACME Finished Good Template.

  1. Select Copy Template from the Tools menu.
  2. We can use this form to select the attributes groups that we want to copy from the Finished Good template.
  3. Click on the Apply button.
  4. Click on the Done button.
  5. In the dialog box presented to us, with the message “Do you want to save the changes you have made?”, click on the Yes button.

How it works…

Item templates can be created from scratch. To make the template creation process easier, Oracle has provided us with a number of seeded templates as a starting point to copy from. We can also combine templates and manually amend the attributes to define our template. When we copy from an existing template, we have choices that determine how the copy will occur.

The three main choices are as follows:

  1. Overwrite: All selected attribute values are copied to the new template and any values that we have manually created will be overwritten.
  2. Append: Attributes that have no value will be copied across to our template. This mode is useful if you are using a combination of templates.
  3. Overwrite Not Null: Only the selected attributes that contain values will be copied.

There’s more…

Let’s amend the template to allow us to automatically populate the template with some default values. Let’s create an Item and apply the amended template to the Item.

Amending the template

Let’s search for the template and amend the templates to include some of the default values:

  1. Search for the ACME Finished Good template by navigating to Setup | Items | Templates.
  2. Enter ACME Finished Good in the Template field and click on the Find button.
  3. Click on the Open button to view the template.


In the Attributes Group region, select Purchasing and enter some default values, for example:

  • Default Buyer: Stock, Ms. Pat
  • Input Tax Classification Code: VAT-15%
  • Taxable: Yes
  • Allow Description Update: Yes
  • Receipt Required: Yes

 Save the template.


 In the Attributes Group region, select Receiving and enter some default values, for example:

  • Over-Receipt Qty Action: Warning
  • Receipt Routing: Direct Delivery
  • Days Early Receipt Allowed: 5
  • Days Late Receipt Allowed: 2
  • Receipt Date Action: Warning

Save the template.
In the Attributes Group region, select Invoicing and enter some default values, for example:

  • Accounting Rule: Immediate
  • Payment Terms: Immediate

Save the template.

Creating an Item and applying the template to the Item

Let’s create an Item and apply the template to the Item:
Navigate to Items | Master Items.
Enter the Item code and description.
Select Copy From in the Tools menu.

 
Click on the Apply button.
Click on the Done button. This action will validate the template created.

 
Click on the Purchasing tab to review the default values of the attributes assigned automatically by the template.
Save the Item.

Exploring Item controls

During the creation of Items, we may decide to restrict the use of the Items by controlling Items within an Inventory Organization. When an Item is defined, it is defined in the Item Master Organization and can then be assigned to other Inventory Organizations. Items are then held in Subinventories, which can contain Locators. Locator, Serial number, Lot number, and Revision number within a Subinventory can be used to control Items. In this recipe, we will explore some of the control parameters for Items.

Getting ready

Log in to Oracle E-Business Suite and select the Inventory responsibility.

How to do it…

Let’s explore the following Item controls:

  1. Item Status
  2. Item Attribute

The Item Status is the status of an Item and it determines the actions that can be performed on an Item. For example, an obsolete Item may not be sold to the customer, but can be used as parts for repairs and can still be stockable. Let’s create an Item status for obsolete Items.
Navigate to Setup | Items | Status Code. 

In the Status field, enter Obsolete and ACME Obsolete in the Translated Status field.
Enter a Description, for example, ACME Obsolete Items.

 Enable the following attributes:
  • BOM Allowed
  • Stockable
  • Transactable

Save the form.

The levels that the attributes can be controlled at are set in the Item Attribute Controls form. Let’s look at some of the Item Attribute Controls:
     Navigate to Setup Items | Attribute Controls|
     From the menu, select View | Query By Example | Enter (or press F11 on the keyboard).
     In the Group Name field, enter Main%. 

     From the Menu, select View | Query By Example | Run (or press Ctrl+F11 on the keyboard).
     Observe that some attributes are controlled at the Master Level and some at the Org Level.
     Close the form.

There’s more…

Items are stored in a Subinventory and can be controlled using a locator. Items can be identified by lot and by serial numbers.

Storing Items by Subinventories

Subinventories are distinct separations of Items within an Inventory Organization. Subinventories can be physical or logical. Items within an Inventory Organization must reside in a Subinventory.
Transactions are performed from the Subinventories. Examples of Subinventories include: finished goods, van, stores, staging area, and fast moving goods. Let’s create a finished goods Subinventory and restrict an Item to the Subinventory.
    Navigate to Setup | Organizations | Subinventories.
    Click on the New button. 
        In the Name field, enter ACME-FG.
        In the Description, enter ACME Finished Goods.
        In the Locator Control field, select Item level. This will enable the Inventory transactions for 

         this Subinventory to use locator control, which we define at the Item level.
Save the record.
 Let’s restrict an Item to the Subinventory:
      Navigate to Items | Organization Items.
      Search for the PRD20001 Item.
 Oracle E-Business Suite: Creating Items in Inventory
Select the Inventory tab and select the Restrict Subinventories checkbox.
d.

    In the Tools menu, select Items Subinventories.
    Select ACME-FG in the Subinventory field.

    Save the record.

Storing Items by locators

Stock locators identify the physical areas where Items are stored. Additional controls can be placed on the Items in stock locators. For example, we can control the shelf life of an Item with stock locators. Stock locators are usually defined as Row, Rack, and Bin. Let’s create three stock locators for the ACME Finished Goods Subinventory and restrict an Item by locator control:
Navigate to Setup | Organizations | Subinventories

Search for the ACME-FG Subinventory (press F11 on the keyboard, and enter the search mask ACME%, then press Ctrl+F11 on the keyboard).
Click on the Locator button to enter the locator details.

   Enter A1.1.1 in the Locator field.
   In the Description field, enter ACME FG 1.
   In the Type field, select Storage Locator.
   Enter another row for A1.1.2, ACME FG 2, with Storage Locator in the Type field.
   Repeat for A1.1.3, ACME FG 3, with Storage Locator in the Type field.

Save the record. 

The structure of the stock locator is defined in the stock locator Flexfield structure and can be defined to fit your business requirements. Locator Control can be “prespecified” before they are used or can be defined dynamically as Items are received or shipped.
Let’s restrict an Item to the Locator:
    Navigate to Items | Organization Items.
    Search for the PRD20001 Item.

 
     Select the Inventory tab, select the Restrict Locators checkbox, and then select the Locator Control as Prespecified.
Save the record.
In the Tools menu, select Items Subinventories.
Select A1.1.1 in the Locator field.
Save the record.

Identifying Items by lot control

A lot of numbers can be used to identify Items that share the same specifications. For example, lot numbers can be used to specify the expiry period of an Item. Let’s look at how to use lot numbers to control Items. We will impose a shelf life of 30 days on the Item and assign lot numbers to the Item:
     Navigate to Items | Organization Items.
     Search for the PRD20001 Item.

Select the Inventory tab.
In the Lot Expiration (Shelf Life) region, select the Control field and select Shelf Life Days.
Enter 30 as the number of days.
In the Lot region, select Full Control in the Control field.
Save the record.

Tracking Items using serial control

Serial numbers can be used to track an Item. A serial number is assigned to each unit of the Item, if serial control is used:
Navigate to Items | Organization Items.
Search for the PRD20001 Item.

Select the Inventory tab.
In the Serial region, select the Generation field, and select At Receipt. This will allow us to specify the format of the serial numbers at the time of receipt.
Save the record.

Controlling Items using revisions

Items can have versions. Item versions are controlled using revisions. For example, we can decide to make the PRD20002 revision controlled, and have another version of the Item. Let’s change the attribute to revision controlled and add a revision B to the Item:

Navigate to Items | Organization Items.
Search for the Item PRD20002.

In the Inventory tab, enable the Revision Control checkbox.
In the displayed message, select OK.
Save the Item.

From the Tools menu, select Revisions.
Add a line for Revision B of the Item with the description Revised Widget.
Save the record.

Summary

This article included recipes for creating Items and exploring the Item attributes. It then continued with creating Item templates and exploring Item controls.

Oracle Purchasing Tables

po_requisition_headers_all
po_requisition_lines_all
po_req_distributions_all
po_headers_all
po_lines_all
po_distributions_all
rcv_transactions
po_requisitions_interface_all
po_reschedule_interface
po_headers_interface
po_lines_interface
po_distributions_interface
 
po_vendors
po_vendor_sites_all
po_vendor_contacts

Understanding the Matching Tables

Payables uses several of Oracle Purchasing tables for matching. To implement matching in Payables, you need to load these tables with the data from your non-Oracle purchasing application.

    • PO_HEADERS
    • PO_LINES
    • PO_LINE_LOCATIONS
    • PO_DISTRIBUTIONS
    • PO_DISTRIBUTIONS_AP_V (view of PO_DISTRIBUTIONS)
    • PO_RELEASES (Blanket Purchase Orders)
    • PO_LOOKUP_CODES

AutoInstall automatically installs these and other necessary Oracle Purchasing application tables when you install Payables.

PO_HEADERS

Each record in this table represents a purchase order, which is an order for goods or services from a single supplier. Each purchase order may have multiple lines (PO_LINES). In addition, each blanket purchase order may have multiple blanket releases (PO_RELEASES), which release an amount from the blanket.

PO_LINES

Each record in this table represents a purchase order line, which identifies the items and unit price for the goods ordered on a purchase order. Each purchase order line may have multiple shipments (PO_LINE_LOCATIONS).

PO_LINE_LOCATIONS

Each record in this table represents a purchase order shipment, which identifies the quantity of an item shipped to a buyer location by the supplier. Each purchase order shipment may have multiple accounting distributions (PO_DISTRIBUTIONS).

PO_DISTRIBUTIONS/PO_DISTRIBUTIONS_AP_V

Each record in this table/view represents a purchase order distribution, which identifies the account charged for the items on a purchase order shipment.

PO_RELEASES

Each record in this table represents a blanket release for a purchase order. A blanket release may create multiple shipments.

AP_INVOICES/AP_INVOICE_DISTRIBUTIONS

Each purchase order shipment can be matched to multiple invoices (AP_INVOICES), and a single invoice may be matched to multiple purchase order shipments. When you match an invoice to a purchase order shipment, Payables creates an invoice distribution (AP_INVOICE_DISTRIBUTIONS) from each purchase order distribution on the shipment. When you match an invoice to a single purchase order distribution, Payables creates a single invoice distribution from the purchase order distribution.

Table Descriptions

The following section describes the tables and the columns that Payables supports for matching to purchase orders from your non-Oracle purchase system. We describe how the columns are used and, if a column is required, the values you must load to successfully perform matching. For a complete description of the tables, please consult the Payables Applications Technical Reference Manual.

Attention: You must populate all NOT NULL columns in the purchasing tables.

PO_HEADERS

AGENT_ID

Enter the ID for the agent who created the purchase order. This value is used by the following reports in Payables: Merge Suppliers, Matching Agent Notice and Receiving Hold Requestor Notice.

TYPE_LOOKUP_CODE

Enter BLANKET or STANDARD (Lookup Type: PO TYPE) to identify the type of purchase order.

TERMS_ID

Enter the ID for the payment terms of the purchase order. Payables uses this value during matching to warn you if the payment terms on the purchase order do not match the payment terms on the invoice being matched to the purchase order. If you choose to leave this column empty, Payables will not warn you if the purchase order and invoice payment terms differ.

FREIGHT_TERMS_LOOKUP_CODE

Enter a QuickCode (QuickCode Type: FREIGHT TERMS) to identify the freight terms for the purchase order. See: QuickCodes.

CURRENCY_CODE

Enter the currency code for the purchase order. You can obtain a list of valid codes from FND_CURRENCIES.CURRENCY_CODE. The currency code for the invoice you want to match to this purchase order must be the same as the code you enter here.

PO_RELEASES (Blanket releases)

PO_LINES

LINE_TYPE_ID

Enter the ID for the line type of the purchase order line. You can obtain a list of valid IDs from PO_LINE_TYPES.LINE_TYPE_ID.

ITEM_ID

Do not enter a value in this column. Payables does not allow you to record purchase order lines with Items unless you install Oracle Purchasing.

ITEM_DESCRIPTION

Enter a description for your purchase order line. You can use this column to record information about the item on the purchase order line. Payables displays this description in the Purchase Order Shipments zone during matching.

TYPE_1099

Enter the income tax type for the purchase order line, if the supplier for the purchase order is a 1099 supplier. Payables assigns this type as the default income tax type for each invoice distribution created by matching to this purchase order line. If you leave the column empty, Payables uses the income tax type for the supplier as the default. You can obtain a list of valid types from AP_INCOME_TAX_TYPES.INCOME_TAX_TYPE.

PO_LINE_LOCATIONS (PO Shipments)

QUANTITY

Enter the quantity of goods ordered for the purchase order shipment. Payables uses this amount to match against if you are using 2-way matching. Payables verifies that this quantity matches the invoice quantity within defined tolerance levels and places the invoice on hold if it doesn’t match. In addition, if the quantity of the invoice is greater than the shipment quantity, your Payables warns you during invoice entry that the match will result in an overbill.

QUANTITY_RECEIVED/QUANTITY_ACCEPTED

Enter the quantity of goods received/accepted if you are using 3-way/4-way matching. Payables verifies that the quantity matches the invoice quantity within defined tolerance levels and places the invoice on hold if it doesn’t match.

QUANTITY_BILLED

Do not enter a value in this column, unless you have already matched an invoice to this purchase order shipment. When a match successfully completes (invoice is approved), Payables updates this column with the quantity you specified during matching.

QUANTITY_CANCELLED

Only enter a value in this column if you have cancelled a portion of the purchase order shipment in your non-Oracle purchasing system. The amount you enter reduces the amount that Payables considers to be the outstanding quantity ordered. Payables displays a warning if you try to match to a shipment which has been cancelled. When you cancel a shipment, Oracle Purchasing sets the PO_LINE_LOCATIONS.QUANTITY_CANCELLED to:

    • QUANTITY – QUANTITY_RECEIVED if receipt is required
    • QUANTITY – QUANTITY_BILLED if receipt is not required.

Attention: Approval does all quantity checks assuming the QUANTITY is the actual QUANTITY minus the QUANTITY_CANCELLED.

UNIT_MEAS_LOOKUP_CODE

Payables displays this value in the matching zones, but does not validate the column. You can enter any value into this column; however, you should use the same value that you use in your non-Oracle purchasing system.

TAXABLE_FLAG

Enter Y or N to indicate the purchase order shipment is subject to tax. If you enter Y, enter a value in the TAX_NAME column. During Approval, Payables verifies that the tax name for the purchase order shipment matches the tax name on the invoice and places a Tax Difference hold on the invoice if the tax names don’t match.

TAX_NAME

Enter the tax name used to verify that the tax names on the invoice and purchase order shipment match. You do not need to enter a value if you enter N in the TAXABLE_FLAG column. You can obtain a list of valid tax names from AP_TAX_CODES.NAME.

TYPE_LOOKUP_CODE

Enter BLANKET, STANDARD, or SCHEDULED (Lookup Type: SHIPMENT TYPE) to identify the type of purchase order shipment.

CLOSED_CODE

Do not enter a value in this column if you want to match an invoice to this purchase order shipment. If you enter the values CLOSED, FINALLY CLOSED, or CLOSED FOR INVOICE in the column, Payables warns you that you are matching to a closed purchase order.

PO_DISTRIBUTIONS (Account distribution)

Payables uses a view (PO_DISTRIBUTIONS_AP_V) to this table to perform purchase order distribution matching.

SET_OF_BOOKS_ID

Enter the set of books ID for your purchase order distribution. The ID you enter must be for the set of books you define in the Set of Books window.

CODE_COMBINATION_ID

Enter the Accounting Flexfield ID for the expense account you want to charge for the goods on the purchase order distribution.

QUANTITY_ORDERED

Enter the amount of goods charged to the Accounting Flexfield for this purchase order distribution.

Attention: NOTE: Payables does not validate the following, but assumes it to be true:

Total of PO_DISTRIBUTIONS.QUANTITY_ORDERED for one PO_LINE_LOCATION_ID = PO_LINES_LOCATIONS.QUANTITY (for the same ID).

Payables sometimes prorates the PO_DISTRIBUTION.QUANTITY_ORDERED using the PO_LINES_LOCATIONS.QUANTITY as the total.

BUDGET_ACCOUNT_ID/ACCRUAL_ACCOUNT_ID/ VARIANCE_ACCOUNT_ID

Enter the same Accounting Flexfield ID you entered for the CODE_COMBINATION_ID. Payables allows you to record budget, accrual, and variance (price and exchange rate) amounts for your purchase order distributions, but requires you to charge these amounts to the same expense account for the distribution.

QUANTITY_BILLED

Do not enter a value in this column, unless you have already matched an invoice distribution to this purchase order distribution. When a match successfully completes (invoice is approved), Payables updates this column with the quantity you specified during matching.

QUANTITY_CANCELLED

Enter a value in this column only if you have cancelled a portion of the purchase order distribution in your non-Oracle purchasing system. The amount you enter reduces the amount that Payables considers to be the outstanding quantity ordered. Payables displays a warning if you try to match to a shipment which has been cancelled.

Attention: Approval does all quantity checks assuming the quantity for the distribution is QUANTITY_ORDERED minus QUANTITY_CANCELLED.

AMOUNT_BILLED

Do not enter a value in this column, unless you have already matched an invoice to this purchase order shipment. When a match successfully completes (invoice is approved), Payables updates this column with the amount of the quantity you specified during matching multiplied by the unit price.

Oracle Projects Columns

Enter project information from Oracle Projects if you want to associate the invoice distribution (created through matching) with a project in Oracle Projects. Payables transfers the information into the AP_INVOICE_DISTRIBUTIONS table and uses it to create the default Accounting Flexfield for the invoice distribution. 

Matching to Purchase Orders

Perform the following steps to match invoices to purchase order information from your non-Oracle purchasing system:

Create Flat File with Purchasing Information

To load invoice information into Payables via SQL*Loader, first create a program that produces a flat file containing the information from your non-Oracle purchasing system for the purchase orders you want to match to invoices.

Load Information into Purchasing Tables

Use SQL*Loader to load the required information into the purchasing tables. You will need to create a SQL*Loader control file to format the information you want to load. The file you write will vary greatly depending on the nature and format of the flat file you use. Your control file must populate the purchasing tables as indicated in the previous table descriptions. See also: SQL*Loader (ORACLE8 Server Utilities Guide).

Enter Invoices

You match invoices to purchase order shipments during invoice entry. This online function links an invoice in the database to one or more purchase order shipments you choose. You cannot pay or post an invoice until Approval approves the invoice. You can match any type of invoice to a purchase order, including credit and debit memos.

Match to Purchase Order Shipments and distributions

When you match during invoice entry, you indicate whether you want to match to the purchase order shipment or to specific invoice distributions. You then choose the shipment or distribution you want to match to, and the quantity and price you are matching. Then Payables performs the following for each matched shipment:

    • Update QUANTITY_BILLED and AMOUNT_BILLED in PO_DISTRIBUTIONS
    • Update QUANTITY_BILLED in PO_LINE_LOCATIONS
    • Create one or more AP_INVOICE_DISTRIBUTIONS which record the QUANTITY_INVOICED, UNIT_PRICE, and PO_DISTRIBUTION_ID, in addition to other payables information.

Match to Credit and Debit Memos

Payables lets you enter a credit or debit memo (with a negative amount) and match to a purchase order. You would enter a negative quantity in the Quantity Invoiced field in the Purchase Order Shipment Match zone, thereby matching this credit invoice to one or no purchase order shipment lines. Payables then decreases the quantity billed against the purchase order shipment line(s). When you match a credit invoice to a purchase order shipment line, Payables:

    • Reopens closed shipment lines (sets PO_LINE_LOCATIONS.CLOSED_CODE to NULL)
    • Updates PO_LINE_LOCATIONS.QUANTITY_BILLED
    • Updates PO_DISTRIBUTIONS.QUANTITY_BILLED

Attention: Payables does not update any receiving information. You must install Oracle Purchasing if you want to enter or update receiving information for a purchase order

Close a Purchase Order Shipment

Invoice entry closes a purchase order shipment (sets CLOSED_CODE in PO_LINE_LOCATIONS to ‘CLOSED’) when:

    • QUANTITY_BILLED equals or exceeds QUANTITY_ORDERED (two-way matching), or
    • QUANTITY_ORDERED is less than or equal to QUANTITY_RECEIVED and QUANTITY_RECEIVED is less than or equal to QUANTITY_BILLED

Final Close

Payables does not support finally closing a purchase order if you do not install Oracle Purchasing with Payables. Final close allows you to match an invoice to a purchase order and permanently close the purchase order when you approve the invoice. 

Online Review of Purchasing Information

Without an Oracle Purchasing application, Payables does not allow you to review purchasing information, such as purchase order header and line information, online in the Invoice Workbench.

Using Approval

Approval is the Payables feature that performs two-, three-, or four-way matching. An invoice must pass Approval before you can pay or post the invoice. Approval reviews each invoice and places one or more matching holds on the invoice if the invoice does not meet your matching criteria. It also releases any existing matching holds if you adjust your invoice or purchase order to meet your matching criteria and current information on order, receipt and acceptance prices and quantities. You must submit Approval for all invoices, not just matched invoices, since it also checks for distribution variances, tax variances, and exchange rate information. You can submit Approval online for an invoice or in batch for a group of invoices. See also: Approval.

2-way, 3-way, and 4-way Matching

When you match to a purchase order, Payables automatically checks that the total of PO_DISTRIBUTIONS.QUANTITY_ORDERED = AP_INVOICE_DISTRIBUTIONS.QUANTITY_INVOICED (2-way matching). Payables only checks QUANTITY_RECEIVED (3-way matching) if the RECEIPT_REQUIRED_FLAG is set to Y and only checks QUANTITY_ACCEPTED (4-way matching) if the INSPECTION_REQUIRED_FLAG is set to Y.

Tax Matching

Payables only checks for tax name matching if the Payables option Validate PO Tax Name is enabled and the invoice has distributions with tax names.

Matching Tolerance

You can define percentage and amount tolerances for Matching quantities and price. Payables places a matching hold on an invoice only if the invoice quantity or price is greater than the purchasing quantity or price by more than your tolerance.

Matching Holds

When you submit Approval, Payables places a matching hold on a matched invoice (by inserting one or more rows in AP_HOLDS, one row for each type of hold for each invoice distribution) if:

    • QUANTITY_BILLED > QUANTITY in PO_LINE_LOCATIONS (QTY ORD Hold)
    • UNIT_PRICE in AP_INVOICE_DISTRIBUTIONS > PRICE_OVERRIDE in PO_LINE_LOCATIONS (PRICE Hold)
    • QUANTITY_BILLED > QUANTITY_RECEIVED in PO_LINE_LOCATIONS (QTY REC Hold)
    • QUANTITY_BILLED > QUANTITY_ACCEPTED in PO_LINE_LOCATIONS (QUALITY Hold)
    • TAXABLE_FLAG = NO in PO_LINE_LOCATIONS, but there IS tax recorded on the invoice (TAX DIFFERENCE Hold)
    • TAX_NAME in PO_LINE_LOCATIONS is not equal to VAT_CODE in AP_INVOICE_DISTRIBUTIONS (TAX DIFFERENCE Hold)

Using Encumbrance Accounting with Purchasing

Payables supports using encumbrance accounting with a non-Oracle purchasing system. To use encumbrance accounting, however, you must initially record the encumbered amount for the purchase order to which you want to match an invoice. Then, when Approval approves the invoice, if there is a variance between the invoice and its matched purchase order within the tolerances you define, Payables automatically creates an encumbrance journal entry for the amount of the variance. Payables always creates encumbrance journal entries in detail.

Attention: Approval uses the Payables table, AP_TRANSFER_ENCUMBRANCE, if you enable encumbrance accounting. Payables never drops this table, but deletes the appropriate lines from this table at the beginning of the program each time you submit Approval.

With an Oracle Purchasing application installed, Payables allows you to record these variance encumbrance journal entries to a separate variance account. With a non-Oracle purchasing system, Payables requires you to record the variance amount to the same Accounting Flexfield as the expense Accounting Flexfield for the purchase order distribution.
When you post the invoice to your general ledger, Payables relieves both the original encumbrance journal entries that you created when you encumbered the purchase order and the encumbrance journal entries it automatically created for the variance. Payables then creates actual journal entries for your invoice transaction. Your variance encumbrance journal entries and your actual journal entries update your account balances only when you post the journal entries in your general ledger.

Budgetary Control

The budgetary control feature does not use purchasing information unless you install Oracle Purchasing.

Encumbrance Entries in Payables

If you enable Budgetary Control for a set of books in Oracle General Ledger, you can reserve funds, or encumber them, when you expect an expense so you can avoid overspending a budget and to predict cash outflow. If you enable the PO Encumbrance Financials option, Purchasing and Payables create encumbrances and unencumbrances against the budgets you define in General Ledger. The following equation always holds true:

      Funds Available = Budget – Actuals – Encumbrances

The encumbrances Purchasing and Payables create depends on whether the invoice is purchase order matched, and what accrual method you use in Purchasing:

    • Unmatched Invoice: If you enable the PO Encumbrance Financials option and you enter an unmatched invoice, Payables creates an encumbrance for the expense during Approval, and reverses this encumbrance during posting.
    • Matched Invoice, Receipt Accrual: If you use the On Receipt Accrual Method in Purchasing, Purchasing creates an encumbrance for the goods received at the time of receipt, then reverses that encumbrance when it records the actual expense at the time of delivery of goods. When the invoice is matched to a purchase order and approved in Payables, it is not necessary for Payables to record an encumbrance for the expense. However, Payables will create an encumbrance for an invoice price variance or exchange rate variance, if they exist. Payables does not currently create encumbrances for Quantity variances when you accrue on receipt.
    • Matched Invoice, Period End: If you use the Period End Accrual method for your expense items in Purchasing, Purchasing creates an encumbrance for the goods received at the time of delivery. When the invoice is matched to a purchase order and approved in Payables, it is not necessary for Payables to record an encumbrance for the expense. However, Payables will create an encumbrance for a quantity variance, invoice price variance, or exchange rate variance, if any exist.

Payables reverses all remaining encumbrances for an invoice during Posting, when it records the actual invoice expense. The chart below shows when Payables creates encumbrance entries under the two different Accrual Methods.

Encumbrance with Combined Basis Accounting

If you use the combined basis accounting method, Payables posts encumbrance entries to your primary, accrual set of books only.

Encumbrance with Cash Basis Accounting

If you use the cash basis accounting method, Payables relieves encumbrance entries when you post payments. Payables prorates your encumbrance reversal based on the amount of your invoice payment. 

Purging Purchasing Information

Payables does not allow you to purge purchasing information if you do not have an Oracle Purchasing application installed. When you match an invoice to a purchase order from a non-Oracle purchasing system, you will not be able to purge the invoice because Payables requires that all objects, including matched purchase orders, associated with an invoice must be purgeable before you can purge the invoice.
select prh.segment1 “PO Requisition Number”,
       pha.segment1 “PO Number”,
       aps.SEGMENT1 “Supplier Number”,
       aps.vendor_name,
       apss.vendor_site_code,
       apsc.first_name,
       apsc.last_name,
       pla.item_id,
       plla.ship_to_organization_id,
       plla.ship_to_location_id,
       rt.transaction_type,
       rt.destination_type_code,
       rsh.receipt_num “PO Receipt Number”,
       aia.invoice_num,
       aida.dist_code_combination_id,
       aca.check_number,gjh.ledger_id,
       gjh.name
  from po_requisition_headers_all prh,
       po_requisition_lines_all prl,
       po_req_distributions_all prd,
       po_headers_all pha,
       po_lines_all pla,
       po_distributions_all pda,
       po_line_locations_all plla,
       ap_suppliers aps,
       ap_supplier_sites_all apss,
       ap_supplier_contacts apsc,
       rcv_transactions rt,
       rcv_shipment_headers rsh,
       rcv_shipment_lines rsl,
       ap_invoices_all aia,
       ap_invoice_lines_all aila,
       ap_invoice_distributions_all aida,
       ap_invoice_payments_all aipa,
       ap_checks_all aca,
       xla.xla_transaction_entities xte,
       xla_events xe,
       xla_ae_headers xah,
       xla_ae_lines xal,
       xla_distribution_links xdl,
       gl_import_references gir,
       gl_je_batches gjb,
       gl_je_headers gjh,
       gl_je_lines gjl
 where prh.segment1 = :RequitionNumber –Right click :RequitionNumber from Toad Enable Prompt For Substitution Variables
   and aps.vendor_id = pha.vendor_id
   and apss.vendor_id = aps.vendor_id
   and apss.vendor_site_id (+) = pha.vendor_site_id
   and apss.vendor_site_id  = aca.vendor_site_id
   and apsc.vendor_site_id = apss.vendor_site_id
   and apsc.vendor_contact_id = pha.vendor_contact_id
   and prl.requisition_header_id = prh.requisition_header_id
   and prd.requisition_line_id = prl.requisition_line_id
   and pda.req_distribution_id = prd.distribution_id
   and pla.po_header_id = pda.po_header_id
   and pla.po_line_id = pda.po_line_id
   and pha.po_header_id = pla.po_header_id
   and pha.org_id = 204
   and plla.po_header_id = pla.po_header_id
   and plla.po_line_id = pla.po_line_id
   and rt.transaction_type = ‘DELIVER’
   and rt.po_header_id = pha.po_header_id
   and rt.po_line_id = pla.po_line_id
   and rsh.shipment_header_id = rt.shipment_header_id  
   and rsl.shipment_header_id = rsh.shipment_header_id
   and rsl.shipment_line_id = rt.shipment_line_id
   and aila.po_header_id = pha.po_header_id
   and aila.po_line_id = pla.po_line_id
   and aia.invoice_id = aila.invoice_id
   and aida.invoice_id = aila.invoice_id
   and aida.invoice_line_number = aila.line_number
   and aipa.invoice_id = aia.invoice_id
   and aca.check_id = aipa.check_id
   and xte.entity_code = ‘AP_PAYMENTS’
   and xte.transaction_number = aca.check_number
   and xte.source_id_int_1 = aipa.check_id
   and xte.security_id_int_1 = aia.org_id
   and xe.entity_id = xte.entity_id
   and xah.event_id = xe.event_id
   and xal.ae_header_id = xah.ae_header_id
   and xal.ae_line_num = aida.invoice_line_number
   and xdl.ae_header_id = xah.ae_header_id
   and xdl.ae_line_num = xal.ae_line_num
   and xdl.applied_to_dist_id_num_1 = aida.invoice_distribution_id
   and gir.reference_5 = xte.entity_id  — Entity Id
   and gir.reference_6 = to_char(xe.event_id) –Event Id
   and gir.reference_7 = to_char (xah.ae_header_id) — AE Header Id
   and gir.gl_sl_link_id = xal.gl_sl_link_id
   –and gir.created_by = 1318
   and gjb.je_batch_id = gir.je_batch_id
   and gjh.je_batch_id=gjb.je_batch_id
   and gjh.je_header_id = gir.je_header_id
   and gjl.je_header_id=gjh.je_header_id
   and gjl.je_line_num= gir.je_line_num