The concept of customer item is to link the customer item with the inventory item of the organization so that the customer can order with their customer item for which we have a refernce to the inventory item. To facilitate the process we use commodity code to group all the customer items.
- Customer items can be defined at customer category level, customer level and customer ship to level.
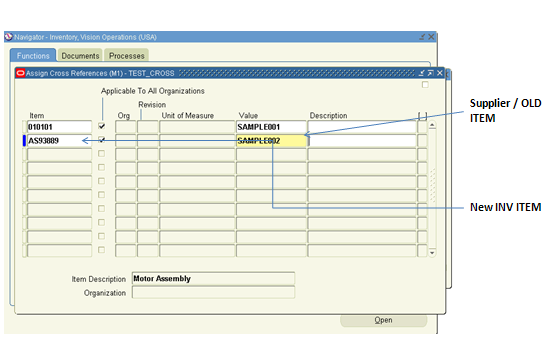
- For a single customer item we can have two differnt inventory items in customer cross reference with rank 1, 2 etc
- The process of difining customer cross reference is
1. Define commodity code
2. Define customer item and
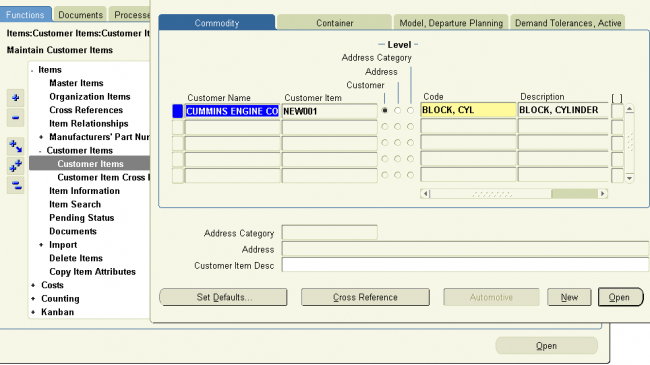
3. Enter the customer reference.Use the Customer Items Summary and Customer Items Detail windows to define and update customer items. You can toggle between these windows with the Summary/Detail option in the Go option on the Toolbar. You can cross reference customer items to your Oracle Inventory items to support processing orders and shipments.
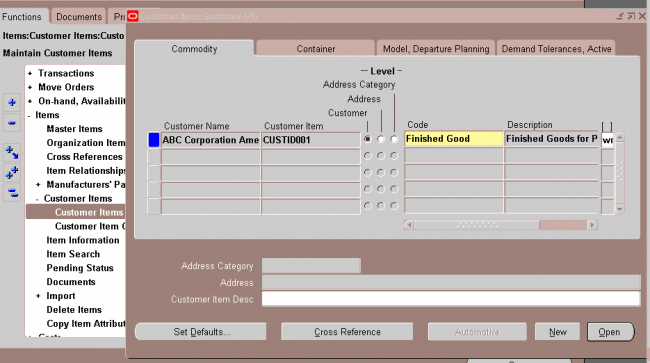
A customer item defined at the Customer level is recognized across all address and address categories for that customer. If you ship an item to multiple customer ship–to sites that have been grouped as an address category, you can define the customer item for that address category. You would define a customer item at the address level if you ship the item to only one ship–to site for that customer.
Commodity Codes
Customer Item Commodity Codes are used to group customer items and can be entered during the definition of customer items.
Navigation : INV -> Setup ->Items -> Customer Item commodity code.

Customer Item1. Select one of the existing Customer Names (in the Details window, you can use either Customer Name or Customer Number,).
2. Select the Definition Level: Customer, Address Category, or Address.
A customer item defined at the Customer level is recognized across all address and address categories for that customer. If you ship an item to multiple customer ship-to sites that have been grouped as an address category, you can define the customer item for that address category. You would define a customer item at the address level if you ship the item to only one ship-to site for that customer.
For the Address Category definition level, enter the address category.
For the Customer Address definition level, enter the customer address.
3. Enter the Customer Item number and description.
4. In the Commodity tabbed region, you can assign the customer item to a Commodity Code.
5. In the Container tabbed region, you can enter the default master and detail containers for this customer item as well as the minimum fill percent for the container.
6. In the Model, Departure Planning tabbed region, you can reference a customer item as a Model by entering the inventory item number of an existing Model item (the BOM Item Type attribute is set to Model).
You can also check Required to indicate that items must be departure planned before they released and Before Build to indicate that ATO items must be departure planned before they are built.
7. In the Demand Tolerances, Active tabbed region, you can enter positive and negative tolerance percentages and select or deselect the Active check box.
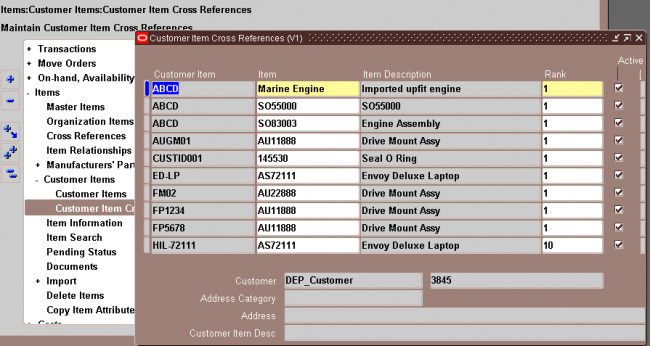
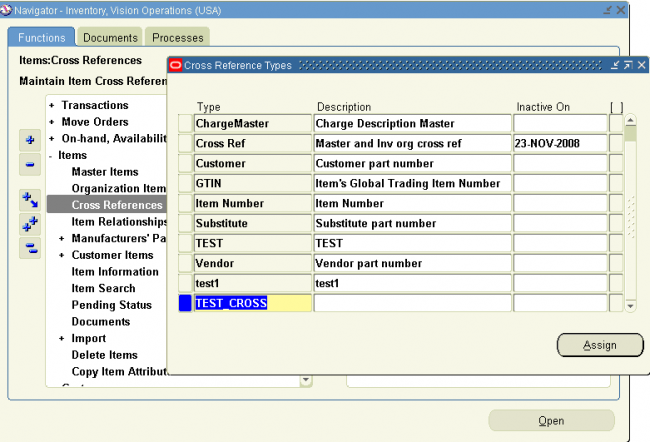
Customer Item Cross References
Use the Customer Item Cross References window to define and update cross references between your inventory items and the customer item numbers defined in the Customer Items Summary/Detail windows.
You can also navigate to this window by selecting the Cross Reference button in the Customer Items Summary window. Inventory displays the existing cross references for the customeritem on the current line in the Customer Items Summary window, and you can add new cross references by selecting a new row.
Enter the Rank as a positive number. To permit alternate or substitute inventory items for a customer item, you can define multiple cross references to inventory items for a single customer item. In these cases, you must specify the Rank of the cross reference. The highest rank is 1.
Recent Comments