Lot specific conversions enable you to perform a specific inter-class conversion for a given lot. This enables you to establish more granular control over the transactional quantities of a lot. For example, the standard inter-class conversion for a lot controlled item is one gallon equals 15 pounds; however, when you receive a particular lot of the item, 1 gallon equals 16 pounds. You can create a lot specific unit of measure for this instance.
You can create lot-specific unit of measure conversions for on-hand lots or lots with a zero balance. If you create a lot-specific conversion for a lot with on-hand quantities, you can automatically update the quantities in the system to more accurately reflect the on-hand quantity.
You can also view the history of changes made to the lot unit of measure conversion, and the corresponding quantity changes.


1. Enter the item number in the Item field.
2. Enter the lot number in the Lot Number field.
3. Select the destination base unit of measure of the class to which you are converting the unit of measure.
4. Enter the conversion factor by which the source base unit is equivalent to the destination base unit.
For example, if 16 pounds (source base unit) is equivalent to 1 Gallon (destination base unit), the conversion factor is 16.
5. Optionally, enter an inactive date for the conversion. This is the date when the unit of measure conversion for the lot reverts back to the standard inter-class conversion.
6. Optionally, enter a transaction reason for the conversion.

Unit of measure conversions are numerical factors that enable you to perform transactions in units other than the primary unit of the item being transacted. You can define:
A conversion common to any item (Standard)
A conversion for a specific item within a unit of measure class (Intra-class)
A conversion for a specific item between unit of measure classes (Inter-class)
  • Unit of measure conversions are not organization-specific.
  • You must define a conversion between a non-base unit of measure and the base unit of measure before you can assign the non-base unit of measure to an item

Specifying Which Conversion to Use
When you define an item you decide which type of unit of measure conversion to use:

  1. Itemspecific: Only uses unit of measure conversions unique to this item. If none exist, you can only transact this item in its primary unit of measure.
  2. Standard: Uses standard unit of measure conversions for this item if an item-specific conversion is not available.
  3. Both: Uses both item-specific and standard unit of measure conversions. If both exist for the same unit of measure and item combination, the item-specific conversion is used.

 
Unit of Measure Conversions During Transactions
Whenever you enter an item’s quantity, the default is the primary unit of measure for the item. The list of values for the unit of measure field displays all units of measure for which you have defined standard and/or item-specific conversions from the primary unit of measure.
Transactions are performed in the unit of measure you specify. The conversion happens automatically and item quantities are updated in the primary unit of measure of the item.

Important
: Inventory transactions and on hand balance supports decimal precision to 5 digits after the decimal point. Oracle Work in Process supports decimal precision to 6 digits. Other Oracle Applications support different decimal precision. As a result of the decimal precision mismatch, transactions another Oracle Application passes may be rounded when processed by Inventory. If the transaction quantity is rounded to zero, Inventory does not process the transaction.
It is therefore suggested that the base unit of measure for an item is set up such that transaction quantities in the base unit of measure not require greater than 5 digits of decimal precision. Define a Standard conversion for any item
In standrad conversion you specify how one unit of mesaure is related to the primary unit of measure in the same class.
In standrad conversion you cant do the following
You cant specify any sort of intra class conversion
Relationship between two UOMs not invloving primary UOM

Navigate to the Unit of Measure Conversions window  & Select the Standard tabbed region.
1 Enter a unit of measure.
2 Enter the conversion factor by which the unit of measure is equivalent to the base unit of measure established for this class.
For example, if one DZ (this unit of measure) is equivalent to 12 EA (base unit), the conversion factor is 12. Or, if EA is equal to one-twelfth of a DZ, the conversion factor is 0.08333. Define a conversion for a specific item within a unit of measure class (Intra-class)
We have seen in standard conversion we can only do convesrion from one UOM to primary UOM.
Suppose we have defined a UOM convsrion rule for a unit of measure UOM_XYZ as UOM_XYZ = 6 x Primary UOM but for a particular item the vonvsrion rate is not 6 in that case we define a intra class convesrion for  a particular item and when ever that item is transacted system ‘ll pick the convesrion rate from either intra class or standrad convesrion depending upon ITEM master set up.
Notes
We can do intra class conversion between two UOMs for a particular item only for a single class which is the UOM class of the primary UOM of the item.
For exampe Suppose ITEM001 has a primary UOM as Ea and UOM Ea belongs to class Quantity then we can define intra class conversion for the item ITEM001 between two UOMs in the class Quantity.
we cant define intra class convesrion between any other UOMs belonging to a differnt UOM class.
Navigate to the Unit of Measure Conversions window.
 
1. Select the Intra-class tabbed region.
2. Enter an item.
3. Enter a unit of measure.
4. Enter the conversion factor by which the unit of measure is equivalent to the base unit of measure established for this class.
For example, if one LB (this unit of measure) is equivalent to 16 OZ (base unit), the conversion factor is 16.
 
Define a conversion for a specific item between unit of measure classes (Inter-class)
Inter class conversion is used to convert an item from one primary UOM in one class to another primary UOM in a differnt class for a particular item. Navigate to the Unit of Measure Conversions window and Select the Inter-class tabbed region.

1. Select an item.
2. Select the destination base unit of measure of the class to which you are converting a unit of measure.
3. Enter the conversion factor by which the source base unit is equivalent to the destination base unit.
For example, if one ML (source base unit) is equivalent to one GR (destination base unit), the conversion factor is one.
Units of measure are used by a variety of functions and transactions to express the quantity of items.

  • Defining units of measure is the second step in unit of measure management.
  • The values defined in the Units of Measure window provide the list of values available in unit of measure fields in other windows.
  • Units of measure are not organization-specific.

Primary Unit of Measure
Theprimary unit of measure is the stocking unit of measure for an item in a particular organization. The primary unit of measure is an item attribute that you specify when defining each item.
Prerequisites
You must define at least one unit of measure class.
Enter UOM from UOM Class FORM

After defining the UOM class click on Uint of measure button to enter a new UOM.
Enter the UOM namd and short name. Save the form

Define a UOM in UOM form
Navigate to the Units of Measure window.


1. Enter a unique name for the unit of measure.
2. Enter a unique abbreviation for the unit of measure with a maximum length of three characters.
For example, EA for each or HRS for hours.
3. Enter a unit of measure class.
4. Indicate if this is the base unit of measure for the unit of measure class.

To delete a unit of measure:
1. You can delete existing units of measure that are not base units of measure if no standard or item specific conversions are defined.
To make a unit of measure inactive:
1. Enter the date on which the unit of measure becomes inactive. As of this date, you can no longer assign standard or item-specific conversions to the unit of measure.
To change Base UOM:
Its not possible to change the base UOM from one UOM to another UOM

Oracle Inventory provides you with powerful methods for defining and manipulating units of measure. You can easily convert between the units of measure you define. This enables you to manufacture, order, or receive items in any unit of measure. With units of measure you can:

  1. Define unit of measure classes,
  2. Define units of measure,
  3. Define unit of measure conversions,
  4. Define lot-specific unit of measure conversions

Defining Unit of Measure Classes
Unit of measure classes represent groups of units of measure with similar characteristics.

  • Creating unit of measure classes is the first step in unit of measure management. Each unit of measure you define must belong to a unit of measure class.
  • Each class has a base unit of measure. The base unit of measure is used to perform conversions between units of measure in the class. For this reason, the base unit of measure should be representative of the other units of measure in the class, and generally one of the smaller units. For example, you could use CU (cubic feet) as the base unit of a class called Volume.
  • Unit of measure classes are not organization-specific. Default unit of measure classes are not provided.
1. Enter a unique name for the unit of measure class.
2. Define the base unit of measure for this class.
3. Define a unique abbreviation for the base unit of measure.
 
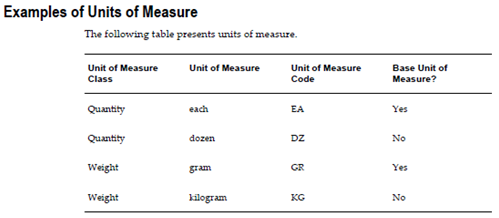
1. Enter all transactions.
Be sure you enter all transactions for the period. Perform all issues,receipts, and adjustments. Verify that no hard copy records exist or are waiting for data entry, such as packing slips in receiving.
2. Check Inventory and Work in Process transaction interfaces.You can set up the material and move transaction managers to execute transactions immediately, then submit an immediate concurrent request to execute, or submit a concurrent request periodically at a time interval you specify. If you do not use immediate processing, or interface external transactions, check the Inventory material transaction manager and the Work in Process move transaction manager before closing the period.

3. Check Cost Management cost interfaces.
Cost Management processes your inventory and work in process accounting transactions as a concurrent request, using a specified time interval. Before you close the period, you should check that the Cost Manager is active.

4. Check Order Management transaction processes.
If you use Order Management, ensure that all sales order transaction processes complete and transfer successfully to Inventory.
5. Review Inventory transactions.
Before you close a period, review all of the transactions using the Material Account Distribution Report for the period with a high dollar value and/or a high transaction quantity. Check that you charged the proper accounts. Correcting improper account charges before you close a period is easier than creating manual journalentries.
6. Balance perpetual inventory.
Check that your ending perpetual inventory value for the period being closed matches the value you report in the general ledger. Perpetual inventory value normally balances automatically with the general ledger. However, one of the following sources can create a discrepancy:
– Other inventory journal entries. Journal entries from products other than Inventory that affect the inventory accounts.
– Charges to improper accounts: For example, you issued material from a subinventory to a miscellaneous account, but used one of the subinventory accounts as that miscellaneous account.
– Issue to miscellaneous account: For example, the following miscellaneous transaction issue would cause an out of balance situation: debit account specified at transaction 123, credit subinventory valuation account 123. The debit and credit net to zero with no financial charge, but since the inventory quantity decreased, the month–end inventory valuation reports will not equal the general ledger account balance.
– Transactions after period end reports. This occurs when you run the end of month inventory valuation reports before you complete all transactions for the period.
If you do not run the inventory reports at period end, you can also run these Reports:
– Inventory Value Report– Material Account Distribution Detail Report
– Material Account Distribution Summary Report

– Period Close Summary Report
Period Close Reconciliation report– Inventory Subledger Report (Average Costing Only)
In a organization using Project Manufacturing Average Costing, if there is more than one cost group, the following valuation reports should not be used for reconciliation purposes because these reports list the average value across cost groups.
– Transaction historical Summary Report
– Receiving Value Report
– All Inventories Value Report
– Elemental Inventory Value Report
– Subinventory Account Value Report
– Item Cost Report
7. Validate Work in Process inventory.
If you use Work in Process, check work in process inventory balances against transactions with the WIP Account Distribution Report.

8. Transfer transactions in advance of closing period (optional).

If time permits, run the general ledger transfer process up to the period end date before closing the period.
Closing a period executes the general ledger transfer automatically. However, you can also run this process without closing a period using Transfer Transactions to General Ledger. Since you cannot reopen a closed period, running this process before period close allows you to proof the interfaced transactions and make adjustments to the period via new inventory transactions as necessary.
9. Close Oracle Payables and Oracle Purchasing.
If you use Payables and Purchasing, you need to close the accounting periods in the following order:
– Payables
– Purchasing
– Inventory
If you only use Purchasing and Inventory, you need to close Purchasing first. Close Payables before Purchasing, in preparation for accruing expenses on uninvoiced receipts. Doing so ensures that all new payables activity is for the new month and you do not inadvertently match a prior month invoice in payables to a new month receipt. When you close Purchasing or Inventory, you cannot enter a receipt for that period. However, as a manual procedure, close Purchasing before Inventory. This still allows miscellaneous transaction corrections in Inventory.

10. Run the Period Close Reconciliation report.

This report automatically runs in simulation mode for the open period. It is used to match account balances with inventory value at period end.
11. Close the accounting period and automatically transfer transactions to the general ledger.
This sets your Inventory Accounting Period status to Closed not Summarized. If the CST: Period Summary profile option is set to Automatic, no other steps are necessary. The period status is set to Closed when the summarization process has completed.

12. If the CST: Period Summary profile option is set to Manual, create period summarization transactions by generating the Period Close Reconciliation report.

The concurrent program creates summarized transaction records, and displays the differences between account balances and inventory value.